Using Template Engines with H5P
In this post, we will explore how to use Template Engines with H5P through an example. The walkthrough will follow these steps:
- Get started with our example library
- Add a Template Engine to our library
- Create and render a template
- Separate concerns through making an external template
Why use Template Engines
A Template Engine is a tool that helps developers separate logic (JavaScript) from view (markup/HTML) when writing applications. Avoiding dependencies between application components is a well known idiom for developers. Benefits include improving code characteristics such as readability, maintainability and extensibility.
Exploring Template Engines and settling on a choice is left to the reader, it already exists an abundance of comparison guides. Different Template Engines focus on different aspects of templating, each with their pros and cons. Some of the most popular ones include:
Our attention will be focused on how to use Template Engines together with H5Ps.
Getting Started
We will rewrite the Greeting Card tutorial to use Mustache. You can create the library using the tutorial or clone it from Github. Greeting Card has a basic structure with all the relevant files placed at root folder.

The files we will focus on are library.json and greetingcard.js in addition to the new files we will create. Library.json is the library specification and contains the required fields for defining a H5P library.
{
  "title": "Greeting Card",
  "description": "Displays a greeting card",
  "majorVersion": 1,
  "minorVersion": 0,
  "patchVersion": 4,
  "runnable": 1,
  "author": "Joubel AS",
  "license": "MIT",
  "machineName": "H5P.GreetingCard",
  "preloadedJs": [
    {
      "path": "greetingcard.js"
    }
  ],
  "preloadedCss": [
    {
      "path": "greetingcard.css"
    }
  ]
}
Adding the Template Engine
The first thing we will do is add the Template Engine to our library. Accomplishing this is done through adding a dependency to a Template Engine wrapped in a library. Assuming we have MustacheJS uploaded to our libraries, we simply define it as a preloaded dependency.
"preloadedDependencies": [
  {
    "machineName": "MustacheJS",
    "majorVersion": 1,
    "minorVersion": 0
  }
]
We might want to use a different Template Engine, such as Jade. Searching the H5P repositories we won't find a wrapper for Jade at the moment, so we will have to add the Template Engine ourselves. There are two methods for doing this, the recommended one is to create a wrapper for Jade, following the approach MustacheJS has done on Github. Adding a new wrapper will allow other developers to use the wrapper whenever they want to use Jade. The second approach is to add the Template Engine straight into our library.
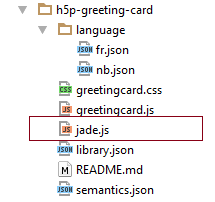
To include the Template Engine at runtime, we must add it to the library.json file like any other script. This will make us load two scripts, greetingscard.js, and jade.js.
"preloadedJs": [
  {
    "path": jade.js
  },
  {
    "path": "greetingcard.js"
  }
],
Using the Template Engine
We have now added a dependency to the Template Engine of our choice, and will be able to use it within our logic.
var H5P = H5P || {};

H5P.GreetingCard = (function ($) {
  /**
   * Constructor function.
   */
  function C(options, id) {
    this.$ = $(this);
    // Extend defaults with provided options
    this.options = $.extend(true, {}, {
      greeting: 'Hello world!',
      image: null
    }, options);
    // Keep provided id.
    this.id = id;
  };

  /**
   * Attach function called by H5P framework to insert H5P content into
   * page
   *
   * @param {jQuery} $container
   */
  C.prototype.attach = function ($container) {
    var self = this;
    // Set class on container to identify it as a greeting card
    // container.  Allows for styling later.
    $container.addClass("h5p-greetingcard");
    // Add image if provided.
    if (this.options.image && this.options.image.path) {
      $container.append('<img class="greeting-image" src="' + H5P.getPath(this.options.image.path, this.id) + '">');
    }
    // Add greeting text.
    $container.append('<div class="greeting-text">' + this.options.greeting + '</div>');

    // TODO - need to wait for image beeing loaded
    // For now using timer. Should wait for image is loaded...
    setTimeout(function () {
      self.$.trigger('resize');
    }, 1000);
  };

  return C;
})(H5P.jQuery);
Depending on Template Engine and wrapper implementation the TemplateEngine will usually attach itself to a global variable. Once you know the variable (see their documentation) you can access the Template Engine inside greetingcards.js using that variable. Continuing with the MustacheJS example, the global variable is Mustache.
Next step is collecting the fragmented DOM elements throughout our logic. Extract the html from our jQuery wrappers and place all markup inside a string.
var template = '' +
  '<img class="greeting-image" src="{{imgPath}}"/>' +
  '<div class="greeting-text">{{greeting}}</div>';
Enclose all variables with double braces (depending on template engine). The path to the image source and the greeting card text are exchanged with variables called imgPath and greeting respectively, an enclosed in mustache markup. If we look at the original code we see that the image should only be displayed if an image is actually set, so we need to add a check to see if an image should be added. This is done through adding an boolean named hasImg. Consult the Template Engine documentation for specification on how to construct templates.
var template = '' +
  '{{#hasImg}}<img class="greeting-image" src="{{imgPath}}"/>{{/hasImg}}' +
  '<div class="greeting-text">{{greeting}}</div>';
Now that we have the complete template we need to render it, we will do that with the global variable Mustache. Since we have created variables in our template we need to define these variables in an object that will be passed to the Mustache renderer. We use the original data for this.
var data = {
  hasImg: (this.options.image && this.options.image.path),
  imgPath: H5P.getPath(this.options.image.path, this.id),
  greeting: this.options.greeting
};
Finally, we have all the pieces and can tie it all together by making Mustache render the template.
var output = Mustache.render(template, data);
The resulting attach function has been reduced to a template, data, and render function.
C.prototype.attach = function ($container) {
  var self = this;
  // Set class on container to identify it as a greeting card
  // container.  Allows for styling later.
  $container.addClass("h5p-greetingcard");
  var template = '' +
    '{{#hasImg}}<img class="greeting-image" src="{{imgPath}}"/>{{/hasImg}}' +
    '<div class="greeting-text">{{greeting}}</div>';

  var data = {
    hasImg: (this.options.image && this.options.image.path),
    imgPath: H5P.getPath(this.options.image.path, this.id),
    greeting: this.options.greeting
  };

  var $output = $(Mustache.render(template, data));
  $container.append($output);

  // TODO - need to wait for image beeing loaded
  // For now using timer. Should wait for image is loaded...
  setTimeout(function () {
    self.$.trigger('resize');
  }, 1000);
};
Separate Template from Logic
When comparing our new function with our starting point there are no obvious benefits. However, the benefits will quickly become apparent as your application, template and JavaScript grows. Moving the template out of the JavaScript, we will create a new file within our library called greetingcard.mustache.

We move the template variable out of greetingcard.js and into greetingcard.mustache. Since we now are inside a mustache file we don't need to define the template as a variable or a string, meaning we can write regular html/mustache markup, resulting in a cleaner view:
{{#hasImg}}
  <img class="greeting-image" src="{{imgPath}}"/>
{{/hasImg}}
<div class="greeting-text">{{greeting}}</div>
To use the mustache file from our JavaScript we need to fetch the file and render the content with MustacheJS, this can be done whichever way you like. I prefer the jQuery way, using $.get and the built-in H5P core function getLibraryFilePath, to get the path the mustache file.
$.get(self.getLibraryFilePath('greetingcard.mustache'), function (template) {
  var html = Mustache.render(template, data);
  $container.html(html);
});
Pulling this together, our attach function now mainly consists of a data object and a function for fetching and attaching the template.
C.prototype.attach = function ($container) {
  var self = this;
  // Set class on container to identify it as a greeting card
  // container.  Allows for styling later.
  $container.addClass("h5p-greetingcard");

  var data = {
    hasImg: (this.options.image && this.options.image.path),
    imgPath: H5P.getPath(this.options.image.path, this.id),
    greeting: this.options.greeting
  };

  $.get(self.getLibraryFilePath('greetingcard.mustache'), function (template) {
    var html = Mustache.render(template, data);
    $container.html(html);
  });

  // TODO - need to wait for image beeing loaded
  // For now using timer. Should wait for image is loaded...
  setTimeout(function () {
    self.$.trigger('resize');
  }, 1000);
};
The final version of the library can be found at the at the h5p-greeting-card repository. And there we have it, now we have added a Template Engine to Greeting Card and added a template in a separate file, which should make working with larger applications more enjoyable. Did you find this post useful? Feel free to leave comments and questions below.
Happy coding! :)