Hello world tutorial
In this short tutorial, we will create a simple H5P package containing a library to display a greeting card consisting of an image and a message. This tutorial is primarily intended for H5P library developers.
Set up development environment
H5P development itself does not require any specific development tools. Your favourite code editor will do the trick although syntax highlighting for JavaScript and JSON is recommended.
For now, just create a working directory named "H5P.GreetingCard". We will fill it in further on in the tutorial.
You do need to set up a site with H5P support. H5P backend is currently implemented for Drupal (6 and 7), WordPress (3.8 and up) and Joomla (2.5) while other backends are in progress.
See installation instructions for the various supported frameworks here.
We recommend using Drupal and the H5P development folder, more about it here.
Create an H5P library
An H5P library is the code that handles display and interaction of an H5P. An H5P may include several libraries, and libraries may have dependencies to other libraries as well. H5Ps without libraries are not currently supported, there is always a main library for an H5P. In our little tutorial package, however, we only need the basic library for a greeting card. We will call it H5P.GreetingCard.
Step 1 - Specify the library metadata (library.json)
An H5P library needs to specify some metadata, so the various modules know how to identify it. This is done in the library.json file.
Create the file H5P.GreetingCard/library.json containing the following:
{
  "title": "Greeting card",
  "description": "Displays a greeting card",
  "majorVersion": 1,
  "minorVersion": 0,
  "patchVersion": 0,
  "runnable": 1,
  "author": "Amendor AS",
  "license": "cc-by-sa",
  "machineName": "H5P.GreetingCard",
  "coreApi": {
    "majorVersion": 1,
    "minorVersion": 0
  },
  "preloadedJs": [
    { "path": "greetingcard.js" }
  ],
  "preloadedCss": [
    {"path": "greetingcard.css"}
  ]
}
This identifies the library as "Greeting card". The specified machineName will be used internally, and should match the folder name of the library.
The preloadedJs option preloads your javascript file. This file is responsible for the display of your content, and will be defined in a later section.
Note that the patchVersion needs to be increased between uploads unless the H5P framework is set in "Development mode". If the patchLevel matches (or is lower than) the currently installed version, it will not be installed.
Step 2 - Specify library data structure (semantics.json)
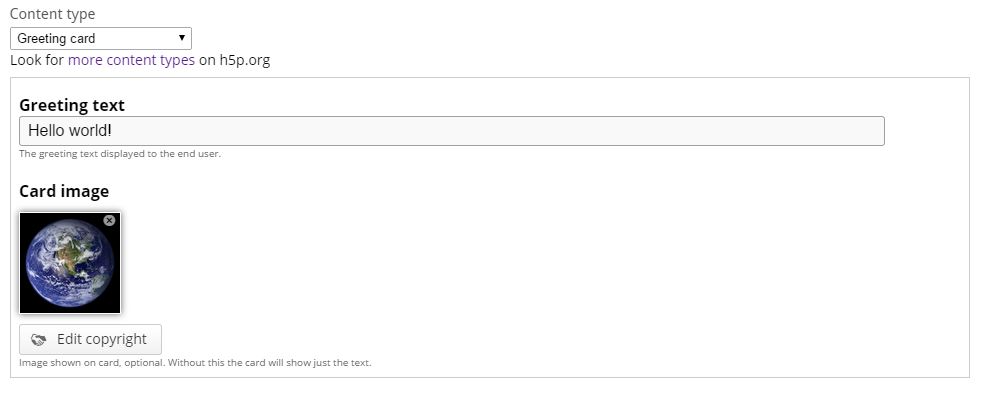
The greeting card library consists of an image and a text. In order to make the greeting card editable we specify this in the semantics.json file for the library.
Add the file H5P.GreetingCard/semantics.json with the following content:
[
  {
    "label": "Greeting text",
    "name": "greeting",
    "type": "text",
    "default": "Hello world!",
    "description": "The greeting text displayed to the end user."
  },
  {
    "label": "Card image",
    "name": "image",
    "type": "image",
    "optional": true,
    "description": "Image shown on card, optional. Without this the card will show just the text."
  }
]
The semantics specifies the input data format used, as well as defining how the editor will display the fields when editing/creating a greeting card in the browser. (See example of editor below)
Have a look at the semantics specification to get an overview of what fields you can create and use in your content type, and what field options that exist for them.
Step 3 - Add library display code (js)
The library requires a little Javascript to display its content. The library attaches itself to the overall H5P object loaded by the framework and then needs to provide at least an "attach" method that will be called to make the library render into the destination page.
Add the file H5P.GreetingCard/greetingcard.js with the following content. (The recommended code structure for this may be a little overwhelming at first.)
var H5P = H5P || {};

H5P.GreetingCard = (function ($) {
  /**
   * Constructor function.
   */
  function C(options, id) {
    // Extend defaults with provided options
    this.options = $.extend(true, {}, {
      greeting: 'Hello world!',
      image: null
    }, options);
    // Keep provided id.
    this.id = id;
  };

  /**
   * Attach function called by H5P framework to insert H5P content into
   * page
   *
   * @param {jQuery} $container
   */
  C.prototype.attach = function ($container) {
    // Set class on container to identify it as a greeting card
    // container.  Allows for styling later.
    $container.addClass("h5p-greetingcard");
    // Add image if provided.
    if (this.options.image && this.options.image.path) {
      $container.append('<img class="greeting-image" src="' + H5P.getPath(this.options.image.path, this.id) + '">');
    }
    // Add greeting text.
    $container.append('<div class="greeting-text">' + this.options.greeting + '</div>');
  };

  return C;
})(H5P.jQuery);
The "attach" function is the only required method exported from a library. It will be called to tell the library to render into the supplied container object. How to perform the actual render is up to the library itself. In our case, we simply use jQuery DOM creation methods. More advanced libraries may want to use EmbeddedJS templates or other methods.
If you're using Drupal with the development folder enabled you should be able to create a greeting card now and display it, but it will lack styling.
Note that the library class receives H5P.jQuery in its initial creation. This is because H5P bundles its own copy of jQuery 1.9 to avoid conflict with other versions of jQuery in various site setups. It is always possible when H5P is available to access this as H5P.jQuery, but for simplicity we pass it in on module creation time, so the module see it as the '$' we're used to.
If you create a library that does not initiate like this, remember to always use the H5P.jQuery, as weird behaviour may result when mixing versions of jQuery used.
Step 4 - Add styling to library (css)
The initial rendering of the greeting card looks a bit dull. Let's spice it up by adding some styling. When doing changes to our library, we need to increase the patchVersion, making the final library.json file look like this:
{
  "title": "Greeting card",
  "description": "Displays a greeting card",
  "majorVersion": 1,
  "minorVersion": 0,
  "patchVersion": 1,
  "runnable": 1,
  "author": "Amendor AS",
  "license": "cc-by-sa",
  "machineName": "H5P.GreetingCard",
  "coreApi": {
    "majorVersion": 1,
    "minorVersion": 0
  },
  "preloadedJs": [
    { "path": "greetingcard.js" }
  ],
  "preloadedCss": [
    { "path": "greetingcard.css" }
  ]
}
Then create the CSS file as "H5P.GreetingCard/greetingcard.css". Add the following styles
.h5p-greetingcard {
  width: 400px;
  margin: 0 auto;
  border: 1px solid #ccc;
  box-shadow: 2px 2px 4px #ccc;
}
.h5p-greetingcard .greeting-image {
  width: 100%;
  height: auto;
}
.h5p-greetingcard .greeting-text {
  width: auto;
  margin: 16px;
  font-family: fantasy;
  font-size: 20px;
  font-weight: bold;
  line-height: 24px;
  text-align: center;
}
Now if you're using Drupal with the development folder enabled you should be able to create greeting cards right away, and they should look something like this: tutorial-greeting-card
If you're not using Drupal you'll have to zip your library folder so that the library folder is in the root of the zip. Rename the .zip to .h5p and upload it through your sites library administration. Remember that you need development mode on for updates of your library to take effect (or you must increase the patch version every time)
If you're able to upload the library and view/edit the Greeting card, you have successfully completed this tutorial!
You may also choose to manually create an H5P package with content.
You might also want to support translations.
Good luck creating your own H5P libraries! If you get stuck, reach out to the community in the forums.
Comments
ProfGra
Sun, 02/21/2016 - 14:08
Permalink
Just a small typo
Hi,
«or you mush increase the patch version every time» -> «or you must…»
Thanks for the tutorial.
falcon
Tue, 02/23/2016 - 11:54
Permalink
Hi, fixed the typo. Thanks!
alkanadi
Tue, 08/09/2016 - 17:14
Permalink
Can you add numbers. Like
Can you add numbers. Like step 1, step 2, step 3, step 4, ect...
Also, I think this is a typo: "First add the following lines to the library.json file..." - these lines of code already exist and don't need to be added.
fnoks
Wed, 08/10/2016 - 09:49
Permalink
Thank you for your inputs - I
Thank you for your inputs - I have updated the tutorial accordingly :)
dhascruz
Wed, 10/05/2016 - 07:53
Permalink
how to debug h5p through nodejs
Please help me how we can debug this h5p hello world application.
please revert back on this.
Thanks
dhas
fnoks
Thu, 10/06/2016 - 07:36
Permalink
I am not sure what your setup
I am not sure what your setup is like, but debugging an H5P content type usually means using the debug functionality the browser gives you. In Google Chrome, for example, you could use the Developer Tools, where you e.g. can set breakpoints in the JavaScript and so on.
lloop
Sun, 05/21/2017 - 20:28
Permalink
Development mode
Maybe I am being slow but... after coming across repeated references to 'development mode' I can't find how to turn it on. Is it supposed to be in the H5P settings window in the wp admin sidebar?
tomaj
Mon, 05/22/2017 - 08:27
Permalink
Not supported in WordPress
Hi,
Development mode is currently only found in the Drupal plugin. You can read more about it here.
- Tom
lloop
Mon, 05/22/2017 - 08:46
Permalink
Including the patch version disable?
Including the ability to disable the necessity for patch versions when uploading library updates? I am asking this because I could swear that I enabled that setting about a month ago on a hosted wordpress site. Now that I am working locally on the same site I can't find it.
icc
Mon, 05/22/2017 - 10:03
Permalink
Adding the following to wp
Adding the following to wp-config.php should do the trick:
define('H5P_DEV', true);Some other options that may or may not be useful:
// Print any errors or warnings define('WP_DEBUG', true); error_reporting(E_ERROR | E_WARNING | E_PARSE); // Prevent combining CSS and JS files: (means more requests – not good for production environments) define('H5P_DISABLE_AGGREGATION', true); // Make sure the embed URL work even though the embed button is disabled define('H5P_EMBED_URL_ALWAYS_AVAILABLE', true);joopm
Thu, 01/11/2018 - 20:21
Permalink
testing
I use H5P to create moodle content,but i am interested if there is a quicker way to test the H5p content on local without uploading to moodle.But since there is no html file i have no idea
icc
Thu, 01/18/2018 - 12:54
Permalink
Currently, there's no easy
Currently, there's no easy/quick way of doing it. You must have a site with an H5P plugin installed.
syllabozoo
Sat, 04/04/2020 - 12:39
Permalink
error when I want to upload the library
Hey I work with wordpress but I've some errors :
So I've zipped the 4 files :
I see 4 tables explaining errors but I can't see the left parts of the tables, because it's hidden.(picture of the tables are available here :) https://drive.google.com/open?id=1tdw79-YpP_w1iOwePqvbGPperkXhNLKa I work with wamp and my folder is "MonSuperSite".translation : "Le fichier spécifié est introuvable" means "can't find the specified file".
Thank you for your help.
syllabozoo
Sat, 04/04/2020 - 15:35
Permalink
erreur when I've tried to upload a modified library
Hey I wanted to modifiy the arithmetic quiz library. So I downloaded on github the whole files. I've made some changes adding a field in the semantics.json file.
Then, I've zipped the whole files and folders and I've renamed it as .h5p extension.
But when I want to upload the library it says me :
It seems that it doesn't understand the name of the folder.
here is the h5p file : https://drive.google.com/open?id=1cwnJbEUktVO1taG7aH0o5DGc8I0N6f_X
Can you help me ?
Thank you.
Degrange
Sat, 03/27/2021 - 15:29
Permalink
Error in attachment
Hi,
The attachment is not the same as the code in the documentation. The js file have a part about calling resizing. Which is always nice to know, but there is an error in the code, it's written "self.$.trigger('resize');" instead of "self.trigger('resize');". (thanks otacke)