How to create an editor widget
In this guide, we will show you how to create and use a new widget for the H5P editor
In this guide, we are gonna create a visual color selector that will look like this:
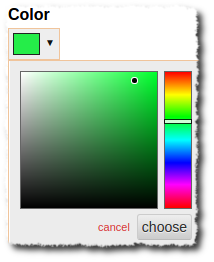
We will use a color selector created by Brian Grinstead. It is found on Brian Grinstead's GitHub page. The editor widget itself is available at H5P's GitHub page.
To create and use a widget, the following steps are needed:
- Create the editor widget library
- Create the code skeleton
- Create code for creating the visual part of the widget
- Create code for doing validation and saving
- Configuring a content type to use the widget
Create the editor widget library
An editor widget is like any another H5P library, i.e. it is defined in a file called library.json:
{
  "title": "H5PEditor.ColorSelector",
  "majorVersion": 1,
  "minorVersion": 0,
  "patchVersion": 0,
  "runnable": 0,
  "machineName": "H5PEditor.ColorSelector",
  "author": "Joubel AS",
  "preloadedJs": [
    {
      "path": "scripts/spectrum.js"
    },
    {
      "path": "scripts/color-selector.js"
    }
  ],
  "preloadedCss": [
    {
      "path": "styles/spectrum.css"
    },
    {
      "path": "styles/color-selector.css"
    }
  ]
}
As you can see from the library definition above, we use the H5PEditor namespace for editor widgets.
The file structure of the library is as follows:
├── library.json
├── README.md
├── scripts
│   ├── color-selector.js
│   └── spectrum.js
└── styles
    ├── color-selector.css
    └── spectrum.css
The files named spectrum.css and spectrum.js are part of the generic color picker.
Creating skeleton code
The coding starts off by creating the skeleton for our widget class:
/**
 * Color selector widget module
 *
 * @param {H5P.jQuery} $
 */
H5PEditor.widgets.colorSelector = H5PEditor.ColorSelector = (function ($) {

  /**
   * Creates color selector.
   *
   * @class H5PEditor.ColorSelector
   *
   * @param {Object} parent
   * @param {Object} field
   * @param {string} params
   * @param {H5PEditor.SetParameters} setValue
   */
  function C(parent, field, params, setValue) {
    this.parent = parent;
    this.field = field;
    this.params = params;
    this.setValue = setValue;
  }

  /**
   * Append the field to the wrapper.
   *
   * @param {H5P.jQuery} $wrapper
   */
  C.prototype.appendTo = function ($wrapper) {};

  /**
   * Validate the current values.
   *
   * @returns {boolean}
   */
  C.prototype.validate = function () {};

  /**
   * Remove the current field
   */
  C.prototype.remove = function () {};

  return C;
})(H5P.jQuery);
Important to notice is the following line:
H5PEditor.widgets.colorSelector = H5PEditor.ColorSelector = (function ($) {
Here two things happen:
- The widget name is defined, and can after this be referenced from a semantics.json file (colorSelector)
- The machineName (H5PEditor.ColorSelector) is declared
Other than that we define the constructor, which only store references to the input parameters.
Create code for creating the visual part of the widget
The visual part of the widget must be created and added to the DOM in the appendTo function:
/**
   * Append the field to the wrapper.
   *
   * @param {H5P.jQuery} $wrapper
   */
  C.prototype.appendTo = function ($wrapper) {
    var self = this;

    self.$container = $('<div>', {
      'class': 'field text h5p-color-selector'
    });

    // Add header:
    $('<span>', {
      'class': 'h5peditor-label',
      html: self.field.label
    }).appendTo(self.$container);

    // Create input field
    self.$colorPicker = $('<input>', {
      'type': 'text',
      'class': 'h5p-color-picker'
    }).appendTo(self.$container);

    // Create color picker widget
    self.$colorPicker.spectrum({
      preferredFormat: 'hex',
      color: self.params ?? null,
      change: function (color) {
        self.setColor(color);
      }
    });

    // Add description:
    $('<span>', {
      'class': 'h5peditor-field-description',
      html: self.field.description
    }).appendTo(self.$container)

    self.$container.appendTo($wrapper);
  };
Create code for doing validation and saving
We need to implement the validate function which verifies the data is valid:
/**
 * Validate the current values.
 * @returns {boolean}
 */
C.prototype.validate = function () {
  return (this.params.length === 6);
};
We also need to inform the generic H5P editor that data has changed:
C.prototype.setColor = function (color) {
  this.params = color.toHex();
  this.setValue(this.field, this.params);
};
The setColor function is invoked from the appendTo function, whenever the color picker fires a change event.
Configuring a content type to use the widget
To test the new widget type in a content type, we have to do two things:
- Add an editor dependency in the content type's library.json
- Update semantics.json to use the new widget
Here is what it will look like in library.json:
"editorDependencies": [
  {
    "machineName": "H5PEditor.ColorSelector",
    "majorVersion": 1,
    "minorVersion": 0
  }
]
Here is what it will look like in semantics.json:
{
  "name": "color",
  "type": "text",
  "label": "Color",
  "description": "The color of the element",
  "optional": true,
  "default": "000000",
  "widget": "colorSelector"
}
The important thing here is that we set colorSelector as the widget, which makes our widget being used instead of a standard input field.
A note about third-party APIs using jQuery
H5P comes with its own jQuery. The same instance has to be used also by third party JS APIs, or potentially a lot of strange things could happen. In this example, we have therefore added the following to the spectrum.js file:
(function(jQuery) {
  // The original spectrum.js content goes here
})(H5P.jQuery);
Comments
pepe_fr
Tue, 11/14/2017 - 17:55
Permalink
Hello,Thanks a lot for this
Hello,
Thanks a lot for this tutorial and h5p. That's a really fun & powerfull tools.
Is it possible to attach a corrected zip of the widget library ? (I don't know where exactly adding the "Create code for doing validation and saving" code).
Thanks a lot,
Best regards
fnoks
Thu, 11/16/2017 - 13:14
Permalink
You can see the full code for
You can see the full code for the example here: http://github.com/h5p/h5p-editor-color-selector
Ray1991
Mon, 03/15/2021 - 04:31
Permalink
What your content of content.json or am I missing sth
use your library from GitHub http://github.com/h5p/h5p-editor-color-selector, and add a empty content.json and then use the docker-compose drupal to test the color-selector to test.
get the wrong info:
pepe_fr
Thu, 11/16/2017 - 15:48
Permalink
Thanks a lot for your reply.
Thanks a lot for your reply.
sunnythewebdeveloper
Fri, 05/01/2020 - 20:44
Permalink
How to add created editor widget to Hello World Content Type
I have been following "Hello world tutorial"
I have created widget by following "How to create an editor widget" (https://github.com/h5p/h5p-editor-color-selector)
However I am unable add this widget tp content type and get this error
Missing dependency H5PEditor.ColorSelector 1.0 required by H5P.GreetingCard 1.0.
How to add a custom widget to custom content type ?
Where to place the "H5PEditor.ColorSelector" so its accessable to "H5P.GreetingCard" in "drupal-7-69/sites/default/files/h5p/development" ?
sunnythewebdeveloper
Mon, 05/04/2020 - 15:39
Permalink
Resolved
the devil was in details,
the tutorial at https://h5p.org/creating-editor-widgets
says to update H5P.GreetingCard/library.json with '"minorVersion": 0' for '"machineName": "H5PEditor.ColorSelector",'
but the version in https://github.com/h5p/h5p-editor-color-selector/library.json "minorVersion" is 3.
Hence it could not find "H5PEditor.ColorSelector" in "h5p/development"
just updated '"minorVersion": 3' in H5P.GreetingCard/library.json and all works.