Fill in the Blanks Tutorial
The Fill in the blanks allows eLearning designers to create cloze tests. Portions of words or sentences are removed from a text and the learner is asked to replace the missing text.
In this tutorial you will learn:
- When to use Fill in the blanks
- How to create Fill in the blanks
Click the "Get started" button to explore all of the possible ways to use H5P!
Video tutorial
The below video shows how Fill in the Blanks may be used and how to use it:
Textual tutorial - example
Here's the Fill in the blanks we'll create in this tutorial:
When to use Fill in the blanks
Fill in the blanks cen be used effectively in language learning. A Fill in the blanks test asesses the learner's ability to understand context, vocabulary or grammatical concepts in order to correctly replace the missing pieces of text.
In addition to native and second language learning, Fill in the blanks can be used to test the learner's ability to reproduce facts or mathematical inferences.
Fill in the blanks can be used stand-alone or they can be used in Question sets, Interactive videos or Presentations. Either way, they are created in the same way.
Step 1: Topic
In this tutorial, we'll use trivial facts about strawberries, English grammar and arithmetics to create a Fill in the blanks.
We'll use these three sentences:
- Insert the correct plural form of the noun strawberry: strawberries
- The strawberry is a juicy, edible fruit that has a red color when it is ripe.
- Tom has 2 strawberries. Jill gives him 4 more strawberries. Now, Tom has 6 strawberries.
We'll test the learner by removing the words highlighted with bold text above. These will be our blanks.
Step 2: Creating a Fill in the blanks
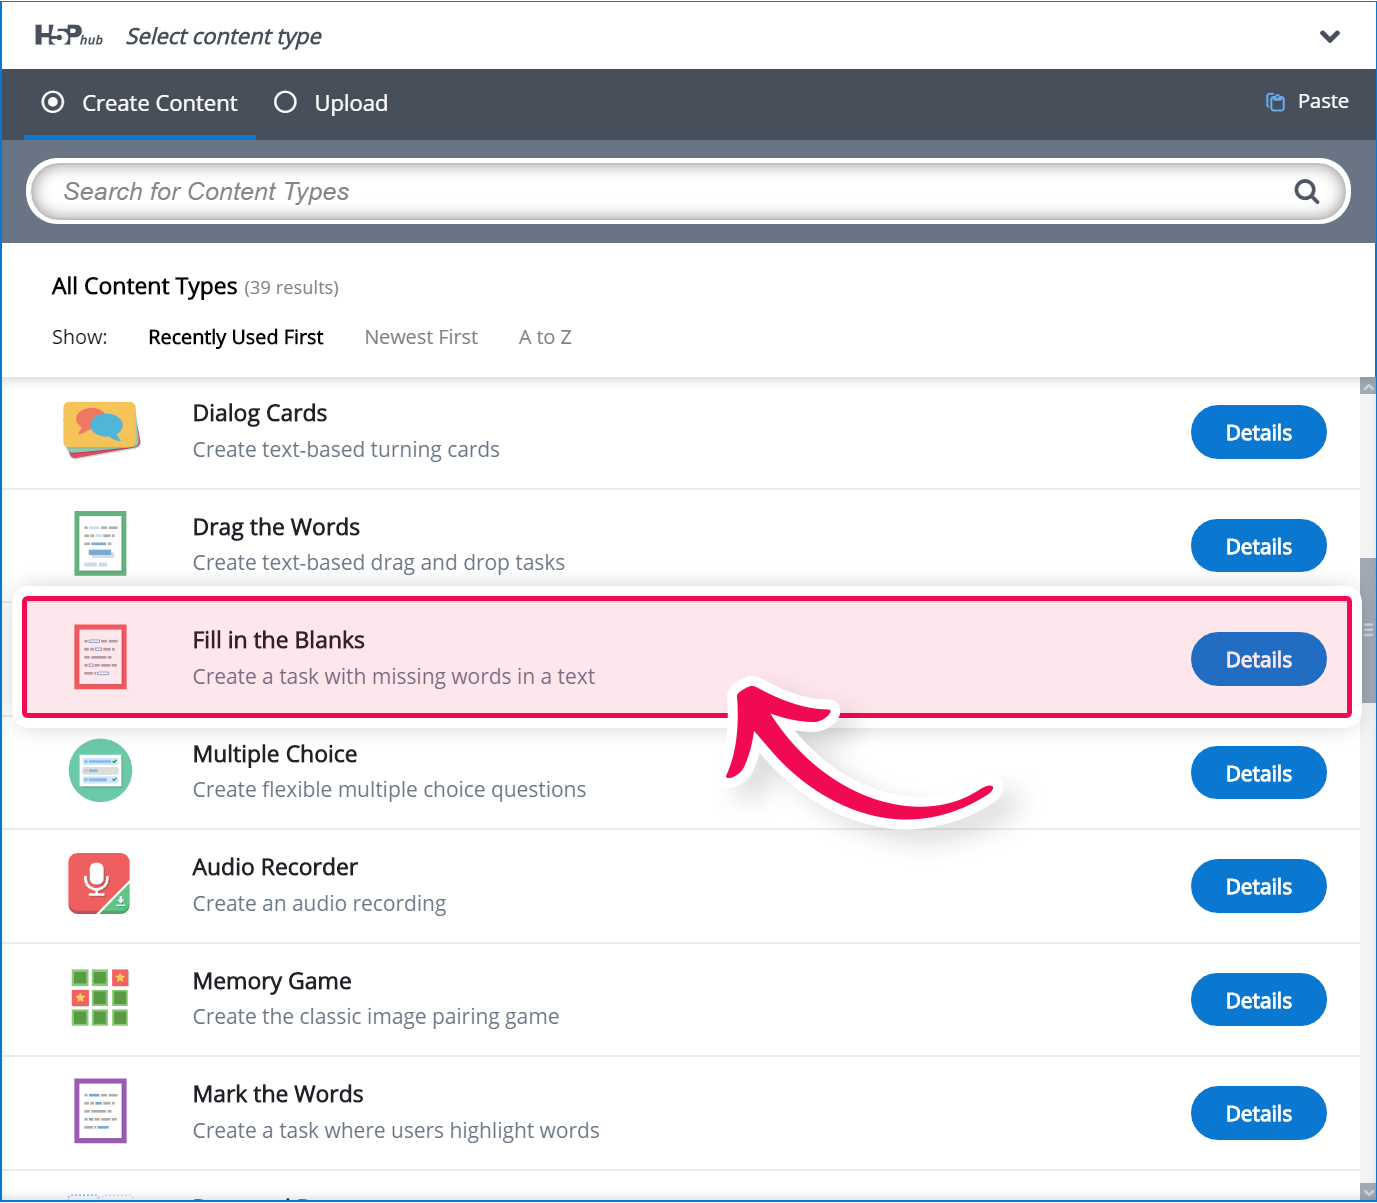
Select the New content option and choose Fill in the blanks from the list of Content types:
Step 3: Fill in the blanks editor
The Fill in the blanks question editor should now appear. The editor looks like this:
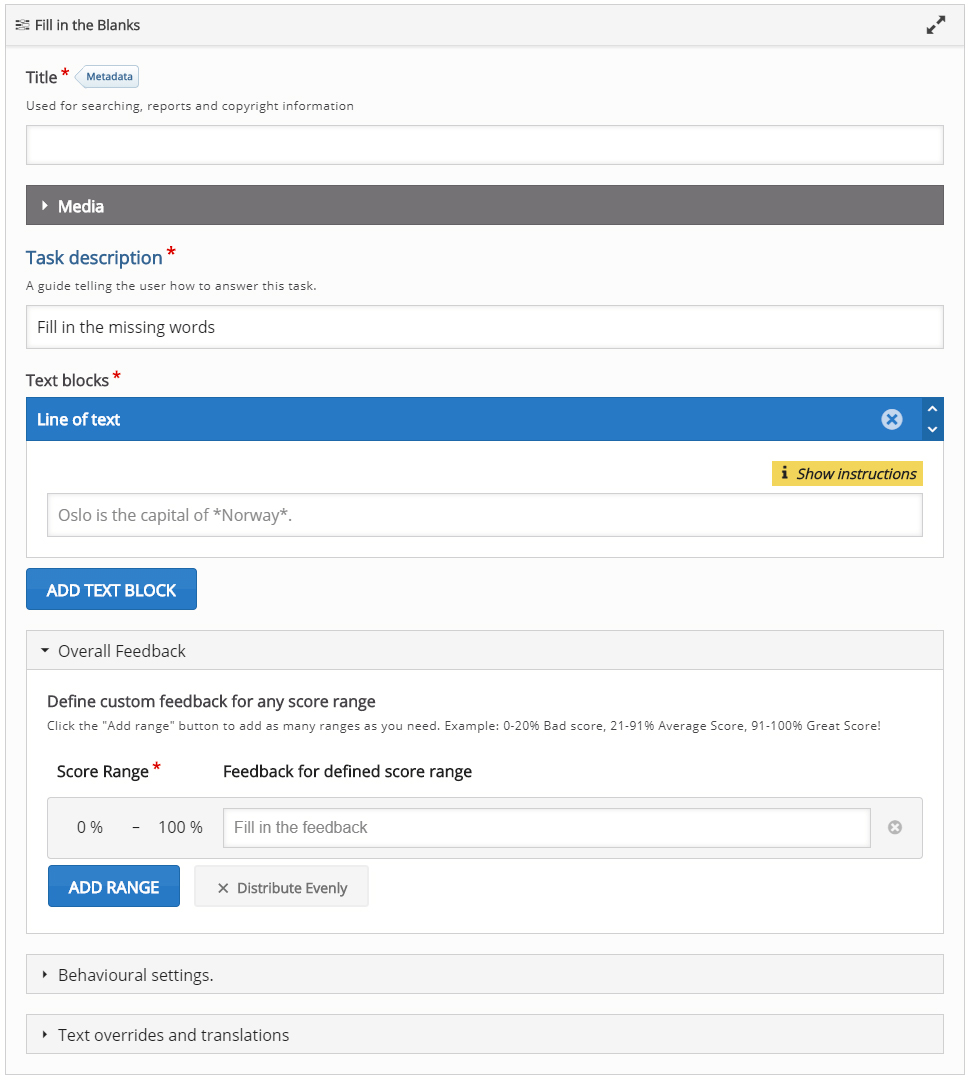
In this tutorial, we'll focus on creating the Fill in the blanks content. The content creation happens in the top part of the editor, so this part of the editor will be our focus here.
The Fill in the blanks editor consists of Task description and Text blocks.
Step 4: Task description
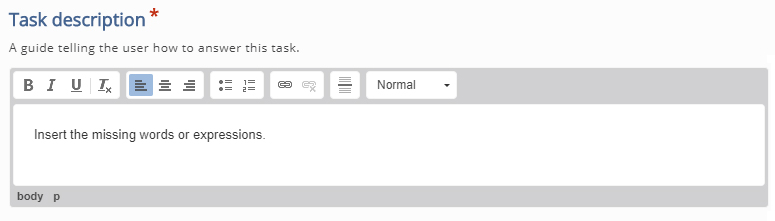
In the Task description field, we give the learner basic instructions or introduce the problem to be solved.
We'll use this text for the Task description: Insert the missing words or expressions.
Step 5: Text blocks
Under Text blocks, we add our three sentences and define which words are to be removed for the learner to identify.
We can add multiple text blocks, and we can remove multiple words in each text block.
By default, only a single Text block is displayed when you create a new Fill in the blanks.
Because we have three sentences, we would like to add two more Text blocks. Press the Add text block button twice to add two more Text blocks.

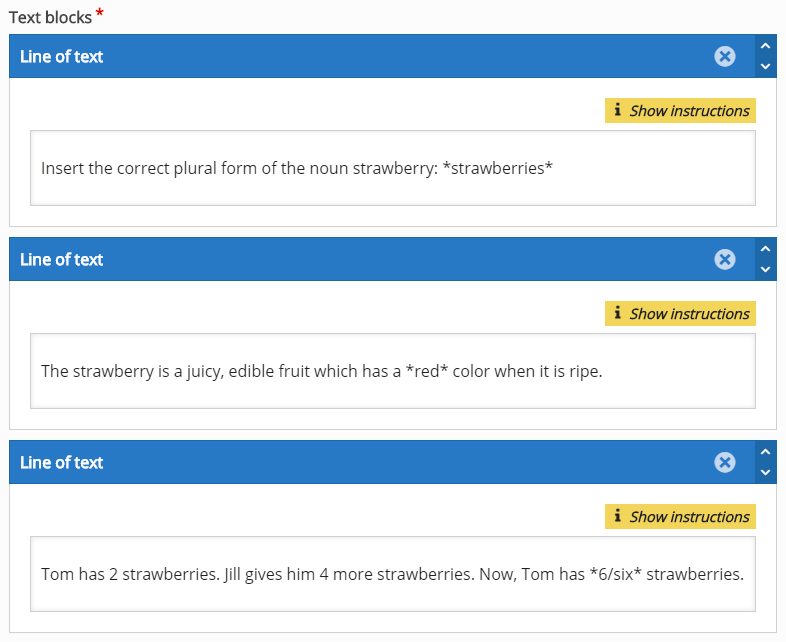
In the top Text block, we add the following sentence under Line of text:
Insert the correct plural form of the noun strawberry: strawberries
We insert asterisks before and after the word, we would like to remove, like this:
Insert the correct plural form of the noun strawberry: *strawberries*

In the screenshot above, we have used the text formatting toolbar to highlight strawberry in italics.
Add the following text in the second Text block, under Line of text:
The strawberry is a juicy, edible fruit that has a *red* color when it is ripe.
In the third and bottom Text block, we add the following text under Line of text:
Tom has 2 strawberries. Jill gives him 4 more strawberries. Now, Tom has *6* strawberries.
In this last sentence, we want to allow the learner to insert both the number 6 as well as the word six.
We can define alternative answers by using a slash to separate the accepted alternative answers inside the asterisks, like this:
Tom has 2 strawberries. Jill gives him 4 more strawberries. Now, Tom has *6/six* strawberries.
You should now have something like this:
You can add as many Text blocks as you want. You remove Text blocks by pressing the
button in the top right corner of the Text block. You change the order of the Text blocks by pulling the
button in the top left corner of the Text block.
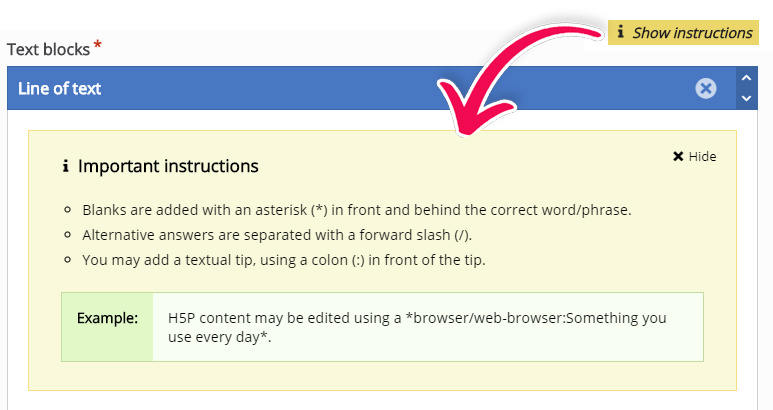
If you need instructions on how to create content you can press the "Show instructions" button at any time and the instructions block will open. It looks like so:
Step 6: Try again button
Check the Enable "Try again" button checkbox to allow the learner to try to solve the Fill in the blanks multiple times.
If you include Fill in the blanks in Question sets, Interactive videos or Presentations, you might want to consider whether you want the user to only get one chance to solve the task.
In this tutorial, we'll leave this option checked.
Step 7: Case Sensitive
In this tutorial, we are not concerned whether the learner uses capital letters or not when inserting the missing text. We, therefore, uncheck the Case sensitive checkbox. Example: The learner will get the correct answer when inserting both Strawberries and strawberries in the first sentence.
Step 8: Finishing up
Save the node/article to view your finished Fill in the blanks.
You should now have the same result as the example on top of this page.
Feel free to leave any comments or suggestions on how to improve this tutorial.
Comments
spazfox
Wed, 03/18/2015 - 02:23
Permalink
Images?
It would be great to be able to add images easily to fill-in-the-blank questions (as it is with multichoice questions)!
falcon
Wed, 03/18/2015 - 11:41
Permalink
Noted!
agis
Sat, 04/18/2020 - 21:57
Permalink
nothing yet?
nothing yet?
BV52
Mon, 04/20/2020 - 21:08
Permalink
Hi Agis,Images can be added
Hi Agis,
Images can be added to Fill in the Blanks.
-BV
Simi89
Tue, 05/11/2021 - 11:20
Permalink
Images
Hi BV52,
would you mind explaining how I can add images? I do not see any button.
Thanks in advance!
Simon
BV52
Tue, 05/11/2021 - 19:26
Permalink
Hi Simon,If you look at Step
Hi Simon,
If you look at Step 3: Fill in the blanks editor under the title there is "Media" if you expand that you will see the menu were you can add an image.
-BV
ARTy
Tue, 05/05/2015 - 02:14
Permalink
Mathmatical Symbols
I posted this elsewhere but this blog is more appropriate for my post. I want to add mathematical symbols to text blocks like, square roots or numbers raised to power but I'm not able to do this? Can you please confirm whether this is possible or not?
Thanks
AR Tawil
falcon
Tue, 05/05/2015 - 18:11
Permalink
Not possible out of the box.
reixarch
Tue, 01/31/2017 - 23:40
Permalink
Graphical math editor
Hi,
just a clarification about an old comment on the graphical math editor used by NDLA.
NDLA is using WIRIS EDITOR www.wiris.com/editor
You may be interested in the CKeditor Plugin for WIRIS EDITOR www.wiris.com/solutions/ckeditor
rickhumphries
Fri, 08/25/2017 - 12:16
Permalink
Hi - just wondered if the
Hi - just wondered if the Drupal module is avaialble to be shared?
tomaj
Mon, 08/28/2017 - 08:56
Permalink
Yes
Hi,
Is this what you are looking for: https://www.drupal.org/project/h5p
- Tom
rickhumphries
Mon, 08/28/2017 - 09:03
Permalink
The Custom Module
Hi Tom, thanks for your reply but I wasn't meaning the official H5P Drupal module. I was referring to the custom module developed by the NDLA and mentioned in the comment above... "They have a custom drupal module that adds the tags they need and the editor to the H5P wysiwyg text editor."
Thanks
Rick
fnoks
Mon, 08/28/2017 - 09:53
Permalink
Hi Rick,You can look at NDLA
Hi Rick,
You can look at NDLA's code here. Note this is for Drupal 6.
Best,Pålrickhumphries
Mon, 08/28/2017 - 10:02
Permalink
Many thanks Pål, much
Many thanks Pål, much appreciated
ade.oduye@harin...
Fri, 01/22/2016 - 22:11
Permalink
Drop-down options
How can I create questions which are like fill-in-the-blanks questions but each blank is a drop-down list for the user to select options from?
falcon
Mon, 01/25/2016 - 14:00
Permalink
There are no such content
vatat
Mon, 08/26/2019 - 11:30
Permalink
Advanced Fill in the Blanks - with a dropdown menu
According to the August 2019 release note, it possible to create dropdown menus as blanks, but I can't find instructions on how to do it.
Can anyone point me there?
vatat
Tue, 08/27/2019 - 09:52
Permalink
I guess "Advanced fill the
I guess "Advanced fill the blanks" is a separate content type (It stands alone – not within the old "Fill in the Blanks"
I understand that besides the dropdown menus as blanks, it also enables to attach feedback to a certain word, by putting two exclamation marks "!!" before and after it
Christopher
Fri, 06/17/2016 - 15:48
Permalink
A simple from with no validations
Am developing a presention, my first slide has a simple form (Name, Age etc). The user just as to type in the details. I need no validation. Is this possible ? Also can we customize the font family and color?
falcon
Tue, 06/21/2016 - 10:30
Permalink
I would try with exportable
I would try with exportable text for the form fields. For regular text areas in Course Presentation H5P has a feature for selecting font color and size, but not for font family. You could develop such a feature yourself if you are or have access to a developer.
TimTim22
Wed, 09/07/2016 - 00:22
Permalink
Remove the embed option for my users on my site?
I'm not sure this is the right place but I'm a bit lost. I'm not using Drupal or Wordpress etc and so cannot install the appropriate plugin. I can use the EMBED option very easily and have my quizz appear nicely on my site but then the options EMBED and DOWNLOAD are also available to my users and I don't want that. Is there something I'm doing wrong?
TimTim22
Wed, 09/07/2016 - 00:45
Permalink
by simply removing the option after embedding on site?
So here's what I did: I first checked the option EMBED so I could embed the quizz on my site. Then I edited my quizz on the H5p.org platform and removed that option. Now the quizz is still up on my site but without the two options available to my users. Hope that works!!
fnoks
Wed, 09/07/2016 - 09:51
Permalink
Good to hear you figured this
Good to hear you figured this one out. In the future the embed-code should probably be available also in the editor, so you don't have to toggle embed to get the embed code.
Steve Covello
Wed, 11/02/2016 - 21:57
Permalink
About the "Automatically check answers after input" option
If you select this option, please note that the answers will only appear after the user clicks somewhere off of the text box the user just typed in. This is fine as long as there is another empty box for the user to click into and type an answer.
But once the user gets to the last one, they have to know to click off somewhere (anywhere) just to see the answer since there are no more empty boxes to click into. Since users are most accustomed to completing interaction with a "Submit" action, this may leave some users disoriented and uncertain about what to do next.
The requirement to do this extra "click on nothing" on the last item is not intuitive. There should be something to click on after the last item to reveal the last item's result.
What is curious is that when the user clicks on the "Continue" button, it shows the solutions -- it does not cause the video to continue like it does for other interactions. I recommend changing the Continue button to say "Show solutions", and then upon showing results, replace it with the actual Continue button that restarts the video.
fnoks
Thu, 11/03/2016 - 08:52
Permalink
Maybe the check button should
Maybe the check button should be available even if the "Automatically check answers after input" is enabled? Do you think that would solve it?
For the Continue button in Interactive Video, I am not able to reproduce this on h5p.org. Is this something which is publicly available, or you could recreate here on h5p.org?
Steve Covello
Thu, 11/03/2016 - 14:02
Permalink
Update
Upon rechecking yesterday's work, the Continue button is now doing what it normally does -- cause the video to resume playing. (I am working on a local installation of Moodle on my laptop Macbook Pro).
Check button: Yes, I agree there should be something obvious for users to click once completed with the fill in activity.
vandijk.rene
Thu, 01/19/2017 - 22:58
Permalink
Text block editor + Undo/Bullets/Numbers?
The Text Block Editor is somewhat basic. What it be possible to add Undo, Bulleted and Numbered List?
fnoks
Fri, 01/20/2017 - 09:00
Permalink
Hi,It is possible, but
Hi,
It is possible, but technically it would make Fill in the blanks a little more complex since the input field is a mix of defining blanks and formatting. Afaik, none is currently working on this, though.
vandijk.rene
Wed, 02/08/2017 - 22:24
Permalink
Hi, sorry for getting back on
Hi, sorry for getting back on this only now: I have been pretty busy last few weeks. Thanks for your swift reply: I understand, it would have been 'nice-to-have'.
vandijk.rene
Thu, 01/19/2017 - 22:58
Permalink
Moodle Plugin: no 'duplicate' option?
I built some Fill-in-the-Blanks in my Moodle install. It appeared to be not possible to duplicate an exercise as is the case with Moodle based Activities and Resources. A duplication option for h5p Activities in Moodle would be very time-saving. Or is there a workaround?
fnoks
Fri, 01/20/2017 - 09:33
Permalink
Hi,The built-in duplcation
Hi,
The built-in duplcation function in Moodle is not yet supported by H5P. But, you may:
vandijk.rene
Wed, 02/08/2017 - 22:25
Permalink
Thanks for the tip! I'll try
Thanks for the tip! I'll try this one.
vandijk.rene
Thu, 01/19/2017 - 23:12
Permalink
Score of Points to reflect number of corrections?
The 'Score of points' now seems to reflect completion status only. It does not seem to consider the extent to which a student had to correct a wrong answer. If so, would it be possible / an idea to build this in? Same for situations in which a student chooses to 'try again' ?
tim
Fri, 01/20/2017 - 09:43
Permalink
Hi, That sounds like a great
Hi,
That sounds like a great idea. I think that will also give instructors a much more detailed understanding of how well their students are grasping the material.
If you have the time, would you mind detailing exactly how you would like this to work under the 'Feature Requests Forum' :
https://h5p.org/forum/16
Hopefully a developer from the community will be inspired and pick it up!
vandijk.rene
Wed, 02/08/2017 - 22:57
Permalink
Hi, sorry for getting back on
Hi, sorry for getting back on this only now; I have been pretty busy. Thnks for your swift and positive reply. I just posted a Feature Request.
youba14
Thu, 01/26/2017 - 19:48
Permalink
Amazing
How easy and powerfull. This is realy amazing.
Thank you
janisf
Sat, 05/20/2017 - 21:09
Permalink
audio
It would be great to be able to add audio to this fill in the blank activity type. I successfully added video and images, but audio would be helpful too. (Maybe I missed something?!)
tomaj
Mon, 05/22/2017 - 07:19
Permalink
Not supported yet
Hi,
Unfortinaly only audio is not supported yet.
- Tom
arnold-fungai
Thu, 05/25/2017 - 01:46
Permalink
Escape Syntax
Is there a way to escape H5P intepreting : and /?
This would be useful in adding a ratio as an answer e.g 2:1 Currently H5P inteprets *2:1* as the answer 2 with tip 1
tomaj
Thu, 05/25/2017 - 08:23
Permalink
No
No, there is no escape. But there is a ticket registered on it, and hopefully it will get fixed soon.
- Tom
deskamilali
Sun, 09/17/2017 - 09:55
Permalink
How can I add * as not a replace mark?
I am trying to make an exercise for programming courses and I need to add * as an operator. How can I add * without taking it as a replace mark? (d=b^2*a*c).
Thank you
tomaj
Mon, 09/18/2017 - 08:59
Permalink
Escaping is unfortunately not supported
Hi,
Escaping doesn't appear to be supported in fill in the blanks. There is a task in he bug tracker for handling it.
- Tom
ElizaG
Mon, 02/26/2018 - 16:50
Permalink
operator * in "fill in the blanks"
How can I get operator * in Line of text inside of Fill in the blanks???
BV52
Tue, 02/27/2018 - 05:44
Permalink
Hi ElizaG,Please check my
Hi ElizaG,
Please check my answer here.
-BV52
hardav
Thu, 11/02/2017 - 18:01
Permalink
Adaptivity - action on all correct/on wrong
Hello, I'm trying to add feedback to a FITB question within an H5P interactive video, and I want to include feedback depending on whether the user answers correctly or wrongly. I've added some text into the message fields for both correct and wrong answers in the adaptivity section, but I can't seem to get the question to reveal the text when the question is answered? Any thoughts?
BV52
Mon, 11/06/2017 - 04:35
Permalink
Hi hardav,Thank you for
Hi hardav,
Thank you for reporting this. A bug report has been filed and you can follow it here.
-BV52
wheelie1978
Thu, 11/16/2017 - 09:42
Permalink
Use / as part of missing text
Hi, I love this resource, but when I use it with students to help them learn html tags by filling in missing code I cannot have any closing tags as blanks as they all contain / e.g. </p> is there a way around this?
Colin
icc
Thu, 11/16/2017 - 12:58
Permalink
Unfortunately, there is no
Unfortunately, there is no way of escaping. I've created an issue for getting this fixed: HFP-1743
Detlef
Sat, 12/09/2017 - 14:13
Permalink
add audio to text
It would be great if one could add audio files in the text (just in front of or after the blank or on hover instead of the tip) to dictate the missing word (for tests that do not check the understanding but only the correct writing); could that be done?
BV52
Mon, 12/11/2017 - 07:10
Permalink
That's a good suggestion
That's a good suggestion Detlef. Plase head over to the Feature Request forum and post your suggestion.
Please include use cases and how you would like the feature to be implemented.
-BV52
Pages