Summary Tutorial
The Summary content type allows learners to interactively build a summary of a certain topic. Summaries are a perfect way to strengthen your learners’ ability to remember by encouraging them to build interactive summaries as they learn.
In this tutorial you will learn:
- When to use Summaries
- How to create a Summary
Click the "Get started" button to explore all of the possible ways to use H5P!
Video tutorial
The below video shows how Summary may used and how to make one:
Textual tutorial - example
Here's the Summary we'll create in this tutorial:
When to use summaries
Summaries work best when they are presented to the learner immediately after the learning content.
Examples are:
- at the end of an article or a chapter of text
- at the end of a video
- at the last slide of a presentation
Summaries help the learner remember key information in a text, video or presentation, by actively buliding a summary about the topic at hand. When the learner has completed a summary, a complete list of key statements about the topic is the end result.
Summaries can be created stand-alone or they can be included in Interactive Videos or Presentations. Either way, they are created in the same way.
Step 1: Summary topic
Let's say you have a text about Blueberries that you want to create a Summary for. We'll use this text from Wiktionary as an example:
Blueberry
An edible round berry, belonging to the cowberry group (Vaccinium sect. Cyanococcus), with flared crowns at the end, that turns blue on ripening.
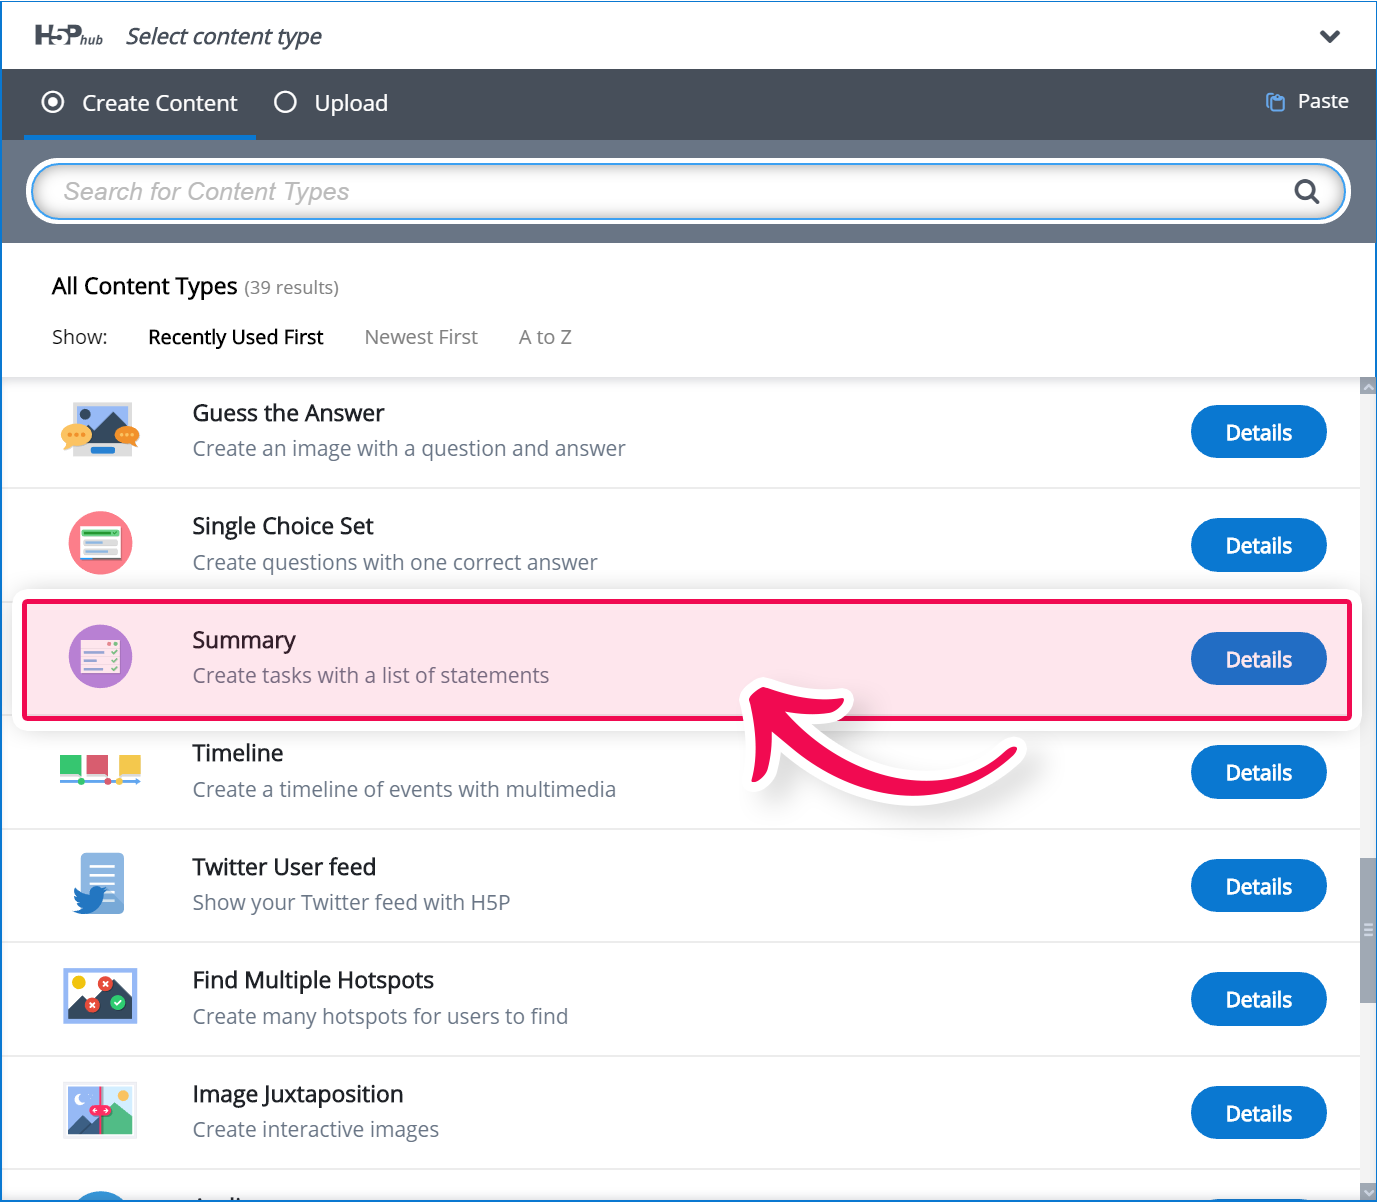
Step 2: Create Summary
Select the New content option and choose Summary from the list of Content types:
Step 3: Summary editor
The Summary editor should now appear. The top part of the editor looks like this:
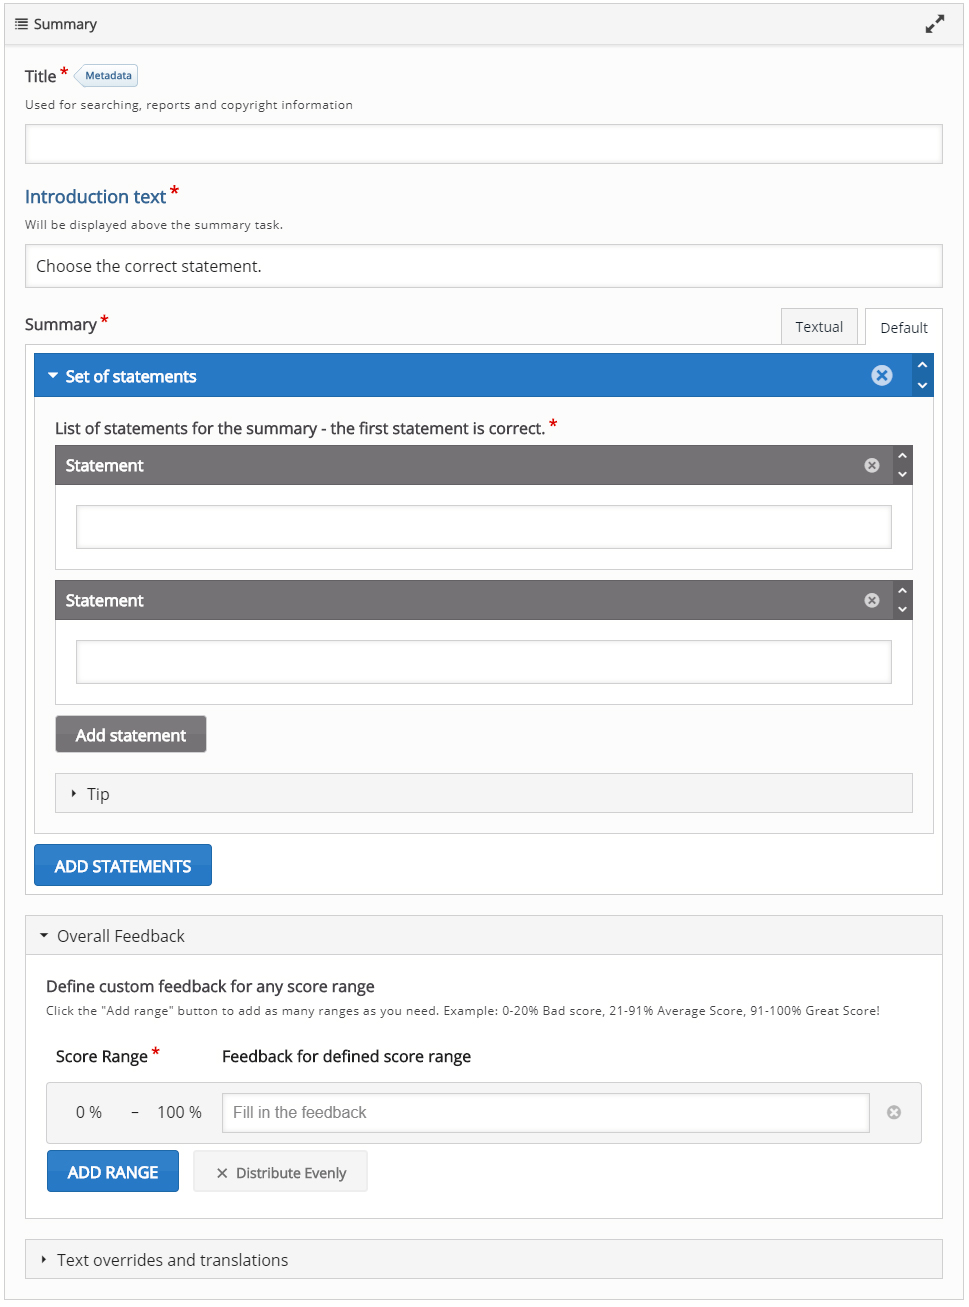
In this tutorial, we will focus on creating the actual Summary content, which happens in the top part of the Summary editor. The lower part of the editor, below the label Common fields, deals with translations and default text and is not important in this context.
Step 4: Introduction text
The Introduction text will be visible to the learner throughout the Summary. You can use this field to give the learner a short introduction or some instructions. A default Introduction text which works fine in most cases is suggested. However, you may modify or translate it into another language.

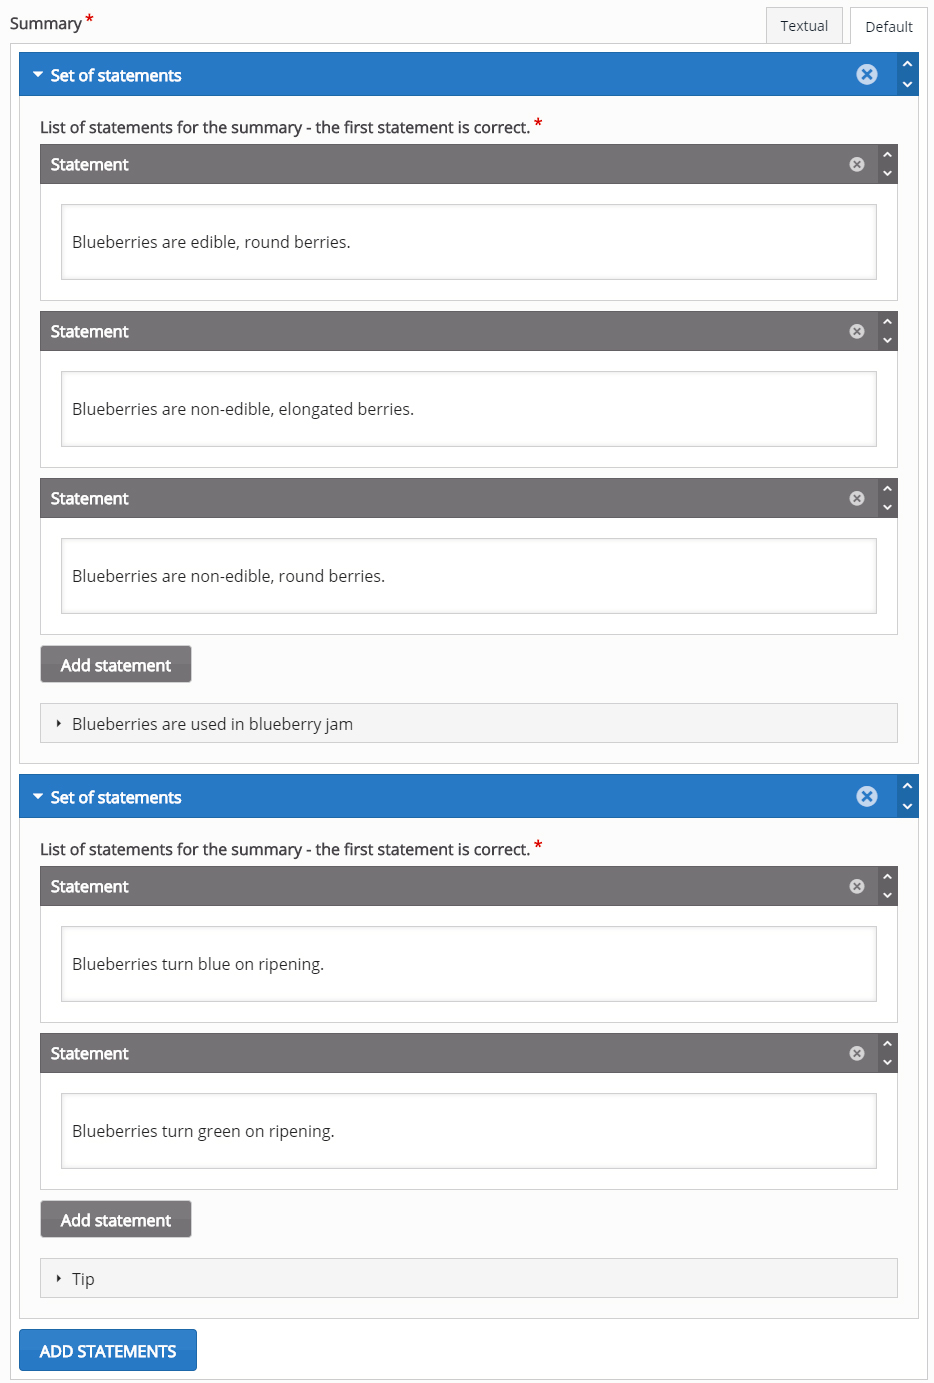
Step 5: Add statements
The Summary content type consists of a sequence of statement groups.
By default, the first statement group consists of two blank text fields each labeled Statement.
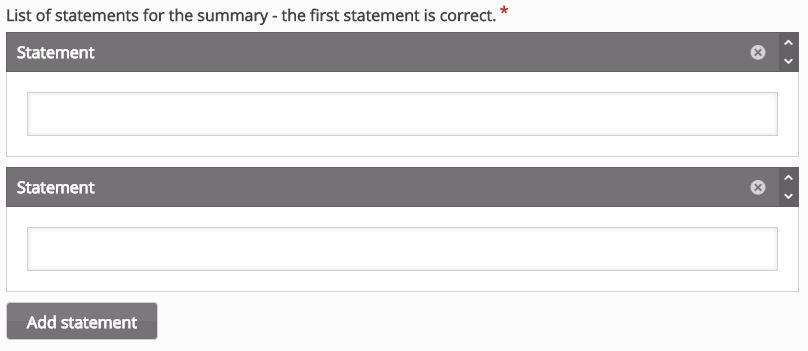
You need one correct statement and at least one incorrect statement in each statement group for the Summary to make any sense.
Note that the top statement in any statement group should always be the correct one.
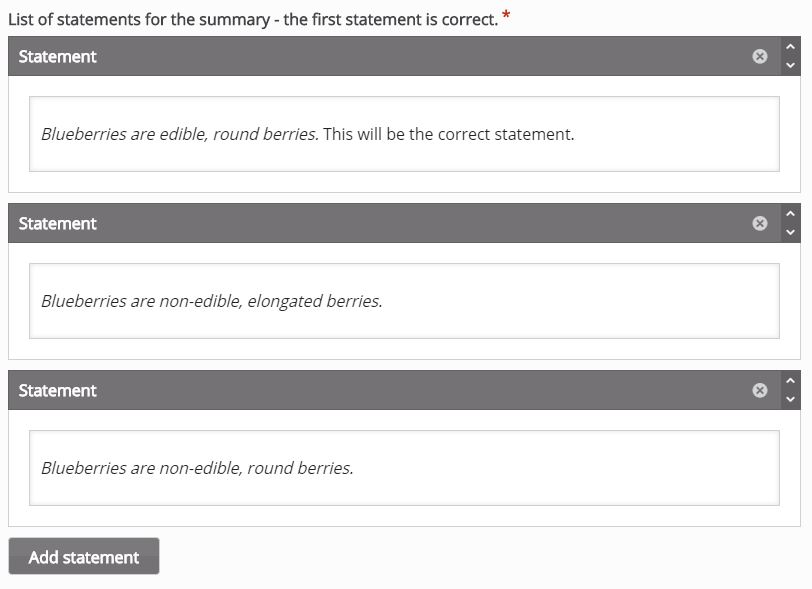
In the top Statement field, add the text:
Blueberries are edible, round berries. This will be the correct statement.
In the bottom Statement field, add the text:
Blueberries are non-edible, elongated berries. This is, of course, an incorrect statement.
You can add as many incorrect statements as you want. Add another statement by pressing the Add statement button. In the third Statement field that now has appeared, add the text:
Blueberries are non-edible, round berries.
You should now have something like this:
We have now finished our first statement group! However, only one statement group makes a very short summary of the topic. You would usually like to add two or more statement groups.
Step 6: Add Statement group
Press the button Add statements. This will add a second group of statements.
In the top statement field, add the text:
Blueberries turn green on ripening. As the blueberry experts, we are, we know this is a wrong statement.
In the bottom statement field, add the text:
Blueberries turn blue on ripening. This is the correct statement.
As the top statement should be the correct one, we will have to change the order of the statements. You change the order by pressing the ![]() button in the top right corner of the statement group, drag it to the top of the List of statements, and drop it there. Now the correct statement is at the top of the statement group, as it should be.
button in the top right corner of the statement group, drag it to the top of the List of statements, and drop it there. Now the correct statement is at the top of the statement group, as it should be.
You should now have something like this:
You can also change the order of entire statement groups in the same way. Just use the ![]() button in the top left corner of the statement group instead.
button in the top left corner of the statement group instead.
Repeat step 6 until you have added enough correct statements to summarize the topic well.
You delete statements or statement groups by using the ![]() button in the top right corner.
button in the top right corner.
Step 7: Finishing up
Press Save when you are done!
You should now have the same result as the example at the top of the page.
Feel free to leave any comments or suggestions on how to improve this tutorial.
Comments
Steve Covello
Tue, 12/27/2016 - 21:04
Permalink
A pedagogical perspective
You state "Summaries help the learner remember key information in a text, video or presentation, by actively buliding a summary about the topic at hand." This is not a fully accurate claim based on the nature of the Summary building process in this H5P library. There is a risk that selecting incorrect choices will unintentionaly reinforce the wrong information. This method of summarizing is also a poor predictor of retention in a future assessment or application.
If the goal of an instructional activity is to demonstrate comprehension of subject matter, it would be better to direct learners to write or record their own summaries (from scratch) based on notes they have taken while engaged with an activity or media.
tim
Fri, 12/30/2016 - 10:37
Permalink
This is a really good point.
This is a really good point. I too feel that H5P summary is a bit lacking in the sense that it does not force students into creatively coming up with their own summaries based on their own understanding.
I would really like to see a more advanced summary content type that would be more open ended but still narrow enough in scope so that it could be graded. What are your ideas? Any perspective from a pedaagogical point of view would be extremely valuable :)
Chrissuli
Fri, 06/02/2017 - 21:49
Permalink
H5P sumarries
Hi,
In the Opigno quiz module, very short answer questions are an option for the student to write down their answer for automatic comaprison and checking against a model answer.
Definitions that require exact wording are an obvious candidate for this, however, perhaps the use of hot/key words and phrases might make it more flexible enough to more open short questions and answers.
Otherwise...
These and more advanced version of the ideas are something I have been toying with and would very much like to see actualised.
Kr,
Chris
icc
Tue, 06/06/2017 - 11:46
Permalink
Thanks for sharing!
Thanks for sharing!
Clare_tea
Thu, 06/11/2020 - 08:56
Permalink
International student perspective
I agree with Steve's comment from a pedagogical perspective. International students who have limited understanding of English would find the summary activity confusing and struggle to complete it. When I created my first summary activity today, I found it confusing as, admittedly, I didn't look at the tutorial. I jumped in to try it out. I would like to see an activity where the sentences of a sample summary are jumbled, and the students need to order them correctly. This would help them to understand the content of the original text/video. It may also get them thinking about coherence and cohesion.
Tommo73
Fri, 05/19/2017 - 05:30
Permalink
I Like this...
I like this rather than a dull radio button, is this avaialable in the question-set?
thanks.
tom.
tim
Fri, 05/19/2017 - 09:31
Permalink
Unfortunately Summary is not
Unfortunately Summary is not currently available in Question Set. It may be added in the future.
Tommo73
Mon, 05/22/2017 - 03:49
Permalink
cheers Tim for the update.as
cheers Tim for the update.
as there is a generational change in our course demographic, the days of the radio button check-box and next button are dead.
i like this interactivity.
tim
Mon, 05/22/2017 - 09:06
Permalink
I do agree that summary is a
I do agree that summary is a slick bit of kit :)
Chrissuli
Fri, 06/02/2017 - 21:53
Permalink
Summary Staements
Hi,
Though the idea of providing a summary / follow-up exercise on the key points is a good idea, technically it seems to me to be no different to a a single or multi multiple choice question set. If only the wording of the questions and answers changes, what is a separate content type / module needed for / do that the other CT modules don't?
Kr,
Chris
tim
Tue, 06/06/2017 - 10:47
Permalink
Hi Chris, I'm not sure I
Hi Chris, I'm not sure I understand your question.
Chrissuli
Wed, 06/07/2017 - 11:01
Permalink
Summary Similarities
Hi,
As I understand it, the summary is a set of statements for the student to choose from to verify their memory or understanding of what they have read.
I do not understand how this differs from any other multiple choice single or multi -selection question, except in name.
Kr,
Chris
BV52
Thu, 06/08/2017 - 06:40
Permalink
In my opinion the summary
In my opinion the summary gives you what it is designed for a summary of the lesson in a question form. Yes it is similar to the other content types but it is more compact which gives the learner the finer points of a certain lesson.
-BV52
ssebastien
Fri, 08/04/2017 - 04:59
Permalink
Right or wrong
I like the summary content type however is it possible to remove the requirement to have right and wrong answers? I would like users to be able to select their best statements from a list and access a summary of that list at the end. As it stands, users get instant feedback about their answers and are expected to only select the right answers... Thank you.
BV52
Fri, 08/04/2017 - 07:50
Permalink
Free answer summary
Hi ssebastien,
This is a good suggestion and I would suggest that you head over to the Feature Request page for better visibility.
-BV52
lvonline
Mon, 10/23/2017 - 18:14
Permalink
I don't want a summary in my video
I was wondering if there is a way to remove the summary option from an interactive video, I don't really need it.
BV52
Tue, 10/24/2017 - 07:55
Permalink
Welcome to H5P!
Hi Ivonline,
Welcome to H5P!
Currently this is not possible but please head over to the Feature Request forum to post your suggestion/request.
-BV52
DOwen
Fri, 09/14/2018 - 22:11
Permalink
Turn off Scoring
How can I remove the answer wrong and answer right counter? Or at lease remove answers wrong? Thanks
BV52
Mon, 09/17/2018 - 08:26
Permalink
Hi DOwen,I'm afraid this is
Hi DOwen,
I'm afraid this is not possible not unless you make changes to the code.
-BV52
guillaumeb
Wed, 11/21/2018 - 05:00
Permalink
Adding audio as a statement option
I don't think it is possible to add audio to the statements. I would be a great addition I think so that students could see how paraphrasing and recap is done. Any idea if this is going to be implementable ?
More generally adding audio as a possible answer to Multiple and single choice questions would be really nice. Is it being talked about?
BV52
Wed, 11/21/2018 - 09:27
Permalink
Hi guillaumeb,These are great
Hi guillaumeb,
These are great suggestions. Would you mind posting this in the Feature Request forum? In order for your feature request to attract as much interest as possible make sure it follows the below guidelines:
It is clear from every perspective how the feature will work. We recommend describing the feature with one or more user stories, for instance “As an author I want it to be possible to pick between different effects for the check answer animation so that the learners will see a variety of effects and also I can adapt the effects to my target audience(I’ll be using pink unicorns which works really well for both my target audience which are 4 year old girls and venture capitalists)”
If the feature can be illustrated with images or videos it always helps
Make it clear what content types this is relevant for, and or if this is a new content type
Make sure you post the feature in the Feature Request forum.
-BV52
leonbrightideas
Sun, 06/30/2019 - 08:38
Permalink
summary
how do we pause the video automatically at the summary point.. Or does it only pause if you click the button.?
BV52
Mon, 07/01/2019 - 06:17
Permalink
Hi leonbrightideas,It really
Hi leonbrightideas,
It really doesn't pause automatically however you can post this as a request in the Feature Request forum. In order for your feature request to attract as much interest as possible make sure it follows the below guidelines:
It is clear from every perspective how the feature will work. We recommend describing the feature with one or more user stories, for instance “As an author I want it to be possible to pick between different effects for the check answer animation so that the learner will see a variety of effects and also I can adapt the effects to my target audience(I’ll be using pink unicorns which works really well for both my target audience which are 4 year old girls and venture capitalists)”
If the feature can be illustrated with images or videos it always helps
Make it clear what content types this is relevant for, and or if this is a new content type
Make sure you post the feature in the Feature Request forum.
-BV52
kristina123smith
Sat, 12/12/2020 - 12:25
Permalink
how to mix up statements?
I tried this out in Moodle, in the course where I want to send students. The first answer in the list of choices is the correct one, in other words the choices in the Moodle page appear in the same order as I typed them. How can I mix up the order for the end user?
BV52
Mon, 12/14/2020 - 17:44
Permalink
Hi Kristina,By design Summary
Hi Kristina,
By design Summary randomizes the answers. Would you mind posting your question in the forums and attaching a sample content.
-BV
examsextra
Tue, 03/01/2022 - 14:57
Permalink
Hello H5P fans,I'm writing in
Hello H5P fans,
I'm writing in the hope that someone would be able to identify where I'm going wrong when adding html tags to a text box in Summary. I've managed to add html widgets to other content types, but I'm running into a brick wall with this one! I've been using Oliver's fantastic video (https://www.youtube.com/watch?v=UIGMqj_yN4A&lc=UgxQMs4GisgJ7N-T2ZN4AaABA...) as well as the H5P documentation, but clearly there is an error somewhere in the semantics.json file. Since I'm not a coder, I'm kind of going round in circles! At this point, I'm guessing it's just a small issue with a misplaced comma or something.
When you look at the Summary editor you can see that the 'Introduction text' box has html, as well as the 'Tip' box, but what I'm trying to achieve is the same with the 'Statement' text boxes, as currently there is only the option for aligning text. It does seem strange that the tips boxes would have these but not the main content boxes. Would anyone happen to have any suggestions as to what I can do to add them? It doesn't seem possible to upload screenshots of the code, or the semantics.json file itself, in this particular section of the forums, otherwise I would do!
Thank you very much!
Paul
alanguagestory
Wed, 10/25/2023 - 06:47
Permalink
Reset option for summaries
Hi. Is there a way for users to retry the summaries activity? At the moment they can only do it once and when they login next time the answers are set there. Is it possible to allow it to reset?
BV52
Wed, 10/25/2023 - 19:20
Permalink
Hi alanguagestory,Resetting
Hi alanguagestory,
Resetting/retrying the summary is not possible not unless you disable the "save content state" or "content resume".
-BV
cathyroy74
Tue, 02/25/2025 - 01:21
Permalink
ARgh
I wish the summary question could either be removed or permitted to be any question type. My video explains some complex content, and the last interaction is a sorting activity with images where they need to demonstrate their understanding by classifying into the correct field. But then it forces me to add a summary which is redundant (the question form is much LESS useful to actually sum up the activity than what is already created...)
BV52
Tue, 02/25/2025 - 17:57
Permalink
Hi cathyroy74,In creating an
Hi cathyroy74,
In creating an Interactive Video you can save the content even if you skip or don't put anything in the "Summary Task". Additionally, if you want to remove a summary task you can click on the "X" for "Set of Statements" then save the content.
P.S. If you have other questions it is best to post them in forums: https://h5p.org/forum. It have more traffic so answers can come earlier. Not only that it has more features such as uploading files for screenshots, sample H5Ps etc.
-BV
fionadixon
Mon, 05/12/2025 - 12:46
Permalink
Removing the blue speech bubble
Hi! Is it possiblee to remove the blue speech bubble that says 'Blueberries are used in blueberry jam' which appears when you embed a published quiz? I can't see how to do this, and it doesn't make sense for the quiz I've created. Thank you.