Drag the Words Tutorial
Drag the Words question type allowing creatives to create text-based challenges where users are to drag words into blanks in sentences. Excellent for language training among other things.
In this tutorial you will learn:
- When to use Drag the Words
- How to create a Drag the Words
Click the "Get started" button to explore all of the possible ways to use H5P!
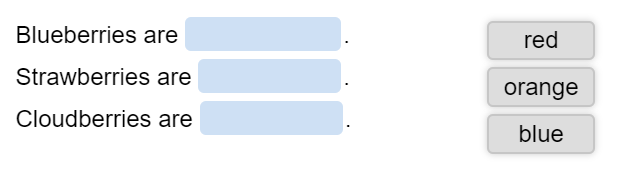
Example
Here's the Drag the Words we'll create in this tutorial:
When to use Drag the Words
Drag the Words allows content designers to create textual expressions with missing pieces of text. The end-user drags a missing piece of text to its correct place, to form a complete expression.
May be used to check if the user remembers a text she has read, or if she understands something. Helps the user think through a text.
Step 1: Topic
Let's say you want to ask a question:
What are the colors of these berries when they are ripe?
Blueberries are _______________
Strawberries are _______________
Cloudberries are _______________
And suggest colors: blue, red and orange.
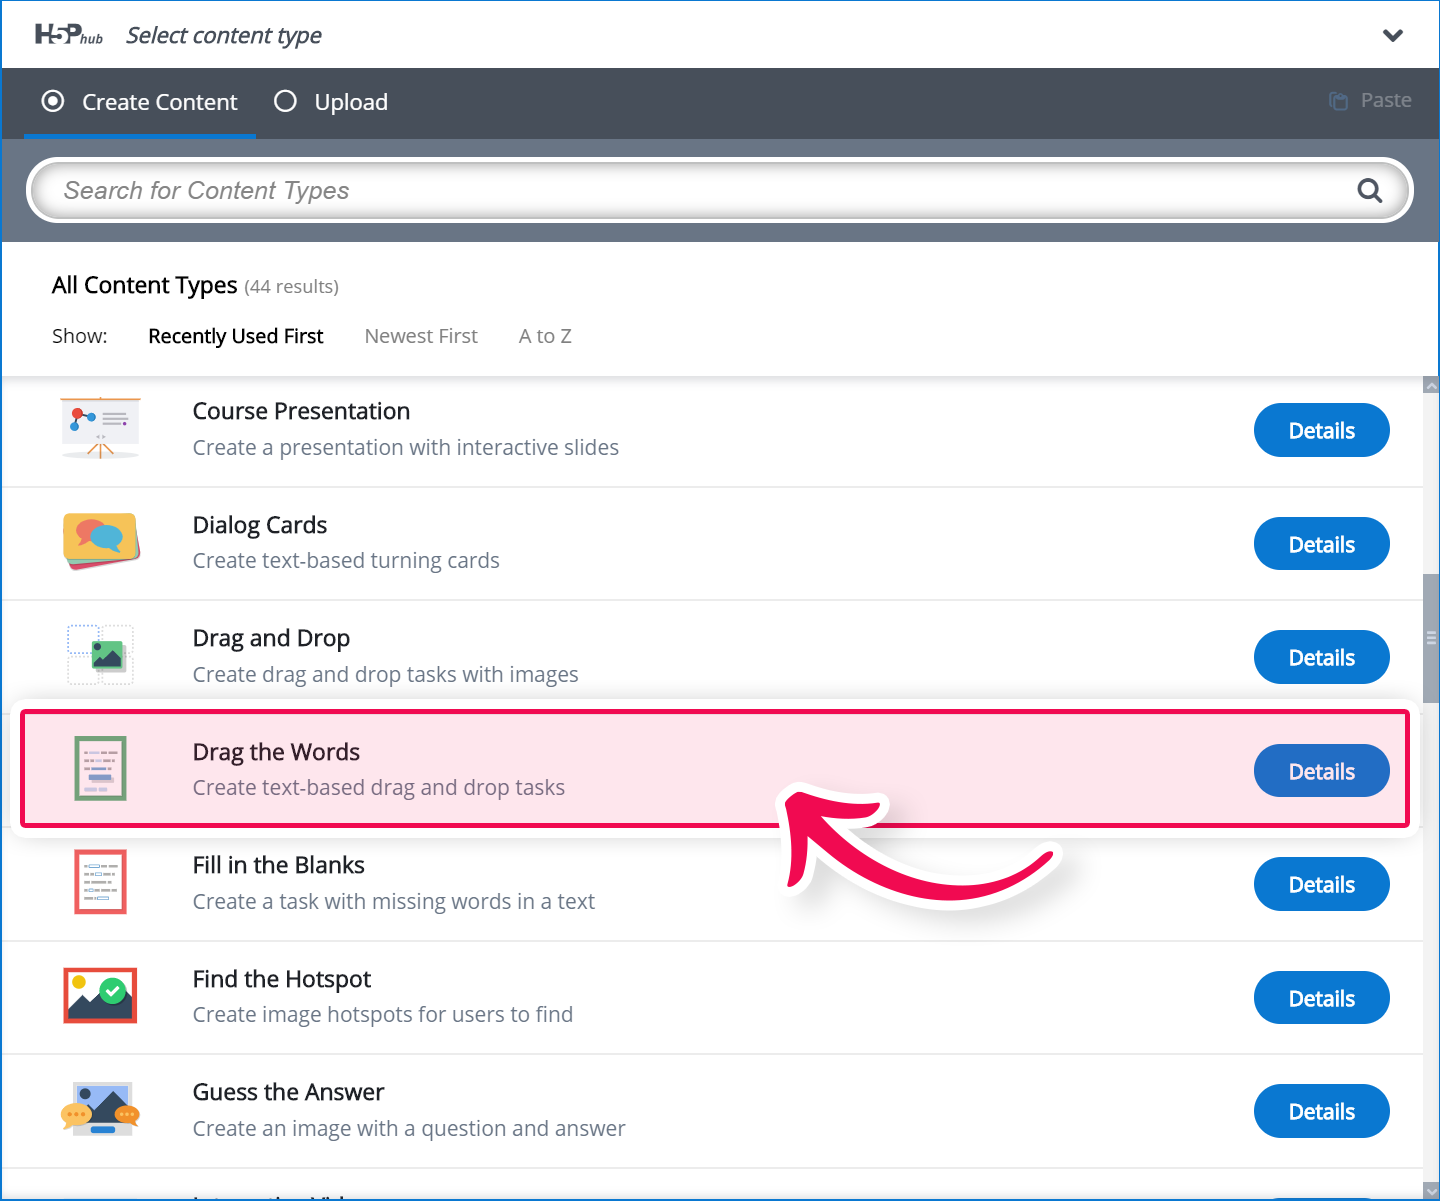
Step 2: Create Drag the Words
Select the New content option and choose Drag the Words from the list of Content types:
Step 3: Drag the Words editor
The Drag the words editor should now appear. The top part of the editor looks like this:
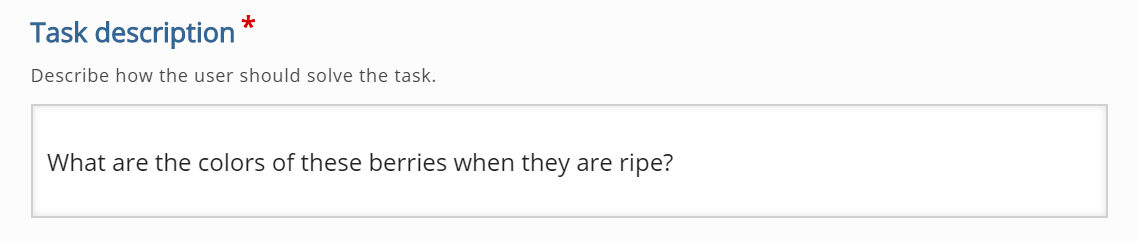
Step 4: Title and Task description
The Task description should give the learner a short introduction or some instructions. A default Introduction text, which works fine in most cases, is suggested: "Drag the words into the correct boxes". However, you may modify it. In this example, we will type in the text: "What are the colors of these berries when they are ripe?"
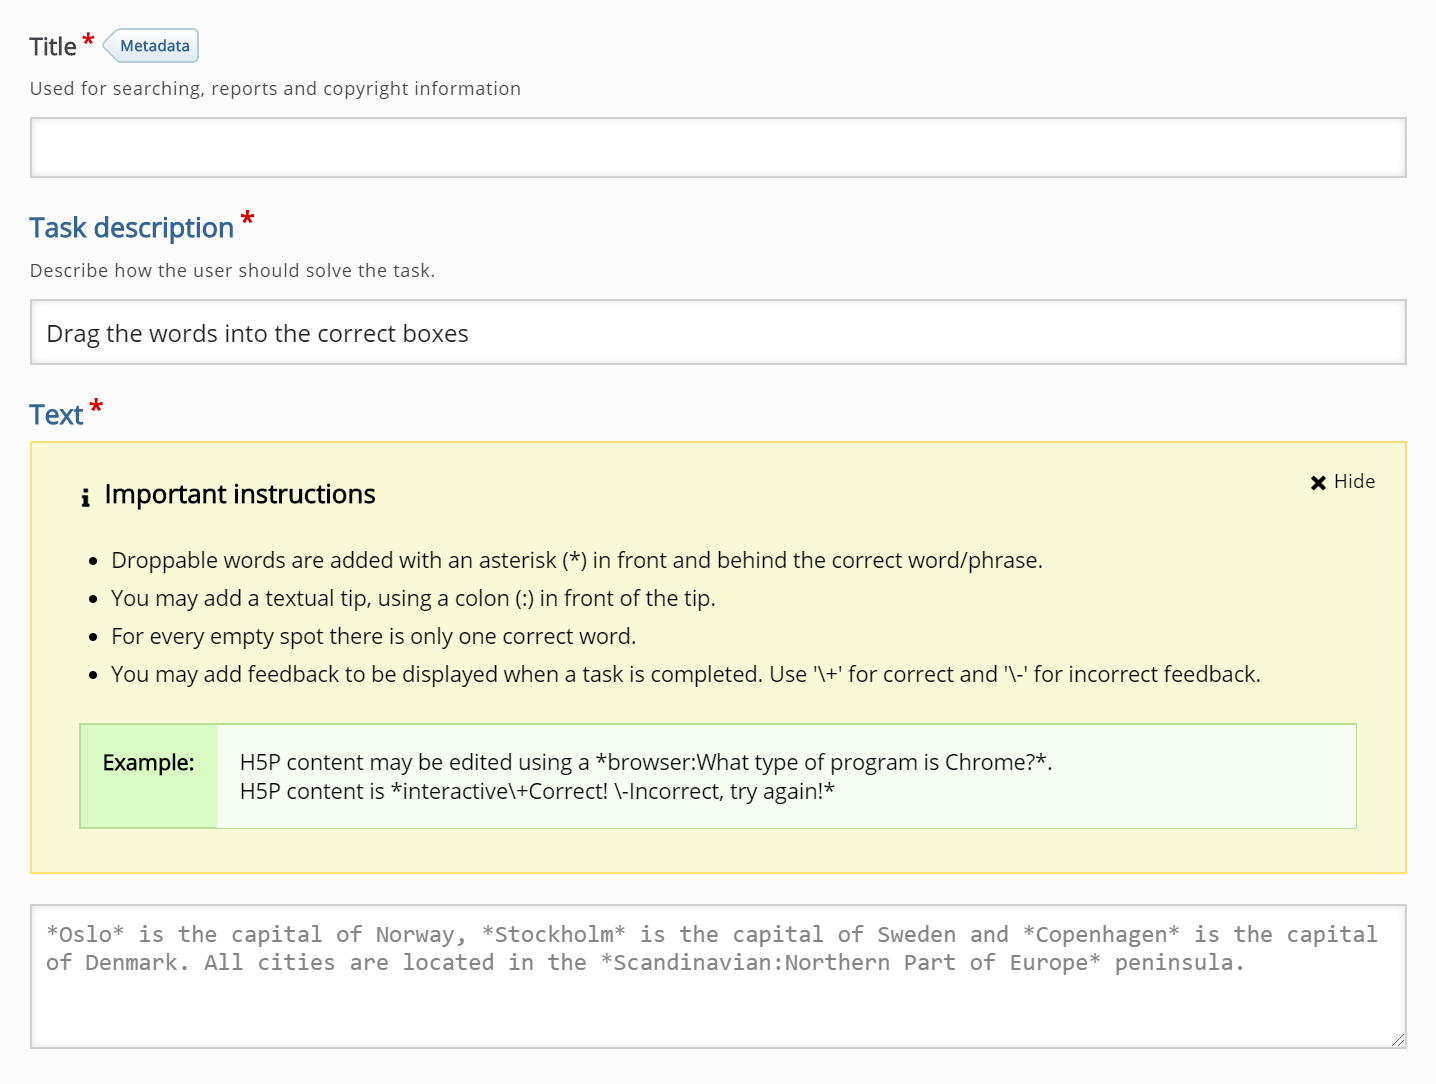
Step 5: Add an exercise
The Text field is where you will type your exercise. Type in the following text:
Blueberries are *blue*.
Strawberries are *red*.
Cloudberries are *orange*.

Add (*) character in front and behind all the words/phrases that you want to display as droppables. For the learner, the word/phrase between (*) characters will appear as a blank inside the text and as a droppable item next to the text. Like shown here:
Step 6: Adding tips
Optionally, you can provide a tip for each word/phrase to help the learner find the correct answer or to provide some additional information about the word/phrase. Let's add some tip for the word "blue". A tip is defined by adding :tip_text next to the word.
So type in :Check the name of the berry! next to the word blue, as shown here:

For the learner, the tip will appear like shown here: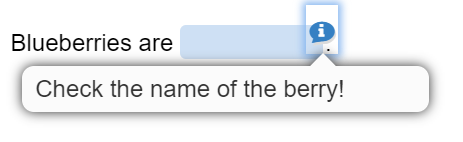
Step 7: Adding feedback
Optionally, you can add correct feedback and incorrect feedback for each word/phrase. This feedback will show below the exercise once the student click "Check".
Feedback is defined by typing \+correct_feedback and \-incorrect_feedback next to the word.
Step 8: Instructions
If you need a reminder of how tips and feedback are defined you can click on "Show information" button, which is placed next to the Text label:![]()
The box with instructions will appear: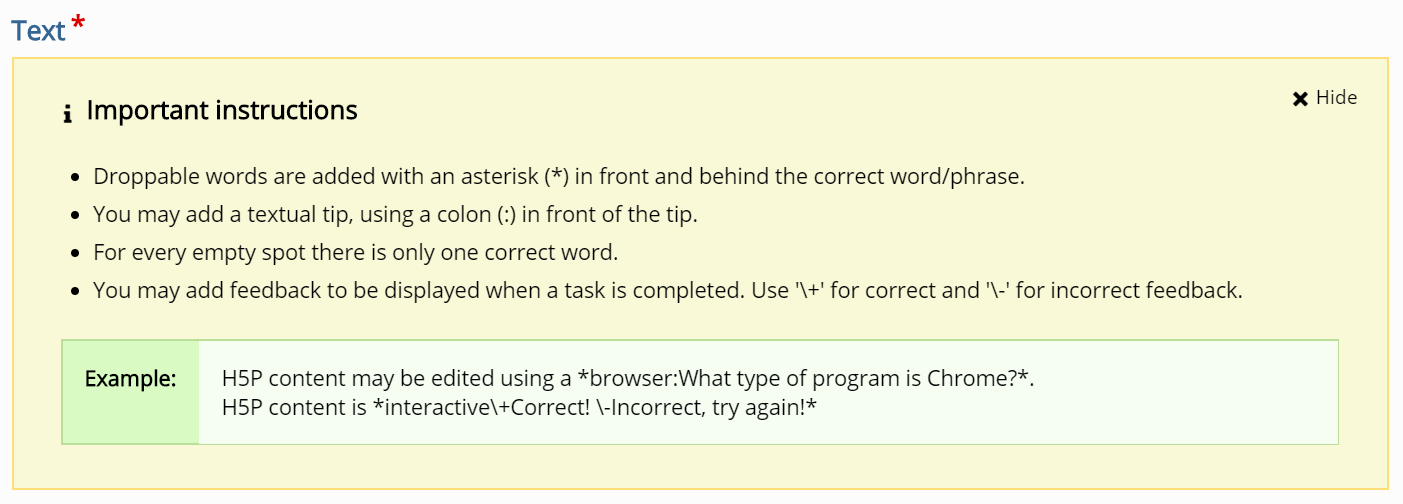
Step 9: Finishing up
Press Save when you are done!
You should now have the same result as this example.
Feel free to leave any comments or suggestions on how to improve this tutorial.
Comments
chilijoe
Sun, 04/10/2016 - 11:51
Permalink
Escape character
Is there a way to escape the colon that is used for denoting the tip text? I want to include a colon in the word to be dragged.
falcon
Tue, 04/12/2016 - 08:53
Permalink
I'm afraid that currently isn
TanyaMeyer
Tue, 05/30/2017 - 09:02
Permalink
Full screen on Drop the Words
Hi, is it possible to enable full screen with this content type?
tomaj
Tue, 05/30/2017 - 09:22
Permalink
Sorry no
No, this content type does not support full screen.
- Tom
pauline.barker@...
Wed, 06/07/2017 - 23:22
Permalink
Testing Comments
Testing Comments
pauline.barker@...
Wed, 06/07/2017 - 23:24
Permalink
Video
Drag and drop video
charlescorn
Mon, 08/21/2017 - 11:48
Permalink
Changing the location of the words to be dragged
Great activity. I do have one issue though:
By default, the words appear on the right hand side of the screen. When I change my browser width, the words will eventually appear under the text, which I think looks better and also makes it easier to drag and drop the words into the text. Is there a way of forcing the words to appear under the text? I realise that there isn't in the settings when you create the activity, but is there a workaround, i.e. a way of forcing the activity to appear in a reduced width so that the words appear under the text - perhaps the iFrame embed code is the way to do this, but what would the width need to be set at? Or possibly by creating columns in the web page (I'm using WordPress).
Certainly being able to choose where the words appeared in the activity would be a useful feature.
tim
Tue, 08/22/2017 - 09:22
Permalink
That's a great idea. Perhaps
That's a great idea. Perhaps you could make a suggestion in the feature request forum and it will be considered there :)
Annabelnl
Thu, 09/28/2017 - 11:42
Permalink
I totally agree. It's
I totally agree. It's difficult to see the words to drag (right below) if the text is a big long. It's not convenient for the student. It would be much beter to be able to choose the place to display the words.
Pammellam
Wed, 10/11/2017 - 07:58
Permalink
Can’t update or edit an exercise
I have made several Drag Text exercises and I have noticed that once I click the CREATE button I can NOT edit a mistake.
I sometimes find a typo or I want to change a word or two. I click EDIT and make the correction. But when I click UPDATE and look at the exercise, the corrections are not there. Opening the exercIse again, I always find my corrections are GONE. I can continue making corrections any number of times and the corrections will never be implemented. I have found that the only way to make corrections is to delete the exercise and start all over again.
This has happened every time I try to make a correction.
BV52
Thu, 10/12/2017 - 05:15
Permalink
Hi Pammellam,In order give
Hi Pammellam,
In order give your bug report the best chance of getting answered, please include the following information:
The more information you provide, the quicker the community will be able to fix it and the quicker you'll have a working solution!
-BV52
Pammellam
Mon, 10/16/2017 - 11:02
Permalink
Drag and Drop not updating correctly
I have asked my supervisor for the information you request.
I believe they are working in Wordpress, but I am not sure.
I am working in the H5P editing page on an iPad Pro, iOS 11
I use Safari.
I am not sure about #4 or #5, I will find out.
I believe it has never worked. I was lucky in the beginning as I found no errors. When I found a few typos or I had added the ‘*’ sign incorrectly and I made changes and pressed the update button, the exercise seemed to update, but when I check it, it is not updated. When I open it again, the text I added is gone and it’s back to its incorrect self.
BV52
Tue, 10/17/2017 - 12:50
Permalink
Hi Pammellam,Thank you for
Hi Pammellam,
Thank you for the addtional information. A ticket has been created and you can follow it here.
I suggest for the meantime use a Mac/PC until the issue fixed.
-BV52
Pammellam
Wed, 10/18/2017 - 07:45
Permalink
Thank you, appreciate it
Thank you, appreciate it.
pamela
tahnja
Thu, 11/02/2017 - 19:15
Permalink
placement of the drag/drop words
As someone wrote earlier in this thread, having the words in the lower right is not ideal placement. I would love the ability to select where on the screen to place the words.
Thank you!
Tahnja
BV52
Fri, 11/03/2017 - 09:52
Permalink
Hi Tahnja,That is the aim of
Hi Tahnja,
That is the aim of the bug report, to have an option where to place the draggables.
-BV52
tchallenger
Thu, 11/30/2017 - 03:03
Permalink
Is it possible to have distractors?
For example to have just one fill-in sentence with one correct answer defined
*dog* is a type of canine.
but with several incorrect draggables, such as "cat" "fish"
BV52
Thu, 11/30/2017 - 05:18
Permalink
Hi tchallenger,This is not
Hi tchallenger,
This is not possible as of the moment with this content type. But I think you are on to something, I suggest that you head over to the Feature Request forum and post your suggestion there.
-BV52
dalza
Fri, 04/27/2018 - 23:33
Permalink
can't drag word into answer field that is not on screen
Hi,
First off, thanks for developing these very useful modules and the plugin for Wordpress.
I am a real beginner when it comes to building webpages, so I apologize in advance if I'm not able to clearly describe my problem.
I am using Wordpress along with the H5P plugin. I created a new "drag the words" exercise using the H5P plugin. I then created a new page on my website and used the "add HP5" button to insert the "drag the words" activity that I just created into the page. So far, so good.
However, when I view the page on my laptop I cannot see the entire activity and the words to drag on the screen. When I take a word from the bottom and drag it towards the top of the page, in order to put it into the first answer field in the activity, the dragged word just stops at the top of the screen, so it is impossible for me to put the word into the correct answer field. I have the same problem, only worse do to less "real estate" on my mobile phone (Samsung Android).
I am wondering how to solve this issue. Is there any way to make the page scroll up when the dragged word reaches the upper limits of the page? Thanks in advance for any help
1) This is the most I can see on a one page view at 100%
2) This is what I don't see on a one page view at 100%
BV52
Mon, 04/30/2018 - 06:02
Permalink
Hi dalza,THank you for the
Hi dalza,
THank you for the well written report. I have filed a bug report regarding this and you can follow the progress here.
-BV52
dalza
Mon, 04/30/2018 - 11:07
Permalink
thank you
Hi BV52,
Thank you for filing the bug report. I imagine I'm not the only one experiencing this problem. The "drag the word" module is really great. I'd love for my students to be able to use it comfortably on their mobile phones.
All the best,
dalza
ericupsidebrown
Fri, 09/25/2020 - 20:41
Permalink
Same issue
I'm having the same issue. I'm on an Android phone. The words are at the bottom of the element and I cannot drag them up to the non-visible area on the screen where they belong. With so many people accessing on mobile, it would be great to get this issue resolved.
Pammellam
Wed, 05/23/2018 - 00:23
Permalink
Extra “wrong” words
I believe this has been requested before, but it would be great if it were possible to have extra words in the list of words to be dragged. Wrong words. Then the student would have to choose only the ”right” words to drag to their positions. This would be wonderful for a language course where there are subtle differences in a noun or verb’s usage that needs to be tested or practiced.
For example: Hindi has male and female nouns that change the adjective‘s ending when used in a sentence. Also, when you address a sentence/question to a man or a woman, you have to use the proper verb ending, male ending to a man, female ending to a woman.... things like that.... that need to be practiced.
BV52
Wed, 05/23/2018 - 04:03
Permalink
Hi Pammellam,This is a great
Hi Pammellam,
This is a great idea. Please head over to the Feature Request forum and post your suggestion there. In order for your feature request to attract as much interest as possible make sure it follows the below guidelines:
It is clear from every perspective how the feature will work. We recommend describing the feature with one or more user stories, for instance “As an author I want it to be possible to pick between different effects for the check answer animation so that the learners will see a variety of effects and also I can adapt the effects to my target audience(I’ll be using pink unicorns which works really well for both my target audience which are 4 year old girls and venture capitalists)”
If the feature can be illustrated with images or videos it always helps
Make it clear what content types this is relevant for, and or if this is a new content type.
-BV52
ltgseb
Thu, 06/21/2018 - 07:37
Permalink
One placeholder, multiple choices
What if you want just one drag & drop target, and three possible choices to drag in (one of them being the correct choice)? How do you build that?
BV52
Fri, 06/22/2018 - 04:43
Permalink
Hi Itgseb,Drag and Drop
Hi Itgseb,
Drag and Drop should be able to handle this. You just need to set the draggables to be dropped in the drop zone but just one answer correct.
The request of Pammellam once created should also take care of this.
-BV52
Trendance
Fri, 10/26/2018 - 08:37
Permalink
Issue
Hello! First, thank you for this amazing tool that is so user-friendly.
I am facing an issue though. I have a long text and all the draggable boxes are in the top-right corner. Since the text is quite long, I can't drag the options and scroll down at the same time. Would there be a solution, please?
BV52
Mon, 10/29/2018 - 00:01
Permalink
Hi Trendance,Thank you for
Hi Trendance,
Thank you for the kind words.
I have created a bug report regarding this and you can follow the progress here.
-BV52
nimfa
Wed, 12/05/2018 - 03:32
Permalink
Using asterisk in my words
Hi I tried using this Drag Words feature in my programming class to sequence JAVA codes, however I had problems in setting up the words/codes that contain asteriks. Is there a solution for this? Thanks!
BV52
Wed, 12/05/2018 - 09:40
Permalink
Hi nimfa,This is not possible
Hi nimfa,
This is not possible as of the moment. Since the asterisk is used to indicate the answer there isn't a code in this content that lets us "escape" the asterisk. I would suggest though that you post a request in the Feature Request forum. In order for your feature request to attract as much interest as possible make sure it follows the below guidelines:
It is clear from every perspective how the feature will work. We recommend describing the feature with one or more user stories, for instance “As an author I want it to be possible to pick between different effects for the check answer animation so that the learners will see a variety of effects and also I can adapt the effects to my target audience(I’ll be using pink unicorns which works really well for both my target audience which are 4 year old girls and venture capitalists)”
If the feature can be illustrated with images or videos it always helps
Make it clear what content types this is relevant for, and or if this is a new content type
Make sure you post the feature in the Feature Request forum.
foramparkh
Tue, 01/29/2019 - 18:52
Permalink
Drag and drop sentence
Hello,
Is there any possibility , can we drag whole sentence as an answer it seems only allowed words?
foramparkh
Tue, 01/29/2019 - 18:55
Permalink
Drag and drop sentence
Is that possible to drag and drop whole sentence as an answer?
BV52
Wed, 01/30/2019 - 07:44
Permalink
Hi foramparkh,I'm afraid this
Hi foramparkh,
I'm afraid this is not possible since Drag the Words is designed to drag single words.
-BV52
Pammellam
Thu, 01/31/2019 - 03:28
Permalink
Answer space cut off
As I have mentioned before, I am helping with writing exercises for a Hindi course using H5P. And I also study the course materials. So I see the material from two sides, as a writer/developer and as a student user, a beginning student of the lowest level.
This is what I have noticed for the DRAG THE WORDS exercise: you can sneak in a couple of extra words and we have been doing that. For example, the answer in Hindi letters and the answer in Roman letters in the same line. (Not all of the students want to use the Hindi letters so both have to be provided for those few students who want to do everything in Roman letters, the English alphabet.) This is fine while you’re doing the exercise. You can see all of the words and drag them to their appropriate spot.
But as a student of this material I have noticed one bad point. Once you drag the word/words to their spot, the little box ( I don’t know the computer term for the name of the little box) they are in gets truncated so all the words don’t show. There is just a certain set length, it seems. So part of the answer gets covered. And as I have mentioned before, as a beginning student, after doing the exercise I want to review the material and look at all my answers again, possibly reading the Roman and Hindi letters again. But if the number words is a little bit too long, the little box they are in gets cut off and I can’t see ALL the words making for a less than perfect review/study method. The only way I can see all of the words in a certain item is to pull it out and start from the beginning again. When I am unsure of the answer, I have to keep doing that again and again. Which is not a perfect study method if you ask me.
One thing that I think needs to be reviewed in general for all the exercises is the USER EXPERIENCE. The STUDENT EXPERIENCE from the point of vie of the student. There are indeed technical limitations that we would all have to live with. I believe more input about user experience with regard to exercises and the learning parameters in general needs to be constantly reviewed on all levels from the lowest beginner type level to the more advanced type level. As all students of different levels need to be satisfied with the material they see on the screen so that they are motivated to keep studying. Developers and programmers working on a certain type of exercise may create that exercise from their point of view, perhaps a high-level point of view whereas it really needs a lower level approach. I guess what I am saying is that developers and programmers are really smart people and perhaps cannot imagine what a low-level learner might need as far as an answer format… And I realize that improvement will come as more and more people use the material and give feedback!
I wanted to upload an example jpg of what I am talking about, but I can not seem to do that.....
BV52
Thu, 01/31/2019 - 08:04
Permalink
Hi Pammellam,As always a very
Hi Pammellam,
As always a very well explained observation and suggestion. I suggest that you post this as an official feature request in the Feature Request forum.
-BV52
winteclibrary
Wed, 07/03/2019 - 01:26
Permalink
Is there a way to make the
Is there a way to make the text italic or bold?
BV52
Wed, 07/03/2019 - 08:36
Permalink
Hi winteclibrary,I'm afraid
Hi winteclibrary,
I'm afraid this is not possible not unless you make changes to the code.
-BV52
bealmj
Tue, 10/01/2019 - 20:43
Permalink
add extra words
Is there a way to way to add extra words to make a legend?
BV52
Wed, 10/02/2019 - 19:24
Permalink
Hi bealmj,I'm not sure I
Hi bealmj,
I'm not sure I follow, can you please elaborate your question.
-BV52
bealmj
Thu, 10/03/2019 - 14:33
Permalink
hope to explain
Example questions
*Lansing* is the capital of Michigan. It is known for is .....
I want options to be Lansing, Detroit, Grand Rapids
I hope this helps.
BV52
Tue, 10/08/2019 - 19:47
Permalink
Hi bealmj,I'm afraid this is
Hi bealmj,
I'm afraid this is not possible not unless you make changes to the code.
-BV52
Miss Karlita
Fri, 03/13/2020 - 06:46
Permalink
Can I attach a picture?
I like to know if is it posibble to attach a picture in this avtivity?
BV52
Fri, 03/13/2020 - 17:31
Permalink
Hi Miss Karlita,I'm afraid
Hi Miss Karlita,
I'm afraid not unless there are changes to the code.
-BV
Michl68
Tue, 03/17/2020 - 11:38
Permalink
HI,In the "instructions"
HI,
In the "instructions" section I can#t get rid of the mentiin "What do you wand to do" and a blue box suggesting an email link.
Thanks for your help
What do you want to do ?New mailCopyBV52
Tue, 03/17/2020 - 18:13
Permalink
Hi Michl68,Would you mind
Hi Michl68,
Would you mind posting your question in the forums. This is so that you can attach a screenshot of what you are seeing.
-BV
ncglobal
Tue, 07/07/2020 - 16:27
Permalink
Is there any way to change
Is there any way to change the font size in the drag the words activity?
BV52
Tue, 07/07/2020 - 19:53
Permalink
Hi ncglobal,The easiest way
Hi ncglobal,
The easiest way is to use a PHP hook, to add your own CSS-file to the content type. Please visit the Visual Changes page for more details.
-BV
ncglobal
Thu, 07/09/2020 - 17:38
Permalink
Thanks, I've read the
Thanks, I've read the instructions - but I'm currently running on Moodlecloud - is there still a way to customize on that service?
BV52
Thu, 07/09/2020 - 19:09
Permalink
Hi ncglobal,Afaik this is not
Hi ncglobal,
Afaik this is not possible.
-BV
wrodgers
Thu, 07/09/2020 - 09:17
Permalink
Can I add
a picture or video to the page?
Pages