Course Presentation Tutorial
The Course presentation content type allows you to create a slide-based presentation of your learning material. Elements such as slide titles, links, pictures, audio and video clips, as well as various quiz types can be embedded seamlessly right into the presentation for a richer learning experience.
In this tutorial you will learn:
- When to use Course presentations
- How to create a Course presentation
Click the "Get started" button to explore all of the possible ways to use H5P!
Video tutorial
The following video shows what Course Presentations may be used for and how to make one:
Textual tutorial - example
Here's the Course presentation we'll create in this tutorial:
When to use Course presentations
Course presentation enables you to author and deliver your course material directly in your browser. Course presentations contain slides where you can add various multimedia- and interactive elements to engage the learner.
Course presentations are used when you want to package a piece of learning content in a structured and interactive format. Learners swipe through slides to experience the learning material while solving various quizzes or watching videos along the way.
Try Course presentations as an alternative to presenting your learning content as Powerpoint presentations, PDFs or text-based web pages. Course presentations are very flexible to use, as they are simple to create, publish and edit.
Step 1: Topic
We'll use the Wikipedia article about Cloudberries as background material for our Course presentation. We'll use a couple of pictures from Wikimedia Commons as well.
Let's create three slides, with a test at the end:
- Slide 1: Cloudberries
- Slide 2: Where to find them?
- Slide 3: Uses
- Summary
Step 2: Creating a Course presentation
Select the New content option and choose Course presentation from the list of Content types:
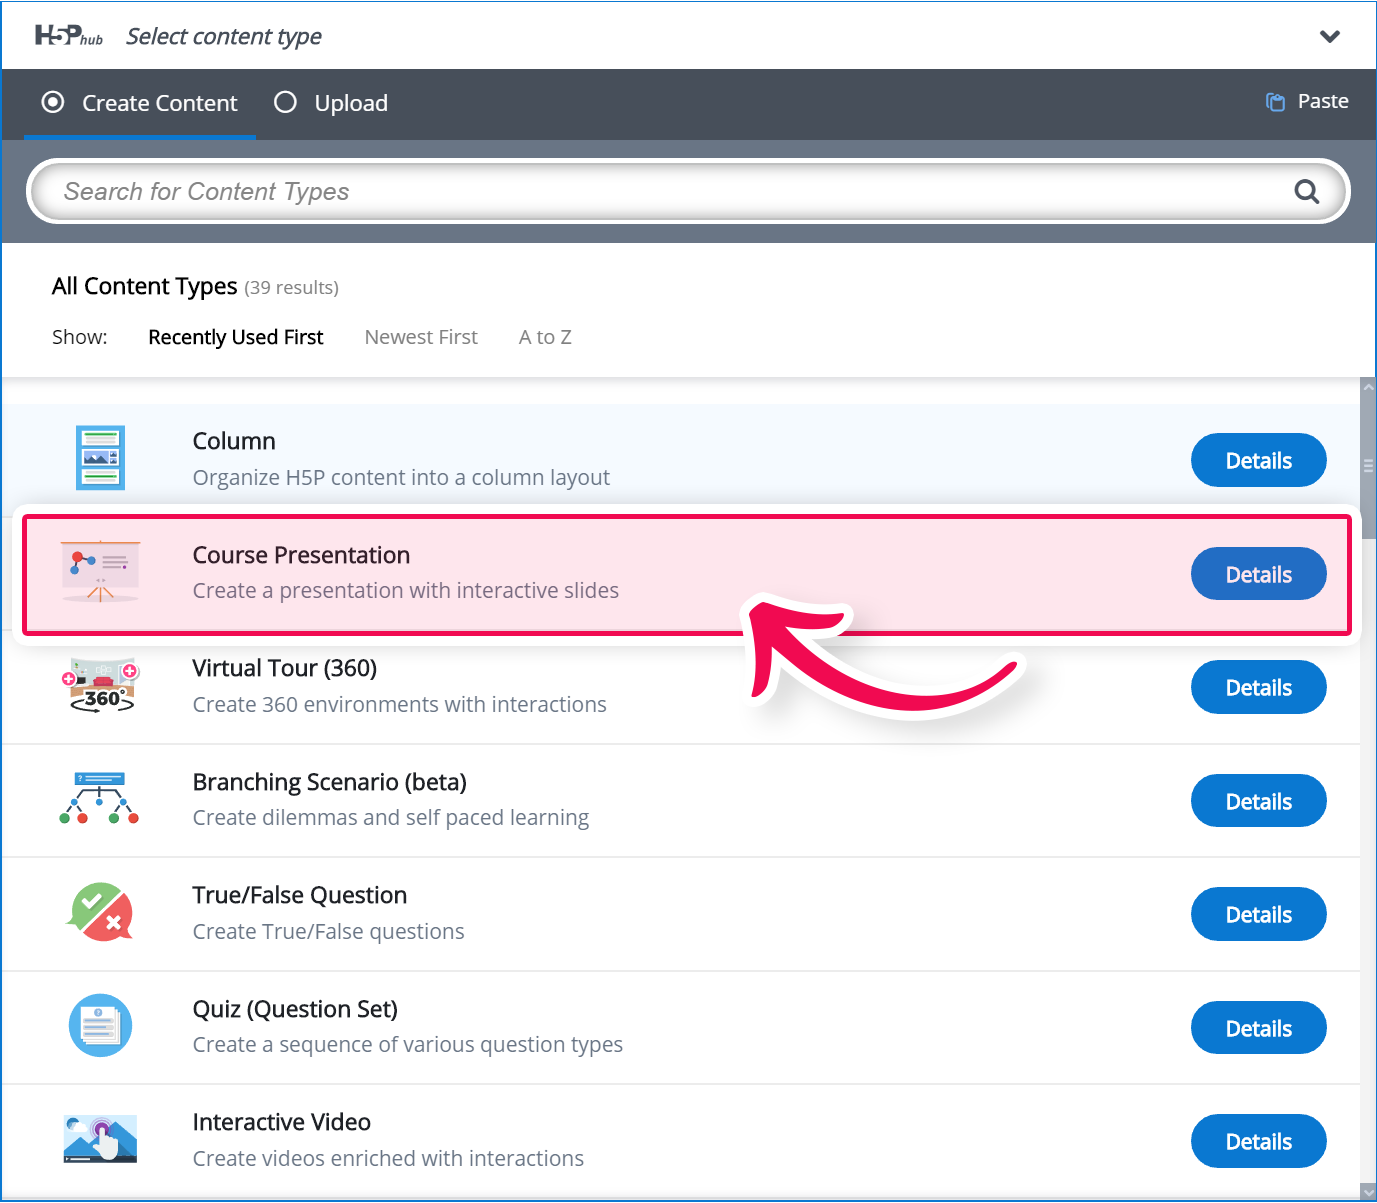
Step 3: Course presentation editor
The Course presentation editor should now appear. The top part of the editor looks like this: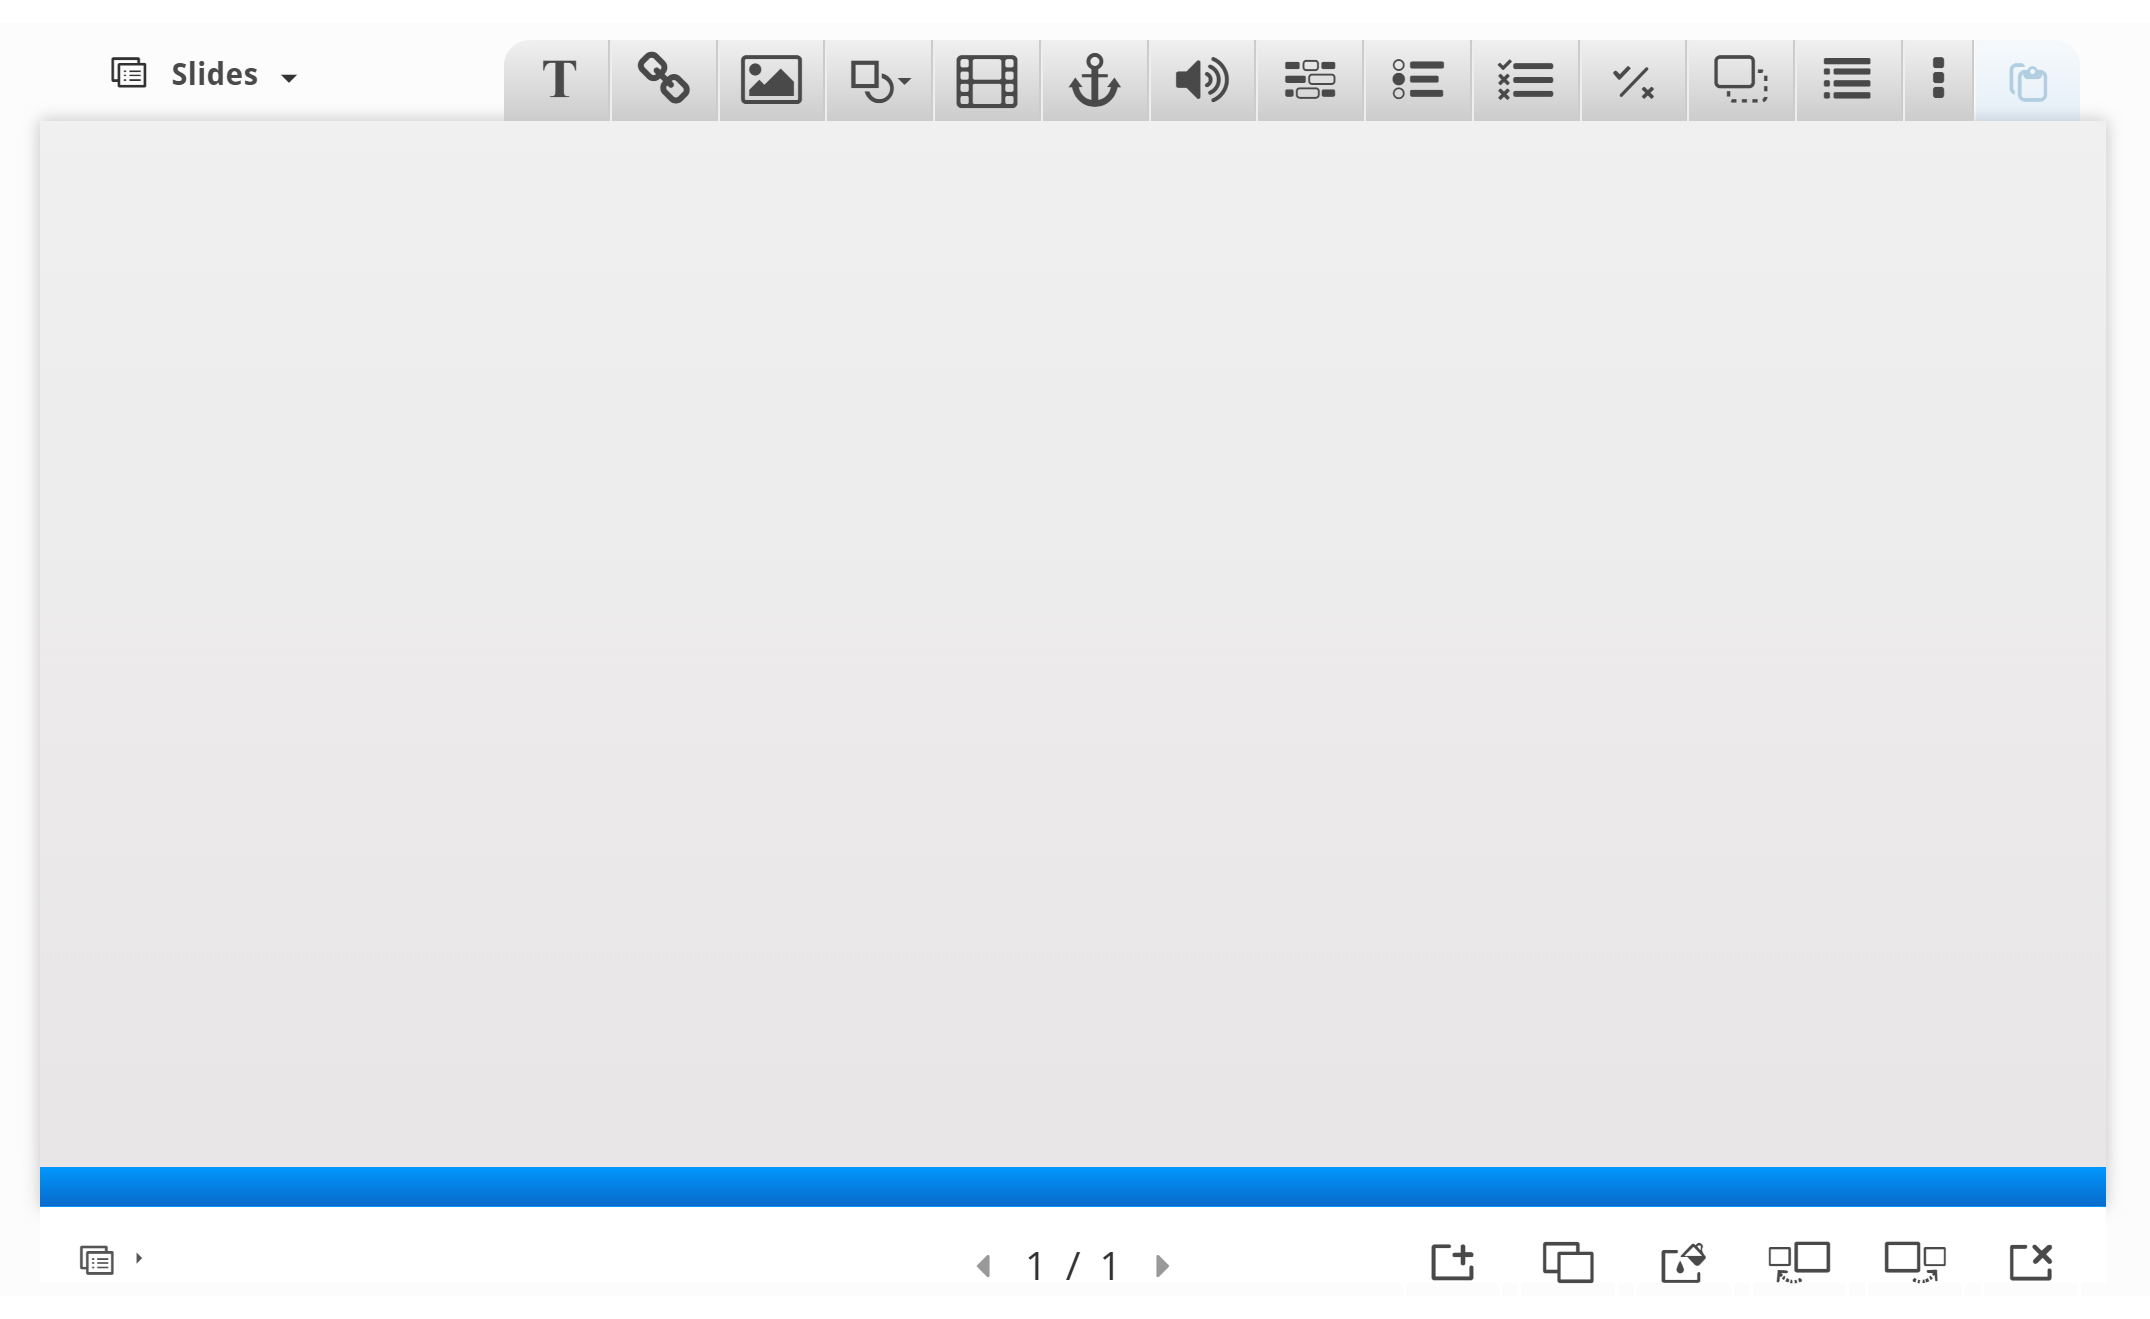
In this tutorial, we'll focus on creating the Course presentation content. The content creation happens in the top part of the editor, so we'll only focus on this for now.
The Course presentation editor is WYSIWYG. The end-user view of the Course presentation will look very similar to the editor's view.
Step 4: Slide 1
We'll start by adding a slide in the slides panel to the left. The slide titles can be used to navigate between the slides.
You can remove the slides panel entirely by pressing the Remove slides button. However, this action cannot be undone.
Press the  button to open the "Slides" menu.
Press the pen next to "No title" ![]() to add a slide title.
to add a slide title.
Use Cloudberries as the title. You should now have something like this:
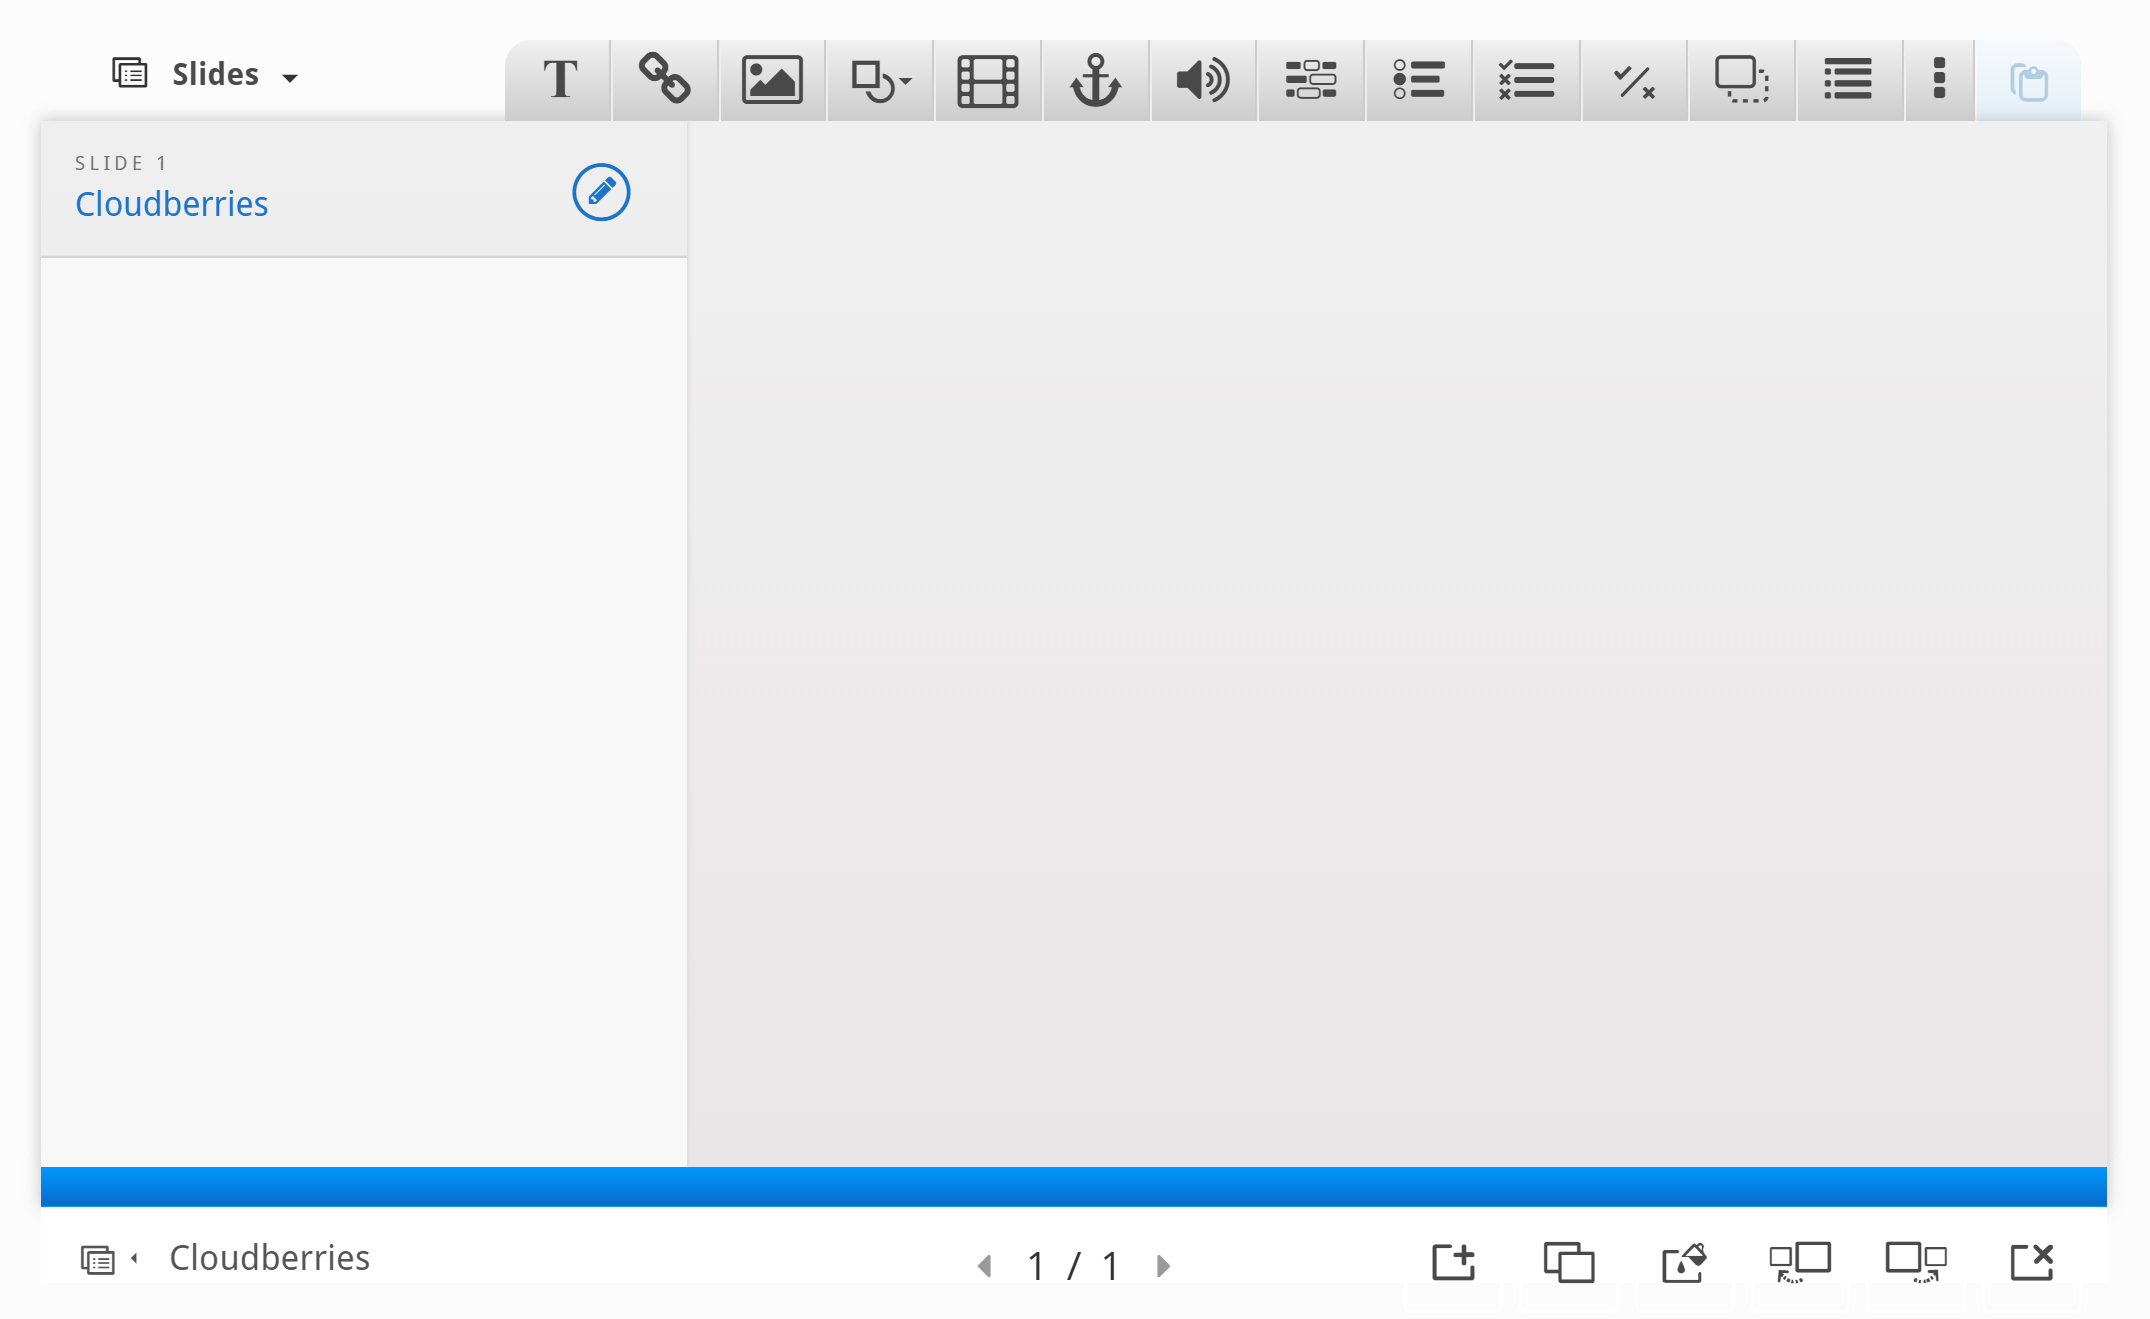
Now we can move on to adding some images.
We'll use these two images from Wikimedia:
Note the license information and URL and save the pictures to a local folder.
We add the pictures by using the ![]() button in the top toolbar. Press this button, drag it to where you want the image to be placed and drop it there. A dialog will automatically open:
button in the top toolbar. Press this button, drag it to where you want the image to be placed and drop it there. A dialog will automatically open:
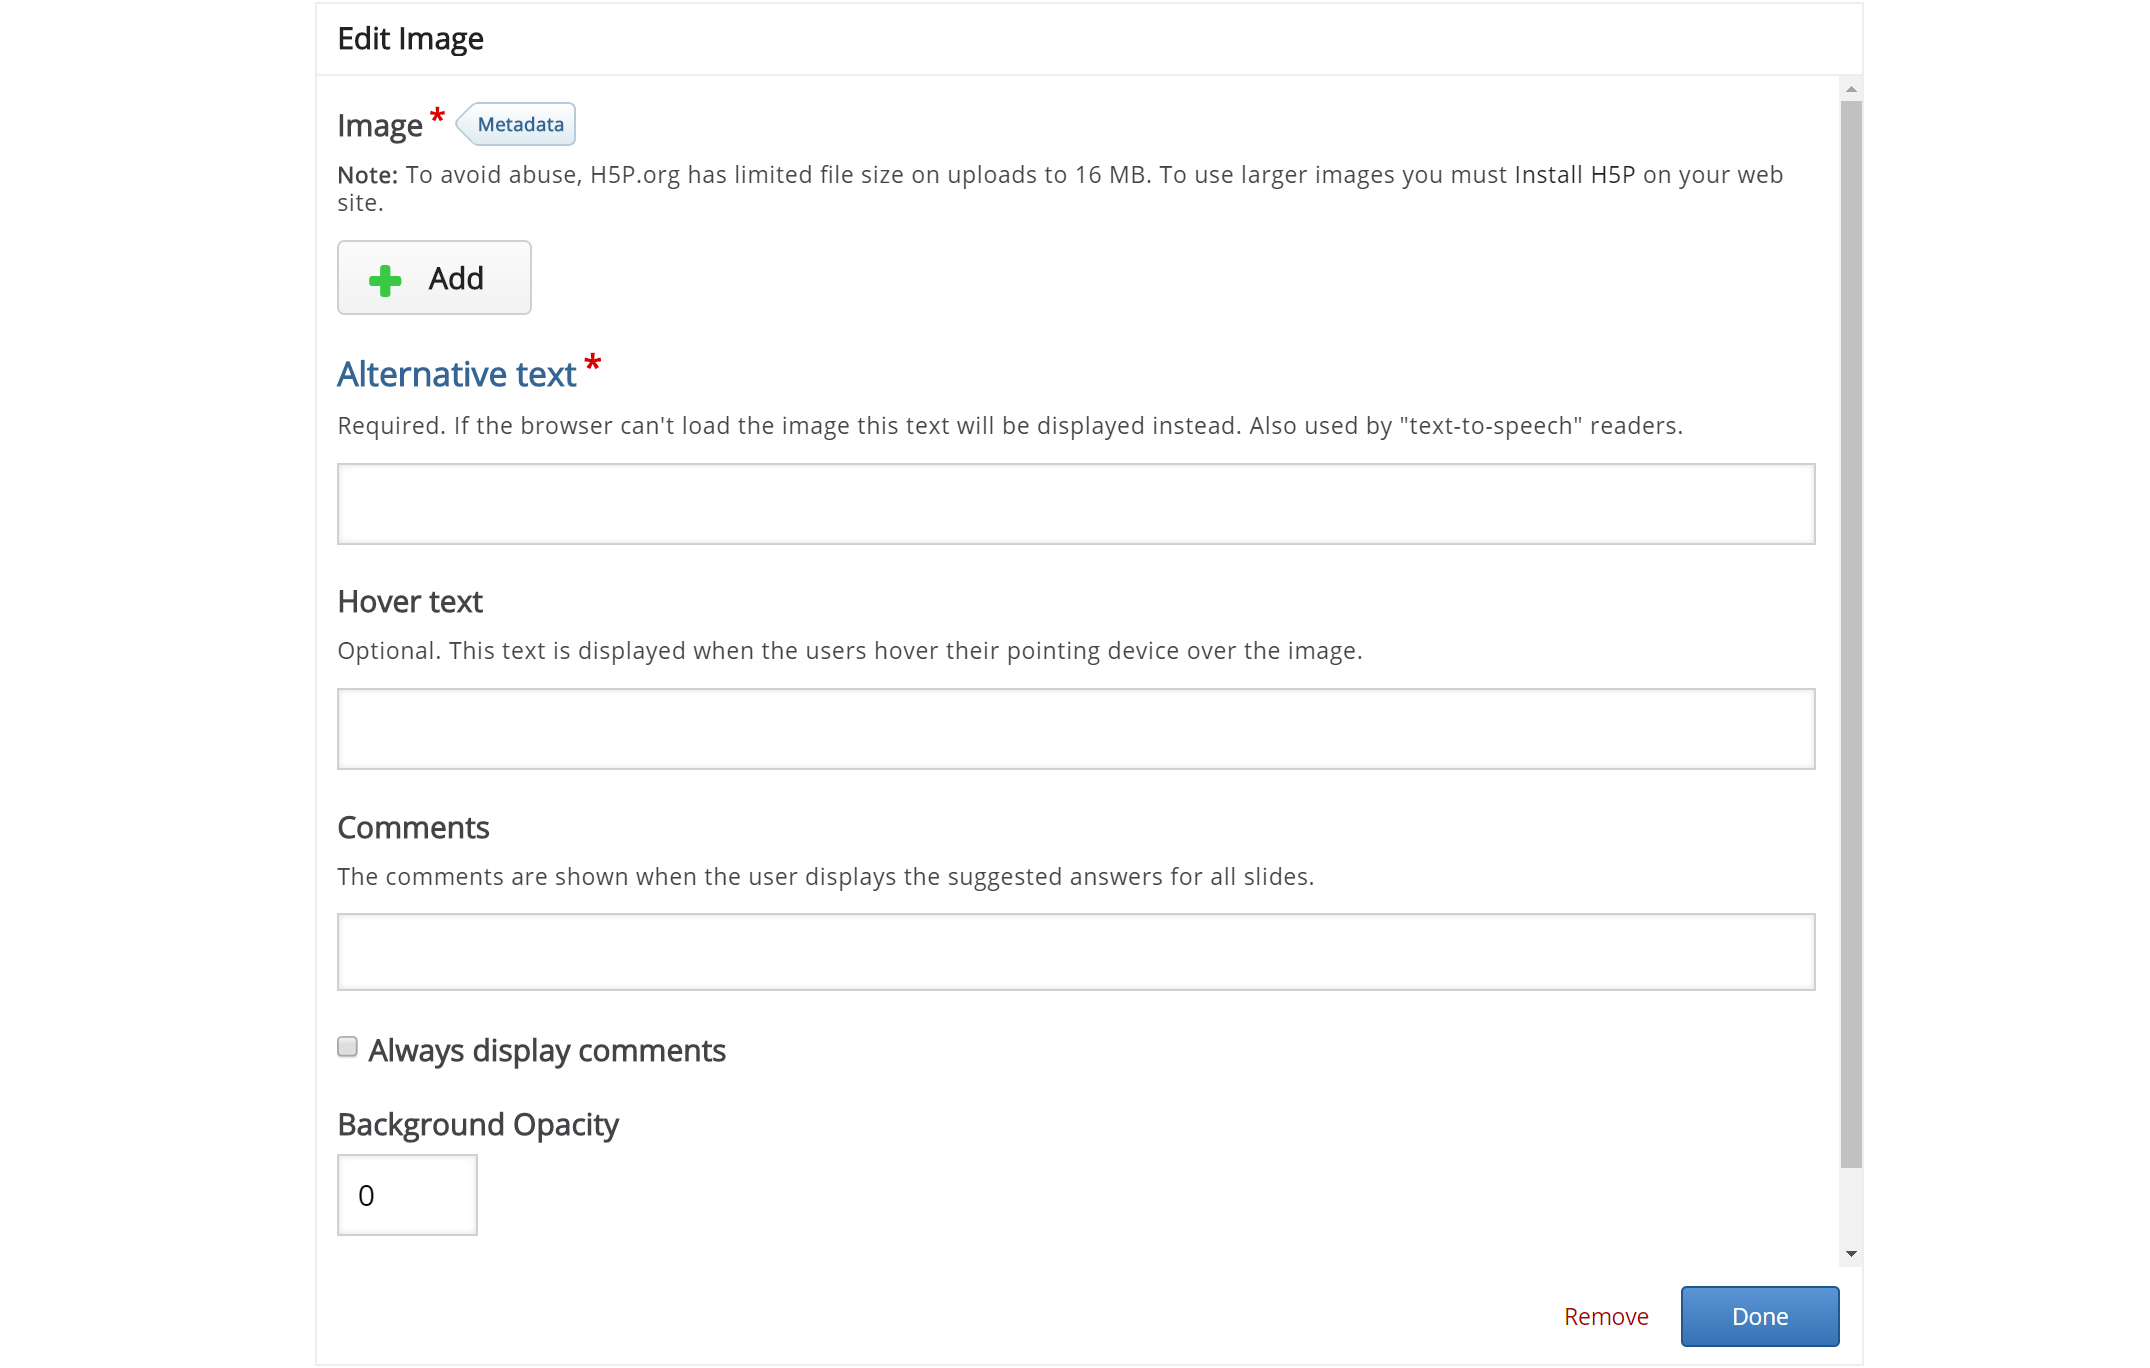
Press the  button, browse to where you saved the cloudberry flower picture and select it for upload.
We must also remember to add multimedia license information. Add the following information to the Metadata  dialog:

Finally, we have to add an Alternative text and a Hover text. The Alternative text is used to describe the image as an alternative to being displayed. The Hover text will show up on devices using a mouse when the cursor hovers over the image.
Alternative text: Picture of a Cloudberry flower
Hover text: Cloudberry flower
You should now have something like this:

Resize the picture by pulling in the lower right corner of the image. Make the image slightly smaller in size. You can move the picture by using drag and drop. Place it in the top left corner, so you get something like this:
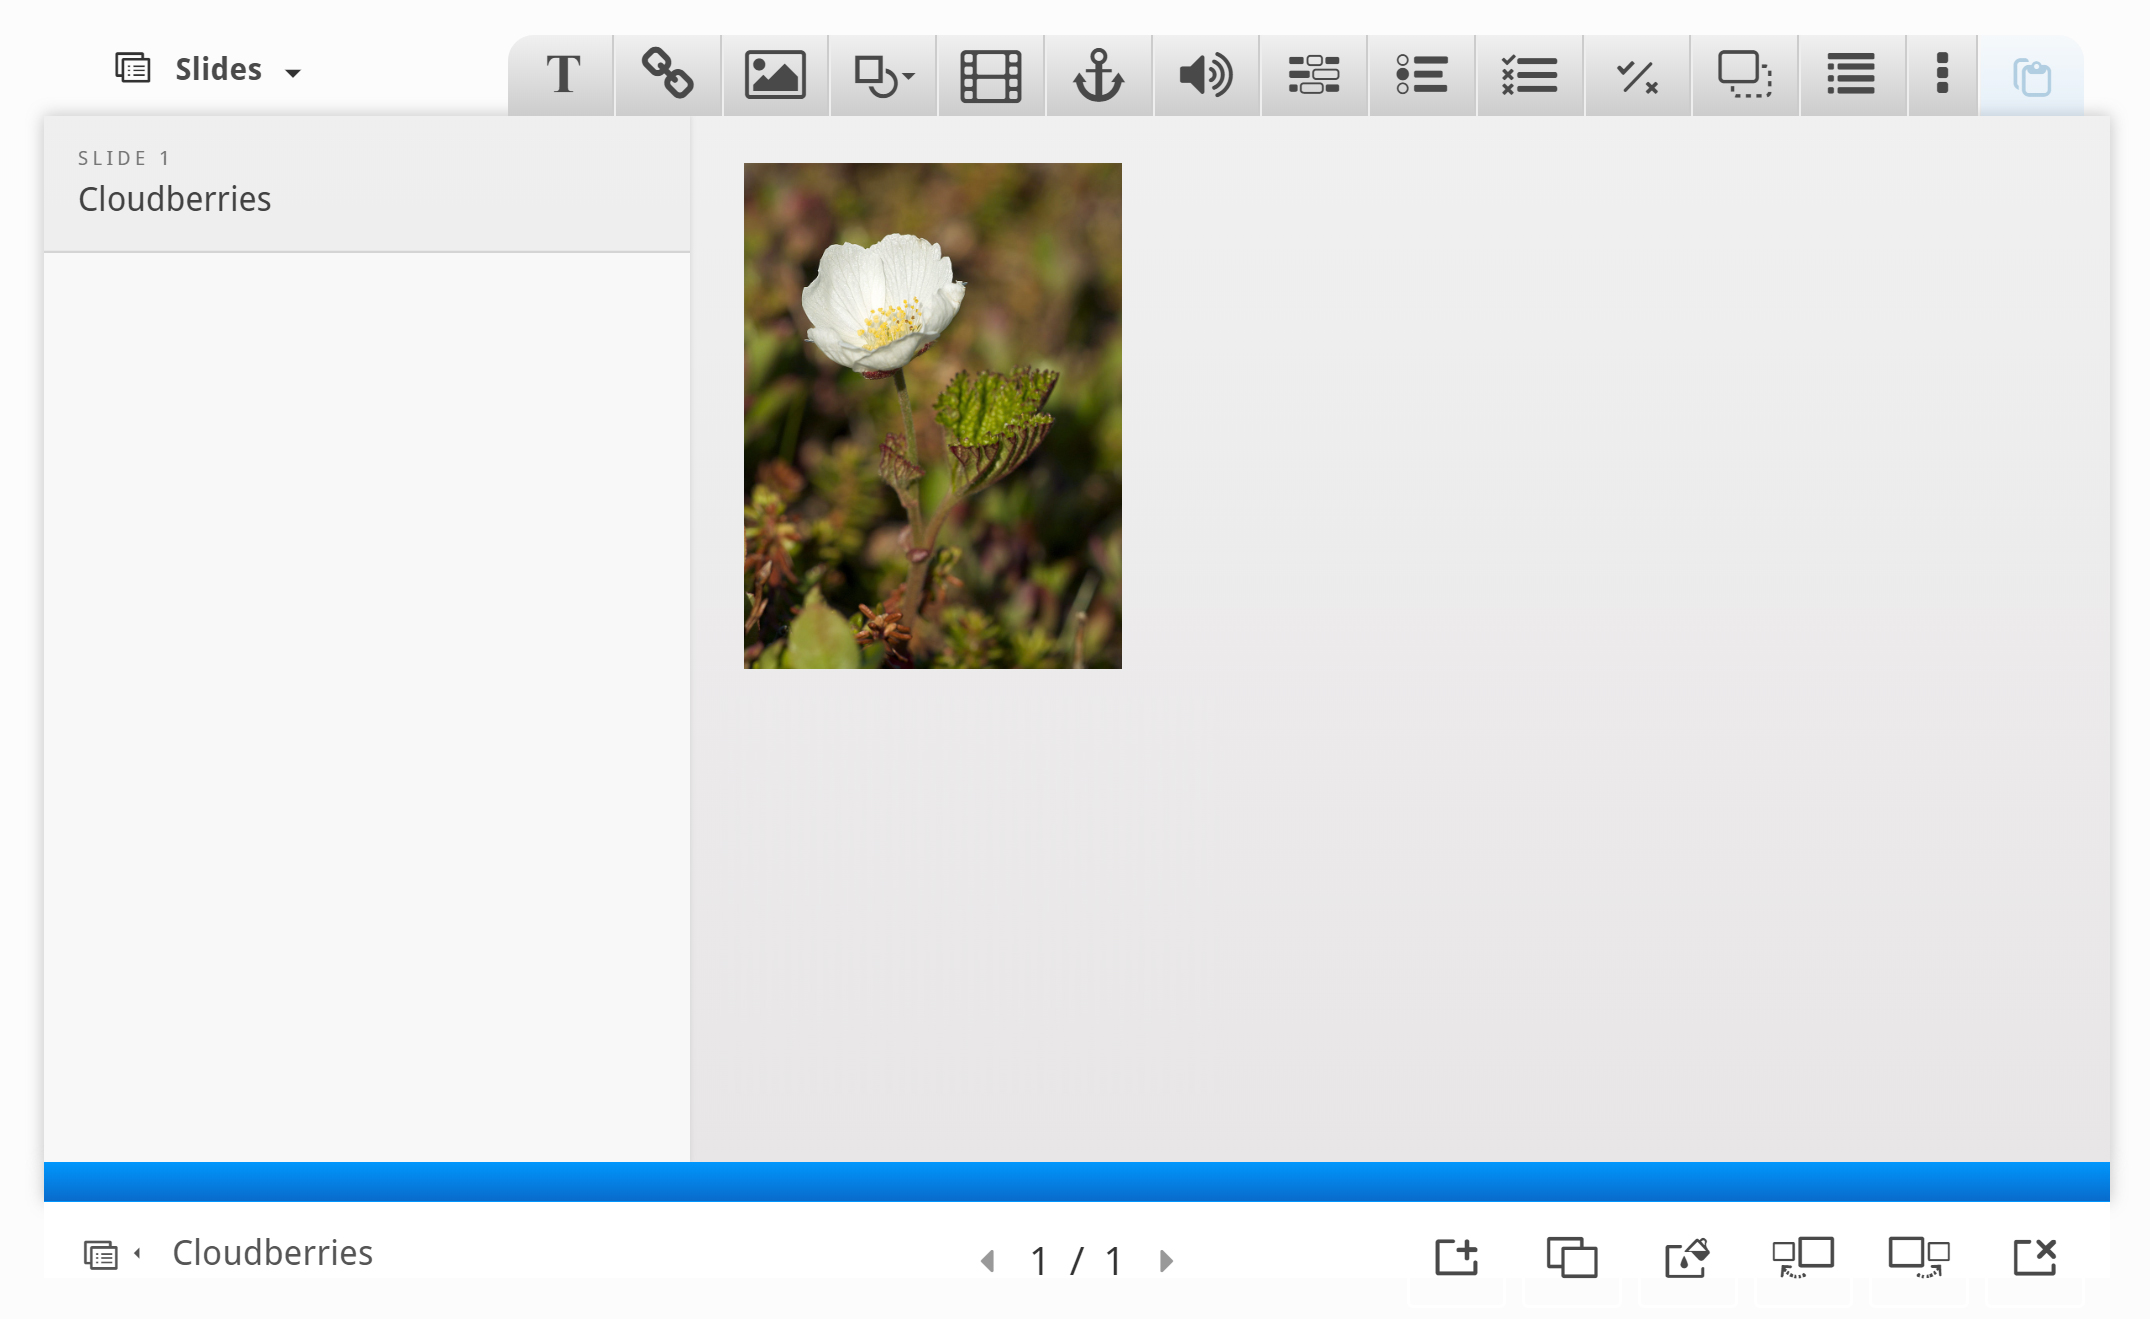
Now, add a second picture. This time, we'll use the cloudberry picture and place it beneath the cloudberry flower picture. Use the same procedure as above.
You should now have something like this:

To finish slide 1, we'll add the following text, which is paraphrased from the Wikipedia article:
- The Rubus chamaemorus is a herb producing amber-colored edible fruit similar to the raspberry or blackberry.
- The cloudberry grows to 10–25 cm high.
- The leaves alternate between having 5 and 7 soft, handlike lobes on straight, branchless stalks.
- After pollination, the white flowers form raspberry-sized berries.
- Each fruit is initially pale red, ripening into an amber color in early autumn.
Use the Text tool ![]() to add a block of text to the slide. Once you have dropped the text box, a dialog will appear. Insert the text above in the Edit text dialog:
to add a block of text to the slide. Once you have dropped the text box, a dialog will appear. Insert the text above in the Edit text dialog:
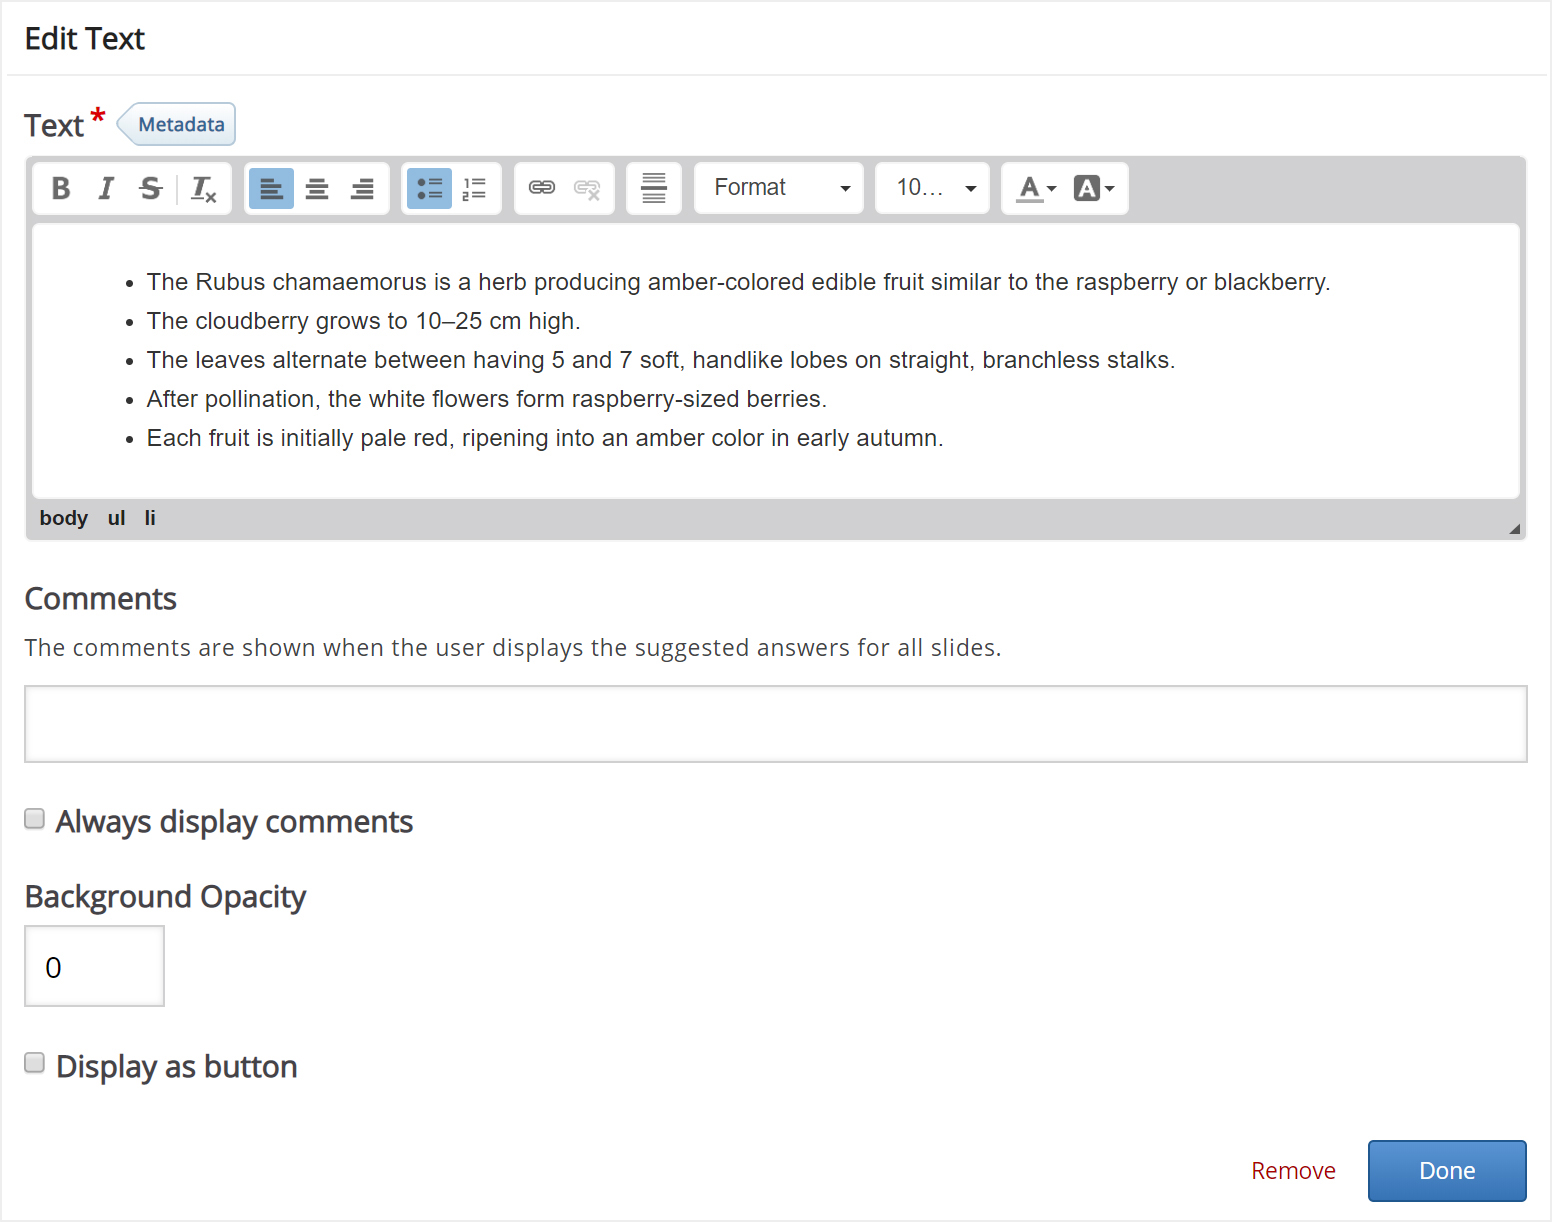
Leave the other fields blank and press Done.
You can place and resize the text block in the same way as images.
Now, position and size the text block so that you end up with something like this:

We have now finished slide 1.
Step 5: Slide 2
Press the  button in the lower right corner of the editor to add another slide.
Slide 2 will contain information about where Cloudberries can be found. Add the slide title Where to find them? in the slides panel.
We'll use the map picture from Wikipedia to show where Cloudberries grow in the wild. We add the picture by using the ![]() button in the top toolbar. Drag the picture onto the slide, upload the picture and add license information. Press Done, then resize the picture so you have something like this:
button in the top toolbar. Drag the picture onto the slide, upload the picture and add license information. Press Done, then resize the picture so you have something like this:

To finish slide 2, we'll add the following text, which is also paraphrased from the Wikipedia article:
Cloudberries are found in mountainous areas on the Northern Hemisphere
- Europe: In the Nordic countries and the Baltic states
- Asia: Across northern Russia east towards the Pacific Ocean
- North America: across most of northern Canada, Alaska, northern Minnesota, New Hampshire and Maine
As on slide 1, use the Text tool ![]() to add a text box to the slide. Once you have dropped the text box, a dialog will appear. Insert the text above in the Edit text dialog:
to add a text box to the slide. Once you have dropped the text box, a dialog will appear. Insert the text above in the Edit text dialog:

You can navigate between slides by pressing the slide titles in the slides panel or by using the navigation bar.
Step 6: Slide 3
Press the  button to add the third slide. Slide 3 will describe various uses of the cloudberry. Add the slide title Uses in the slides panel.
Again, we'll use text and images to deliver our message. In addition, we'll add a link to a website where the learner can find recipes using cloudberries.
Here are the links to the Wikimedia Commons pictures we'll use:
We add the pictures by using the ![]() button in the top toolbar. As on slide 1, we'll place the pictures in a column on the left side of the slide. Insert the three pictures, add the appropriate license information, place and resize them so you have something like this:
button in the top toolbar. As on slide 1, we'll place the pictures in a column on the left side of the slide. Insert the three pictures, add the appropriate license information, place and resize them so you have something like this:

The text we'll use, is again paraphrased from the Wikipedia article:
- In Finland, the berries are eaten with heated, local cheese
- In Sweden, cloudberry jam is used as a topping for ice cream, pancakes, and waffles
- In Norway, they are often mixed with whipped cream and sugar
- In Atlantic Canada, cloudberries are used to make "Bakeapple Pie".
- In Alaska and Northern Canada, the berries are mixed with seal oil, reindeer or caribou fat, and sugar to make "Eskimo Ice Cream" or "Akutaq".
Use the Text tool ![]() to add a block of text to the slide. Once you have dropped the text box, a dialog will appear. Insert the text above in the Edit text dialog. Press Done when you're finished. You should now have something like this:
to add a block of text to the slide. Once you have dropped the text box, a dialog will appear. Insert the text above in the Edit text dialog. Press Done when you're finished. You should now have something like this:

Finally, we'll add a link. Use the ![]() button on the toolbar and place the link onto the slide.
button on the toolbar and place the link onto the slide.
We can find a selection of Cloudberry desserts on yummly.com. Here's the URL: http://www.yummly.com/recipes/cloudberry-dessert
Use the link text Cloudberry dessert recipes.
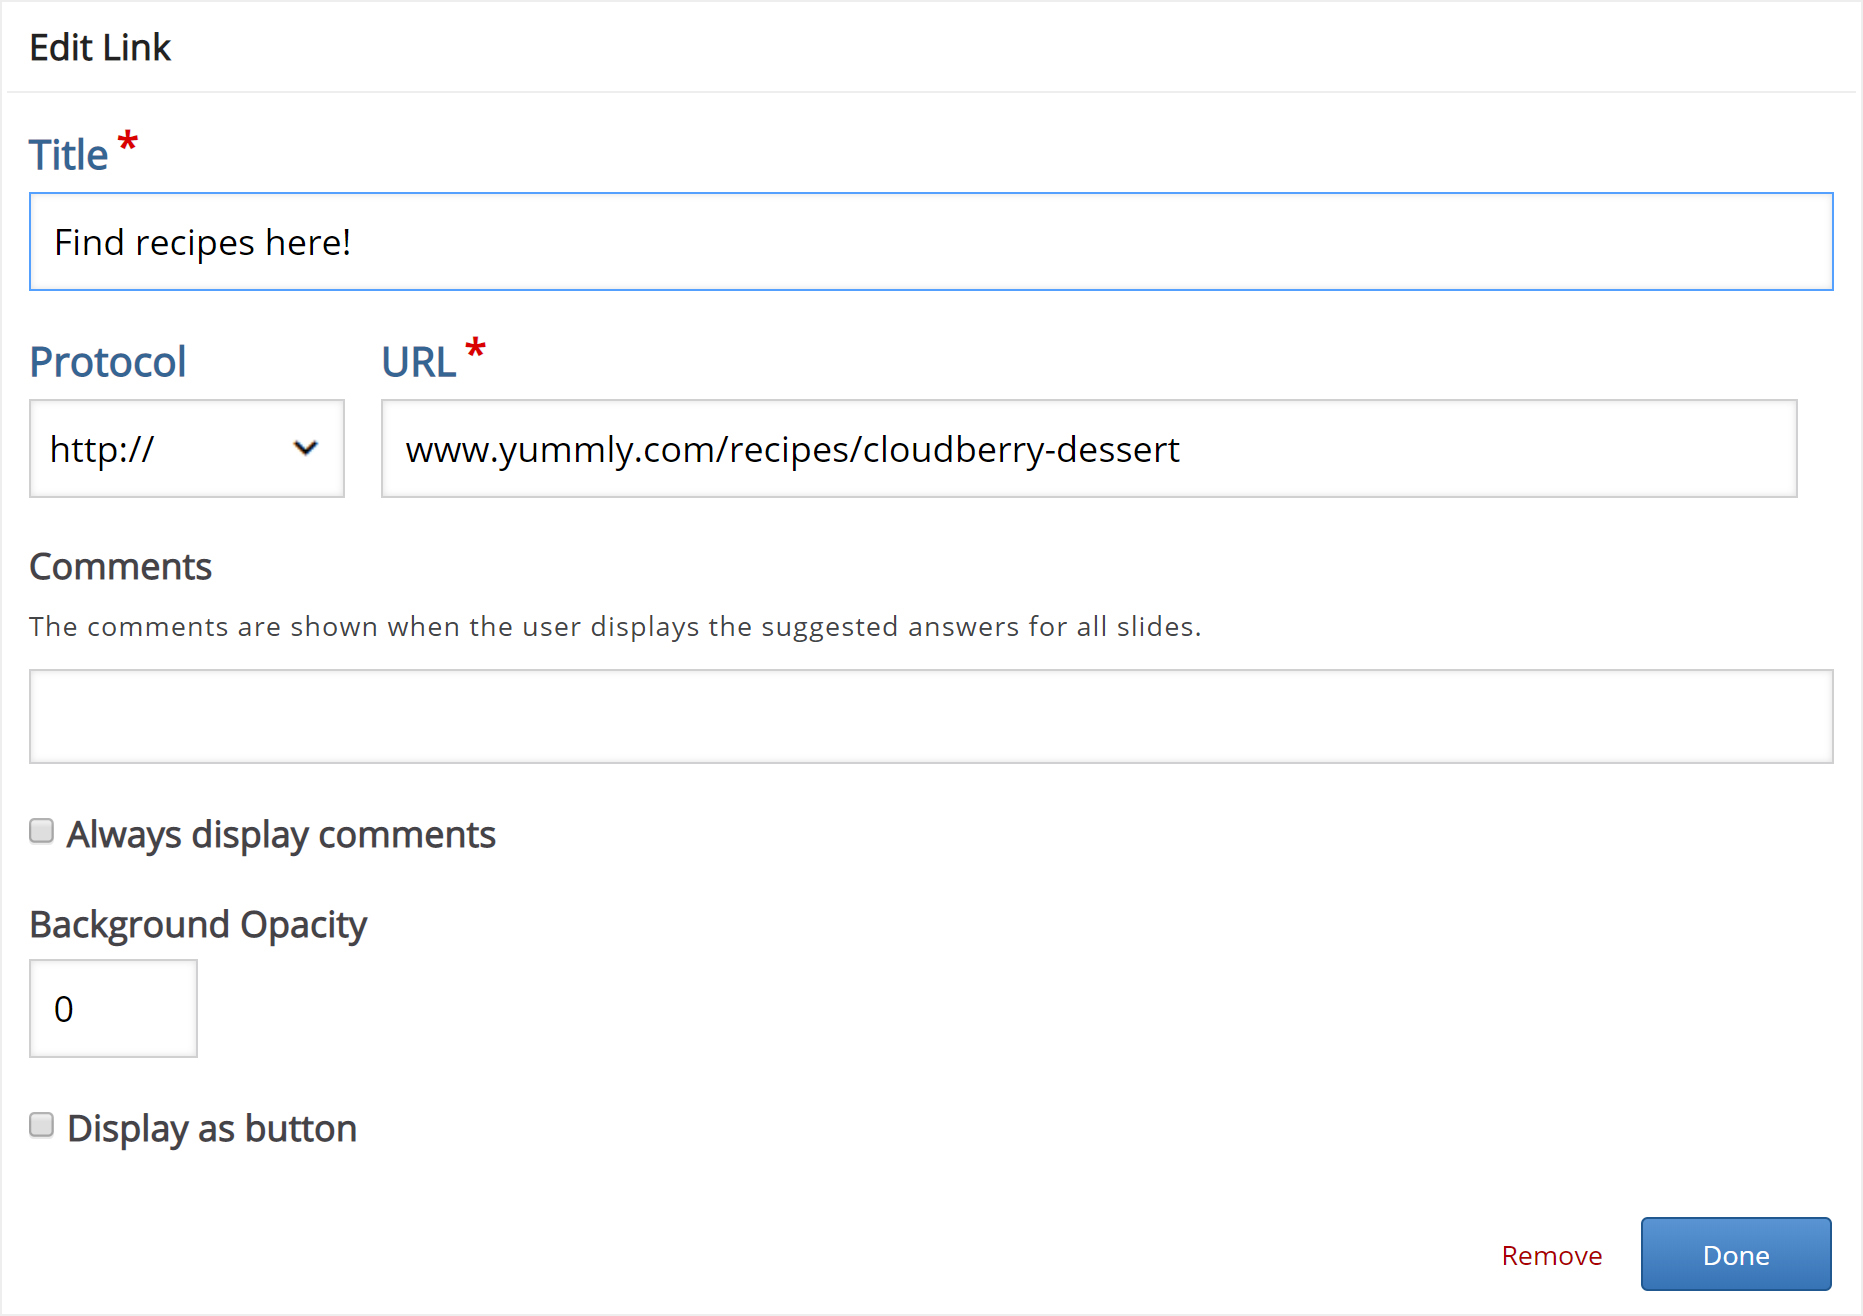
Press Done. then resize and place the link box so you have something like this:
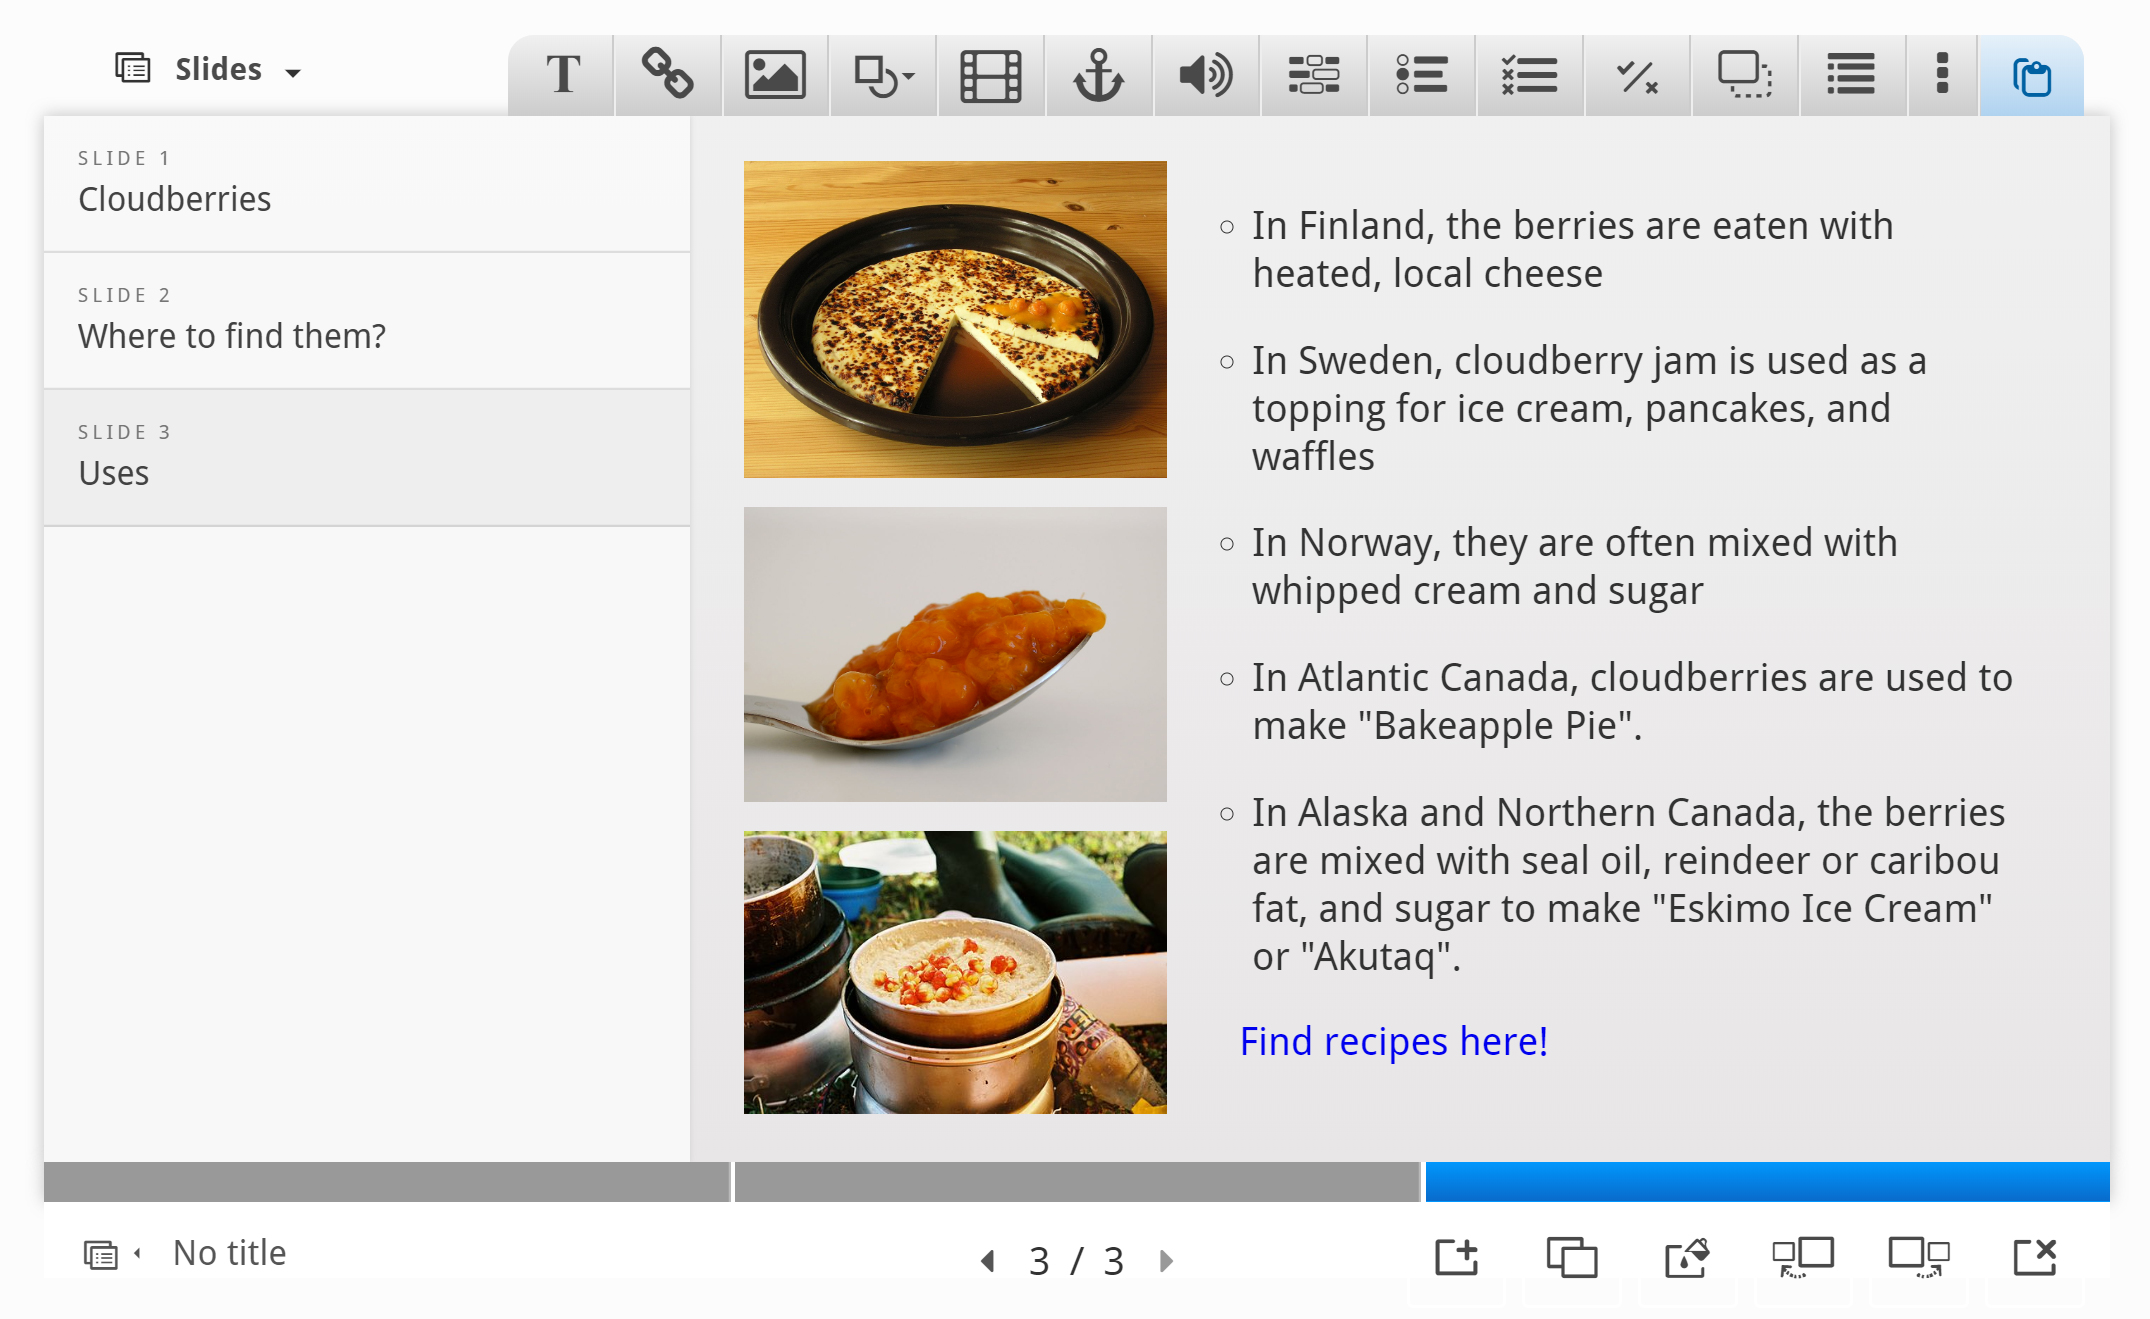
We're now finished with slide 3. Finally, we'll add a Summary to finish the Course presentation.
Step 7: Slide 4
Press the  button to add a fourth and final slide. Add the slide title Summary in the slides panel.
The Summary will allow the learner to make an interactive summary of the most important aspects of the previous three slides.
On the toolbar, press the ![]() button and drag a summary onto the slide. Creating a Summary is covered in this tutorial.
button and drag a summary onto the slide. Creating a Summary is covered in this tutorial.
Once you have dropped the Summary, the editor will appear.
Now we'll add statements to the Summary. Press the Add statements button to add two more statement groups.
In the Summary editor, the top statement in a statement group is always the correct one.
Introduction text:
Choose the correct statement about Cloudberries.
Statement group 1:
- Cloudberries are similar in shape and size to raspberries and blackberries.
- Cloudberries are similar in shape and size to blueberries and redcurrants.
- Cloudberries are similar in shape and size to strawberries.
Statement group 2:
- Cloudberries are found in the Northern Hemisphere.
- Cloudberries are found in the Southern Hemisphere.
Statement group 3:
- In Atlantic Canada, cloudberries are often used to make "Bakeapple pie".
- In Atlantic Canada, cloudberries are mainly eaten with a heated local cheese.
- In Atlantic Canada, cloudberries are mainly eaten with a heated local cheese.
Press Done when you have added the statements. Then position and resize the Summary so you'll have something like this:

Step 8: Finishing up
At the bottom of the editor, you'll find the Enable show solution buttons option. In this context, the option does not have any effect.
Save the node/article to view your finished Course presentation.
You should now have the same result as the example on top of the page.
Feel free to leave any comments or suggestions on how to improve this tutorial.

Comments
BV52
Tue, 06/26/2018 - 06:34
Permalink
Hi emy,If you are using one
Hi emy,
If you are using one of the supported plugins (Moodle, Drupal or Wordpress), there is an option to save content state. This saves user input for most content types. If you are creating the content in H5P.org, I'm sorry this is not possible.
-BV52
emy
Wed, 07/11/2018 - 23:04
Permalink
Thanks. I didn't even think
Thanks. I didn't even think of looking at the settings
lire.et.ecrire
Tue, 10/16/2018 - 10:40
Permalink
Audio icon in single choice set within course presentation
Please how to associate audio on "audio icon" in single choice set within course presentation.
icc
Tue, 10/16/2018 - 10:52
Permalink
If you download the .h5p file
If you download the .h5p file you can rename it to .zip and you will find the audio inside the single-choice-set-1515.h5p/H5P.SingleChoiceSet-1.10/sounds folder. Or here: positive-short.mp3 negative-short.mp3
lire.et.ecrire
Wed, 10/17/2018 - 06:02
Permalink
THANKS
THANKS
[email protected]
Thu, 02/28/2019 - 05:19
Permalink
Course Presentation Bug
We created an H5P by placing a content type, like Drag the Words, in the Course Presentation in Canvas. The score is not integrated with Canvas Grades for some reason, unlike other content types. In other words, the score is not recorded in Grades at all.
BV52
Fri, 03/01/2019 - 01:15
Permalink
Hi,Can you please provide the
Hi,
Can you please provide the information below:
1. Is this happening to all Course Presentation contents that you created?
2. Does this happen to all users?
3. Did you enable "Surface Mode"?
4. Do the users reach the Summary Slide?
-BV52
[email protected]
Sat, 03/02/2019 - 18:16
Permalink
1. Yes, this happens to every
1. Yes, this happens to every one
2. as far as we can tell, yes to all users
3. Failes both with "Surface Mode" enabled and not
4. Failes whether reaching the Summary Slide or not
BV52
Wed, 03/27/2019 - 00:44
Permalink
Hi,Sorry for the late reply.
Hi,
Sorry for the late reply. I created a separate post for you here.
-BV52
Cristian T
Thu, 03/07/2019 - 04:13
Permalink
Display comments button
Hi, is there a way to "move" the Question mark button that show the coments? I like the comment option, but the software places it automatically and I would like to move it.
cgreculescu
Tue, 03/19/2019 - 11:06
Permalink
Showing things one after another?
Hello, I just started using this tool, so my question might be really silly. I would like to display text boxes one after the other... similar to how you would animate text and objects in PPT. First a line of text appears, then an image, then another line of text. How can this be done within the Course Presentation content? If that's not possible, is there any other type of content in which one can do this? Thanks a lot!
cgreculescu
Tue, 03/19/2019 - 11:16
Permalink
Showing things one after another?
Not sure if my comment was saved... I would like to add text and images one after the other on a slide, so that they are not all displayed at the same time, similar to who one could "animate" text and objects in PPT. First text appears, then an image, then some more text. Is this possible in Course Presentation or in any other H5P content? Thanks a lot!
BV52
Thu, 03/21/2019 - 10:27
Permalink
Hi cgreculescu,I'm afraid
Hi cgreculescu,
I'm afraid animations are not yet a feature of Course Presentation.
-BV52
NextLevelEnglish
Thu, 04/11/2019 - 18:17
Permalink
Firstly, i really love this
Firstly, i really love this content type.
One thing I was wondering, is it posible to have slides automatically progress. for example, many of my slides just contain a question or quiz. would it be possible on correctly answering the question for the presentation then to automatically progress to the next slide. I think this would give a really nice intuitive progression :)
BV52
Fri, 04/12/2019 - 08:39
Permalink
Hi NextLevelEnglish,Thank you
Hi NextLevelEnglish,
Thank you for the kind words!
Automatic progression is not yet a feature of Course Presentation. However you can post your suggestion in the Feature Request forum. In order for your feature request to attract as much interest as possible make sure it follows the below guidelines:
It is clear from every perspective how the feature will work. We recommend describing the feature with one or more user stories, for instance “As an author I want it to be possible to pick between different effects for the check answer animation so that the learners will see a variety of effects and also I can adapt the effects to my target audience(I’ll be using pink unicorns which works really well for both my target audience which are 4 year old girls and venture capitalists)”
If the feature can be illustrated with images or videos it always helps
Make it clear what content types this is relevant for, and or if this is a new content type
Make sure you post the feature in the Feature Request forum.
-BV52
sam.mccarthy
Wed, 05/15/2019 - 17:59
Permalink
Customising the course presentation 'wrapper'
Is there any way to customise the wrapper (sorry if this isn't the correct terminology. I mean the area outside of the course, so the progress bar, etc)?
It jars in our site to have the standard bright blue....
thanks
BV52
Thu, 05/16/2019 - 09:01
Permalink
Hi Sam,The easiest way is to
Hi Sam,
The easiest way is to use a PHP hook, to add your own CSS-file to the content type. Please visit the Visual Changes page for more details.
-BV52
abarwick
Tue, 07/02/2019 - 16:28
Permalink
Move course
Can I download the course I started here to upload it to my server?
BV52
Wed, 07/03/2019 - 08:15
Permalink
Hi abarwick,You definitely
Hi abarwick,
You definitely can. Just click on the "reuse" button at the bottom of the content.
-BV52
[email protected]
Wed, 07/24/2019 - 23:34
Permalink
Rollover with pop-up text
It would be great to have an added feature; users click on the text or a picture and pop-up window appears with more information about that picture. So far, only way I figured out to do this is click on a image and directs to another slide.
BV52
Thu, 07/25/2019 - 18:33
Permalink
Hi,This is a great idea!
Hi,
This is a great idea! Would you mind posting this in the feature request forum. In order for your feature request to attract as much interest as possible make sure it follows the below guidelines:
It is clear from every perspective how the feature will work. We recommend describing the feature with one or more user stories, for instance “As an author I want it to be possible to pick between different effects for the check answer animation so that the learner will see a variety of effects and also I can adapt the effects to my target audience(I’ll be using pink unicorns which works really well for both my target audience which are 4 year old girls and venture capitalists)”
If the feature can be illustrated with images or videos it always helps
Make it clear what content types this is relevant for, and or if this is a new content type
Make sure you post the feature in the Feature Request forum.
-BV52
[email protected]
Thu, 07/25/2019 - 23:03
Permalink
Changing the dimension
Is there a way to change the dimension of the displayed window size of inserted Course Presentation?
I want to change the actual course presentation window size shown on the screen to fit my inserted pictures. Importing pictures used for PowerPoint don't fit nicely on your course presentation window.
abarwick
Thu, 08/22/2019 - 18:07
Permalink
Link to slide inside Interactive Video
I am using the interactive video inside my Course Presentation. At the end of the video, I want to give navigation links to go to another slide within the larger presentation. How can i do this?
Thanks
BV52
Thu, 08/22/2019 - 21:46
Permalink
Hi abarwick, I'm afraid this
Hi abarwick,
I'm afraid this is not possible. The contents that we can use in Course presentation are "self-contained" and cannot control how it will behave.
-BV52
bealmj
Wed, 10/02/2019 - 17:48
Permalink
Link an image back to a LMS page
Is there any way to put a link on an image to go back to a specific LMS page?
BV52
Wed, 10/02/2019 - 19:08
Permalink
Hi bealmj,I'm afraid this
Hi bealmj,
I'm afraid this feature is not available. But you can post a rfequest in the Feature Request forum.
-BV52
Syntax-TP
Tue, 10/08/2019 - 23:12
Permalink
Summary question within Course Presentation
First of all I wanted to thank the H5P-Team and all it's contributors for providing such useful tools which really improved e-learning, especially because of the open nature. I really appreciate it.
I have a question regarding the summary questions within the Course Presentation. Unlike (most) other questions there seems to be no way of redoing them by using the redo-function at the very end of the slides, which, like stated above, differs quite heavily from the other embeddable question types, as these behave as one would expect. There is also no (optional) redo-function for the question itself, like it is the case with, for example, single choice.
Following this post, though regarding the separate module "Summary", I wonder if this is wanted behaviour, or if there is any option to change that. Maybe I am missing an option?
Thanks in advance and kind regards,
Syntax-TP
BV52
Wed, 10/09/2019 - 18:31
Permalink
Hi Syntax-TP,The Summary was
Hi Syntax-TP,
The Summary was never meant to be an test which is why it doesn't have a "redo" option on it's own and is not affected by the summary slides "redo" option. However I can your point that in some cases it is needed. You can post a suggestion in the Feature Request forum for this. In order for your feature request to attract as much interest as possible make sure it follows the below guidelines:
It is clear from every perspective how the feature will work. We recommend describing the feature with one or more user stories, for instance “As an author, I want it to be possible to pick between different effects for the check answer animation so that the learner will see a variety of effects and also I can adapt the effects to my target audience(I’ll be using pink unicorns which works really well for both my target audience which are 4 year old girls and venture capitalists)”
If the feature can be illustrated with images or videos it always helps
Make it clear what content types this is relevant for, and or if this is a new content type
Make sure you post the feature in the Feature Request forum.
-BV52
Syntax-TP
Wed, 10/09/2019 - 19:31
Permalink
Dear BV52,thanks for the fast
Dear BV52,
thanks for the fast answer. I see where you are coming from and why "Summary" is the way it is. I will consider a feature request, but before that I am going to check if the questions at hand couldn't be implemented through other (H5P-related) means, which in this case aren't as good as "Summary", but may be a good workaround for the time being.
Kind regards and best wishes,
Syntax-TP
imps
Sun, 10/20/2019 - 03:13
Permalink
Drag and drop background size in a presentation
I'm having trouble getting my drag and drop to appear without a scroll bar in the course presentation. What size is recommended for the background image for best appearance without having to scroll....????
BV52
Mon, 10/21/2019 - 20:28
Permalink
Hi imps,I think my answer
Hi imps,
I think my answer here will also apply to your situation. The second suggestion will make it easier to adjust the size of the play area as well as the "background".
Yana Magician
Wed, 10/30/2019 - 18:07
Permalink
Link to the slide
Firstly I would like to thank you for such а usefull instrument. There are a lot of features which I can use.
I have a question. I want to do the link from the slide 1 to the last slide and use the instrument Go to slide. The link is invisible. But in the example (Berries) the link to the other slide is a picture with text. How can I do it?
BV52
Thu, 10/31/2019 - 17:48
Permalink
Hi Yana Magician,It is
Hi Yana Magician,
It is actually as you said, there are 3 components to this it is an image with text underneath it and the Go to Slide placed on top (invisible). Quick tip you can actually download the content and upload it to your account so that you can check the settings for yourself.
-BV52
elsa
Wed, 12/04/2019 - 18:14
Permalink
Phone
Hi,
I put a fill in the blanks in my course presentation, but it's not working on the phone as I can't write anything in the blank. The keyboard does not appear. Do you have any idea why?
Elsa
BV52
Thu, 12/05/2019 - 17:21
Permalink
Hi Elsa,Would you mind
Hi Elsa,
Would you mind checking this sample content? If you have the same issue please provide the following:
-BV
elsa
Sat, 12/07/2019 - 11:58
Permalink
Yes it's working. Why isn't
Yes it's working. Why isn't working on my platform? I am using learn press. Is this the problem?
thanks for your help.
elsa
BV52
Mon, 12/09/2019 - 17:21
Permalink
Hi elsa,From what I have
Hi elsa,
From what I have gathered Learn Press is based off of Wordpress so it should in theory work seamlessly with H5P contents. However there are other factors that may come into play and this may help you isolate the issue. I suggest that you check the following:
-BV
mytoqha
Wed, 01/01/2020 - 07:41
Permalink
Left/right arrow key doesn't work after clicking any sound unit
I love to use course presentation to create english learning materials. And I updated it without thinking as soon as I see "update available" message.
After the update, I found that left and right arrow key doesn't work to go to next slide or go back to previous slide any more in case you pressed any sound unit in the page right before.
And it makes our learners very inconvenient because they should use mouse only to explore slides forward and backward. Left and right arrow keys works fine if you click other units in the page other than sound units.
Is there any way to downgrade my course presentation to older version?
And where could I see what has been improved in this upgraded version?
Thank you in advance for your kind answers and happy new year.
BV52
Wed, 01/01/2020 - 17:56
Permalink
Hi mytoqha,There is no way of
Hi mytoqha,
There is no way of downgrading the version of H5P contents once it is created.
You can check the release overview for details on updates.
Can you please check if this is the case even if the audio is done playing? When I tested this the left/right arrow keys works fine if the audio is done playing.
-BV
zabelle_motte
Fri, 01/10/2020 - 11:49
Permalink
Describe the button to move to another slide in this doc page
Hello H5P team !
Our professors love your beautiful interactive learning contents, especially "Course Presentation" content type !
We find it very interesting to enable buttons to move to an other slide, but it would be great for you to describe this functionnality in this documentation page. They do not find it !
When working on an "Interactive video" content type, we find the "Crossroad" icon more explicit.
Wishing you a lot of succes and fun with H5P project in 2020 :-*
Zabelle
BV52
Mon, 01/13/2020 - 17:14
Permalink
Hi Zabelle,Thank you for the
Hi Zabelle,
Thank you for the suggestion. We will try to update the documentation as much as we can.
-BV
Bjorn Granberg
Fri, 03/06/2020 - 10:39
Permalink
Menu not showing! Due to CSS problem?
The menu is there but hidden. It flickers if the window is resized.
Opening the page in Inspect, and unchecking "float: right;" in the css-class ".h5p-dragnbar-ul" makes i appear.
See screenshot of missing menu.
The menu is there but hidden. It flickers if the window is resized.
Opening the page in Inspect, and unchecking "float: right;" in the css-class ".h5p-dragnbar-ul" makes i appear.
See screenshot of missing menu.
The menu is there but hidden. It flickers if the window is resized.
Opening the page in Chrome Inspect, and unchecking "float: right;" in the css-class ".h5p-dragnbar-ul" makes i re-appear.
See screenshot of missing menu: https://www.dropbox.com/s/l777gluwjiriufc/screenshot-h5p-presentation.jp...
BV52
Fri, 03/06/2020 - 17:51
Permalink
Hi Bjorn,Would you mind
Hi Bjorn,
Would you mind posting this in the Bug Reports forum, I would also suggest that you include as much information that is being asked in that forum.
-BV
Clover
Fri, 03/20/2020 - 03:37
Permalink
Is there a way to copy and
Is there a way to copy and paste slides across different course presentation?
BV52
Fri, 03/20/2020 - 17:12
Permalink
Hi Clover,I'm afraid this
Hi Clover,
I'm afraid this feature is not available yet.
-BV
phubisz
Thu, 04/30/2020 - 19:36
Permalink
Completion
Hello,
Is there a chance that H5P presentation will send a completion info only after viewing all the slides not as soon as the user opens the interaction?
Przemek
BV52
Fri, 05/01/2020 - 18:14
Permalink
Hi Przemek,I would assume
Hi Przemek,
I would assume that you are talking about completion activity completion in Moodle, if so this is not possible not unless you make changes to the code.
-BV
Ogle
Tue, 05/12/2020 - 21:19
Permalink
Snip, copy & Paste
Greetings:
Is it possible to copy text from elsewhere and paste into the text box on a H5P slide? How?
If I use Windown 10 Snip & Sketch tool, can I paste it directly onto a H5P slide?
Thank you
BV52
Wed, 05/13/2020 - 19:12
Permalink
Hi Ogle,Yes it is possible to
Hi Ogle,
Yes it is possible to copy text from another program and paste it directly into an H5P activity. However I don't think Snip & Sketch will work since it deals with images not text.
-BV
fqantonio
Sun, 05/17/2020 - 17:11
Permalink
not allowed
Validating h5p package failed.
Pages