Question Set Tutorial
The question set allows eLearning designers to create a sequence of various quiz types, including Multichoice questions, Fill in the blanks, and Drag and drop. The question set supports customized text feedback as well as video feedback to the learner.
In this tutorial you will learn:
- When to use Question sets
- How to create a Question set
Click the "Get started" button to explore all of the possible ways to use H5P!
Example
Here's the Question set we'll create in this tutorial:
When to use Question sets
Question sets are useful when you want to create a sequence of problems, as opposed to multiple individual problems, for the learner to solve.
Use Questions sets to assess the learners' ability to reproduce key concepts of a compound learning material. Question sets can, for instance, be used as end-of-chapter tests or as a final course exam. You may use multiple quiz types, including Multichoice, Fill in the blanks, and Drag and Drop questions, to offer variation in your Questions sets.
Question sets can only be used stand-alone.
Step 1: Topic
In this tutorial, we'll use the example content from the Multichoice question, Drag and drop question and Fill in the blanks tutorials. As usual, berries are our overall topic :)
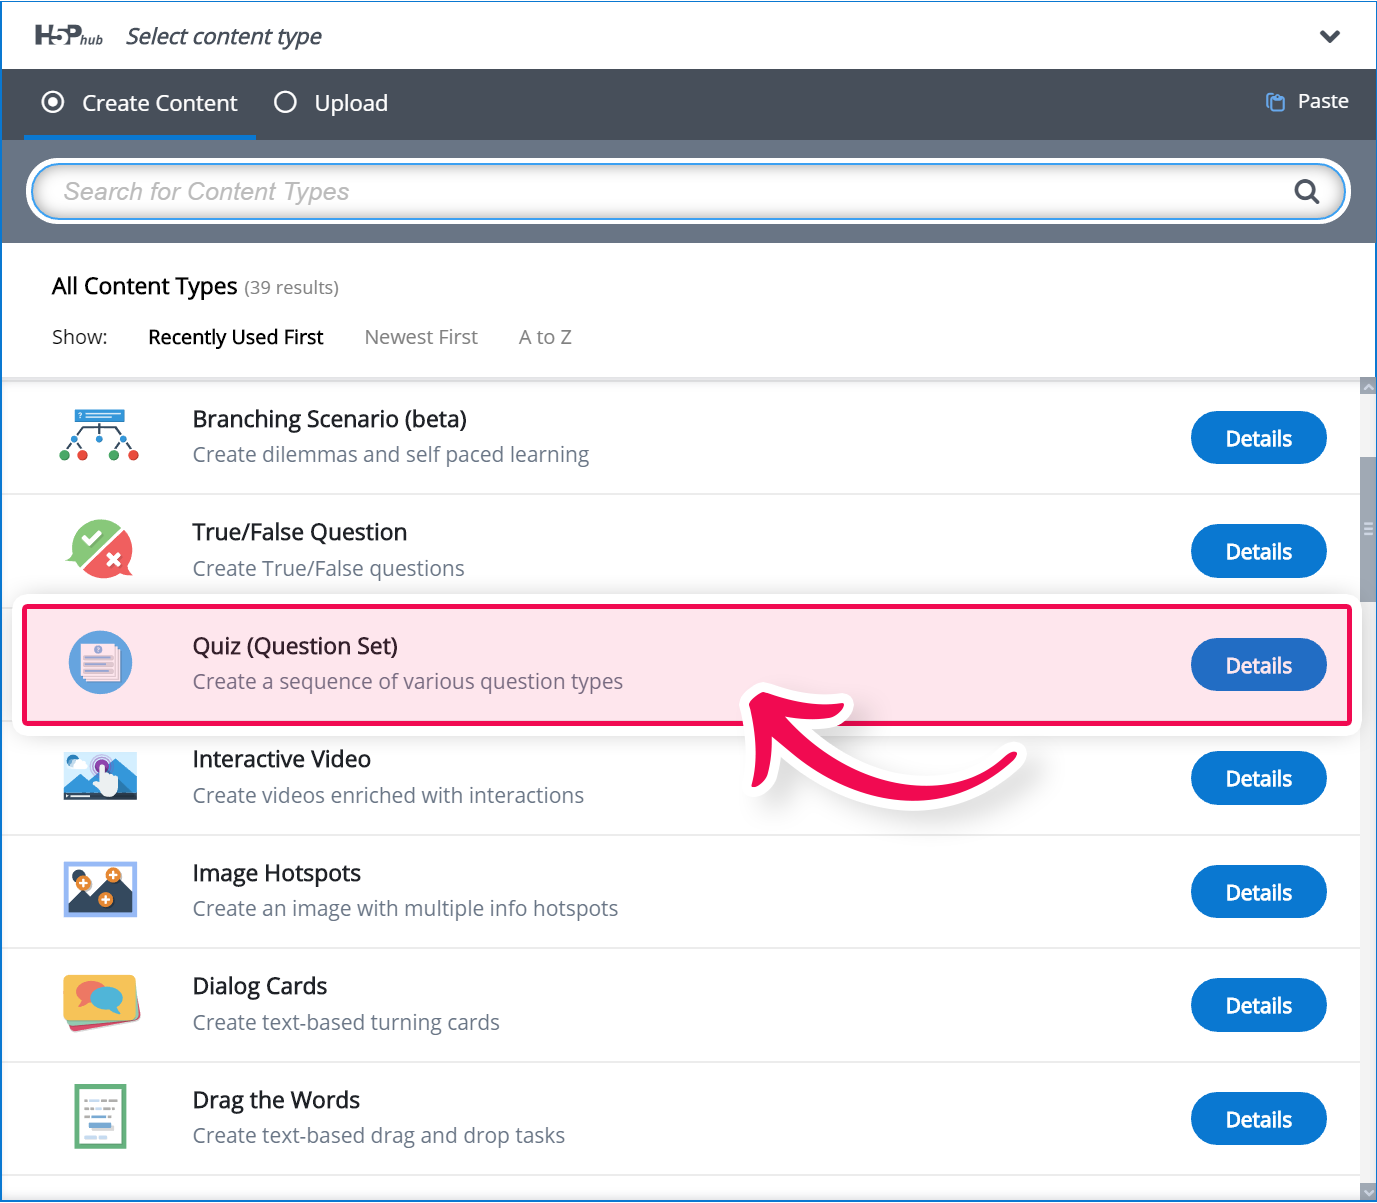
Step 2: Creating a Question set
Select the New content option and choose Quiz (Question Set) from the list of Content types:
Step 3: Question set editor
The Question set editor should now appear. The editor looks like this:
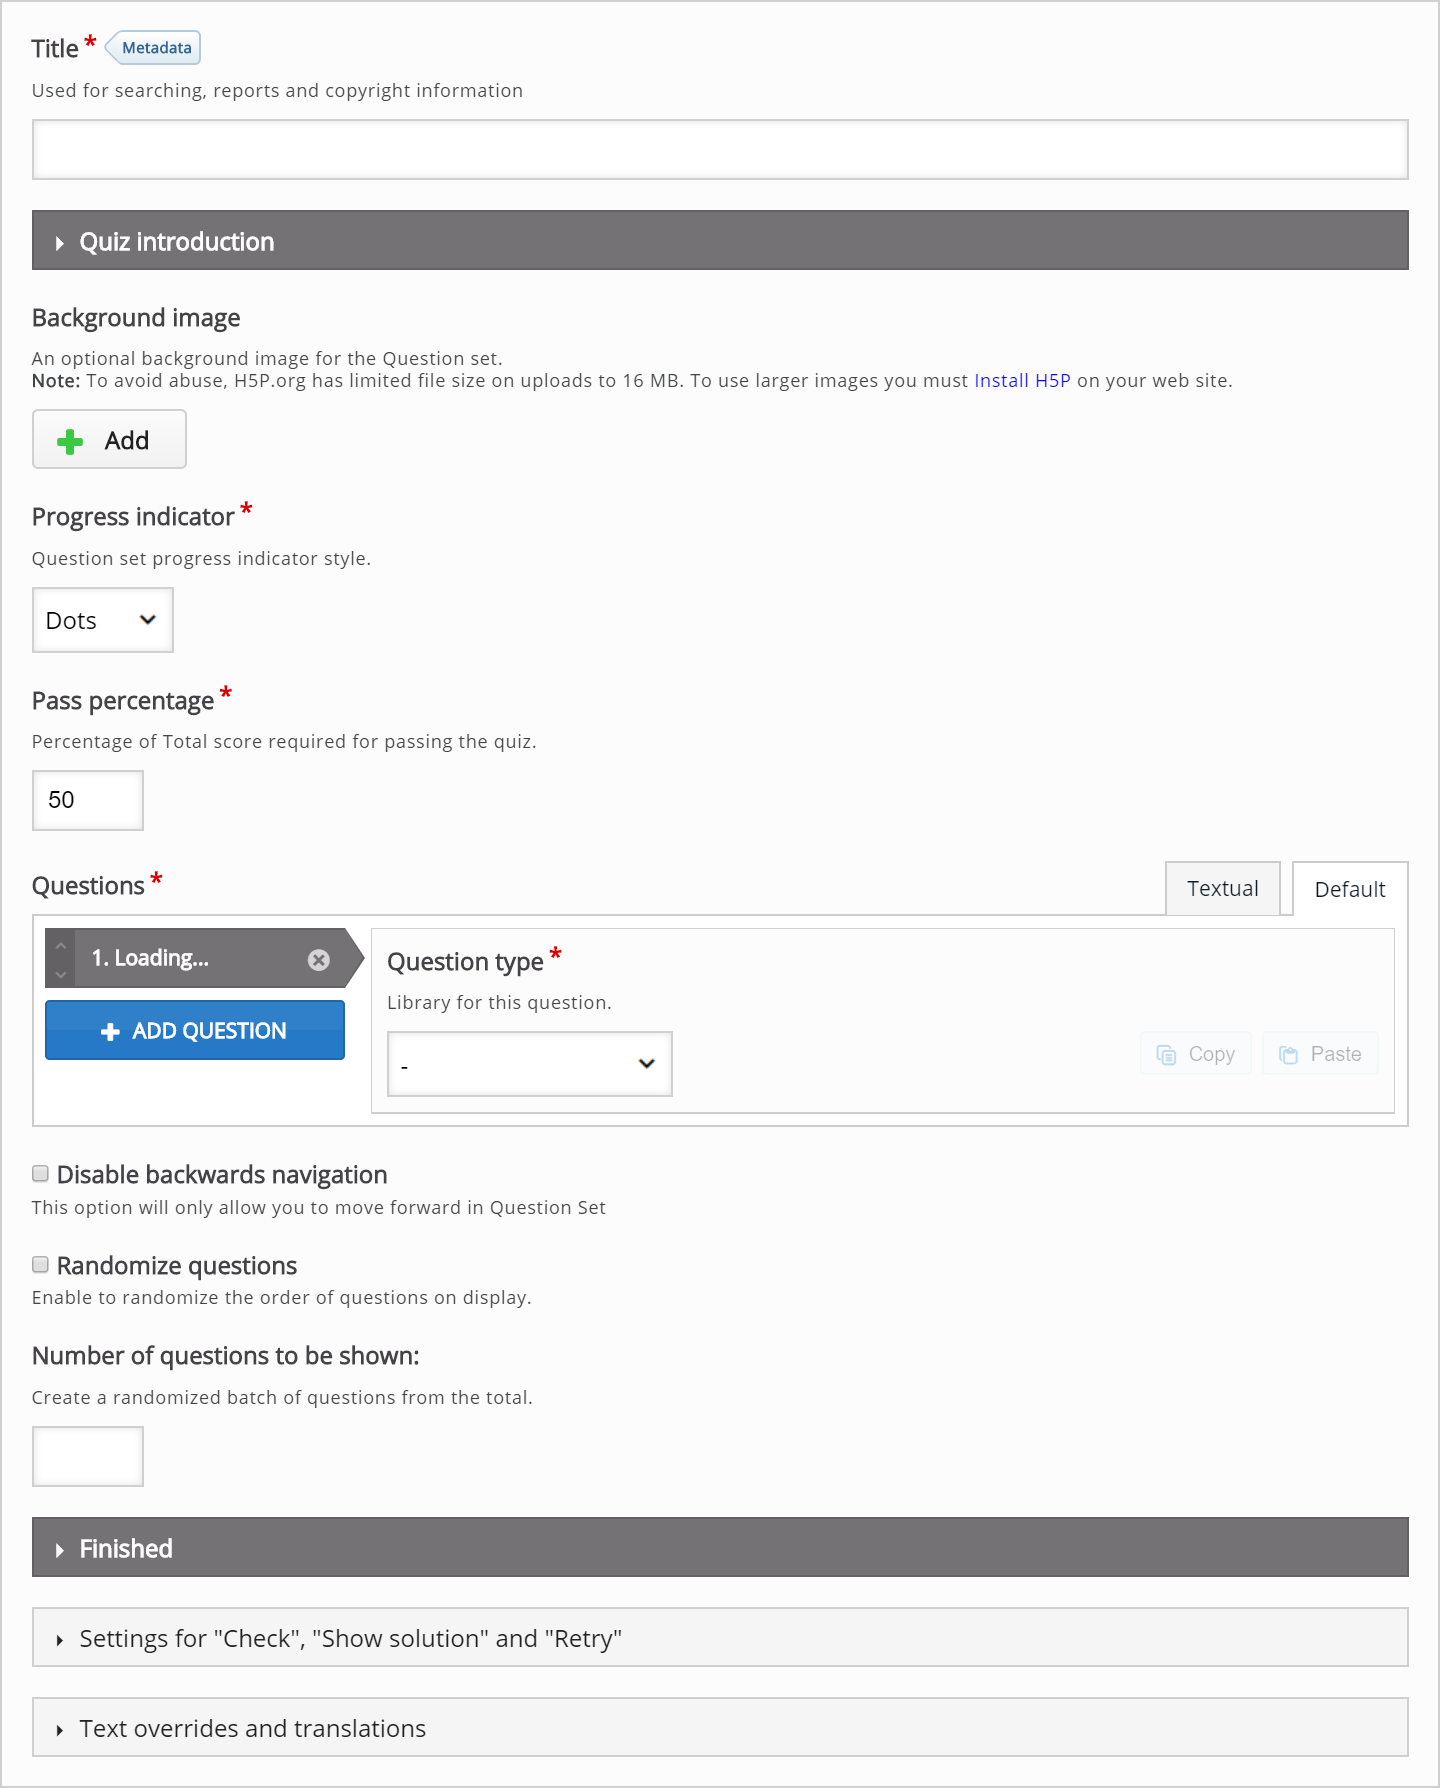
In this tutorial, we'll focus on creating the Question set content. This happens in the top part of the editor, so we won't bother with the Common fields and the lower parts of the editor.
The top part of the Question set editor consists of:
- general settings at the top including Background image, Progress indicator, and Pass percentage
- a Questions sections in the middle, where we add the various quiz tasks
- customizable text fields at the bottom, including Quiz introduction and Quiz finished: Your result:
Step 4: Background image
You can add a Background image that is displayed behind the various quiz tasks included in your Question set.
In this tutorial, we'll use the background below:

This picture is a modified version of a Public Domain picture found on Wikimedia Commons.
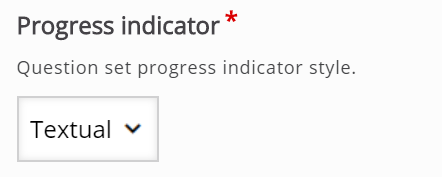
Step 5: Progress indicator
You can choose between a textual indicator and dots. We'll use Textual in this tutorial:
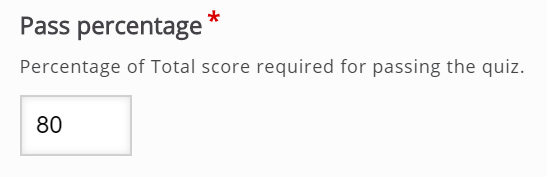
Step 6: Pass Percentage
Here you define the percentage of points the learner will need to achieve in order to pass the Question set. More about score points later in this tutorial. We'll set this to 80 for now:
Step 7: Questions
Here, we'll add the actual questions that the Question set consists of. In this tutorial, we'll add three quiz questions:
- A Multichoice question
- A Drag and drop question
- A Fill in the blanks
When the Question set editor is launched, only one undefined question type is displayed below the Questions header:

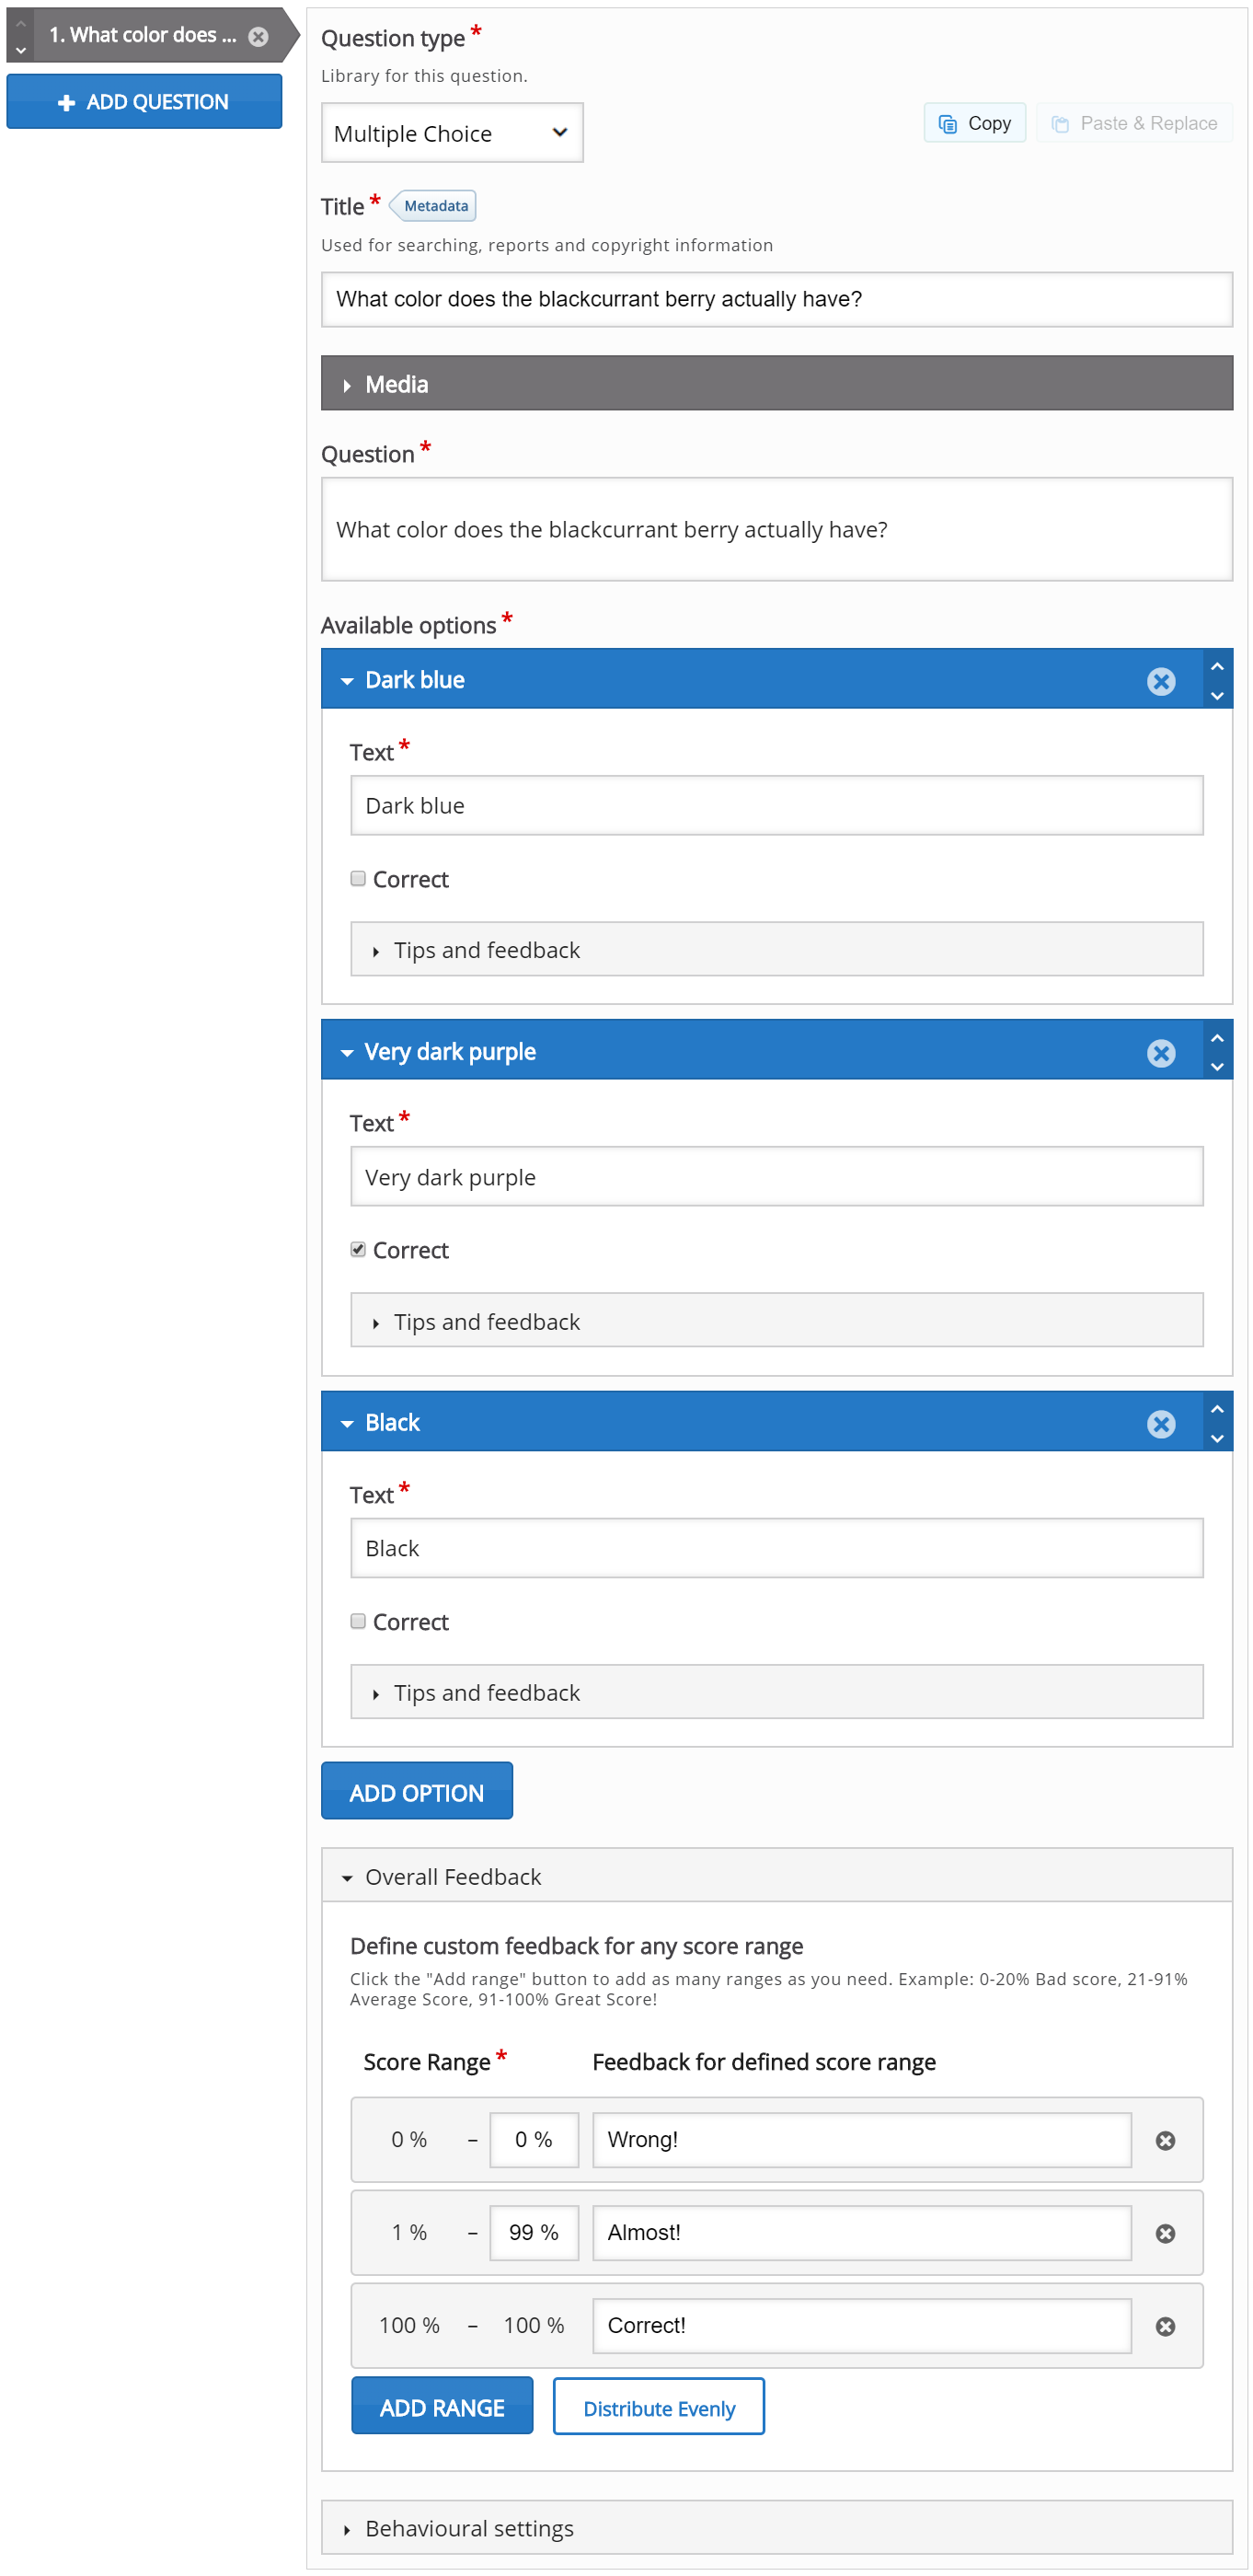
Step 8: Add Multichoice question
In the Question type dropdown, select a Multichoice question. This will load the Multichoice question editor:

We will add the exact same content as in the Multichoice question tutorial. Read it if you're curious about how to create a Multichoice question.
You should by now have something like this:
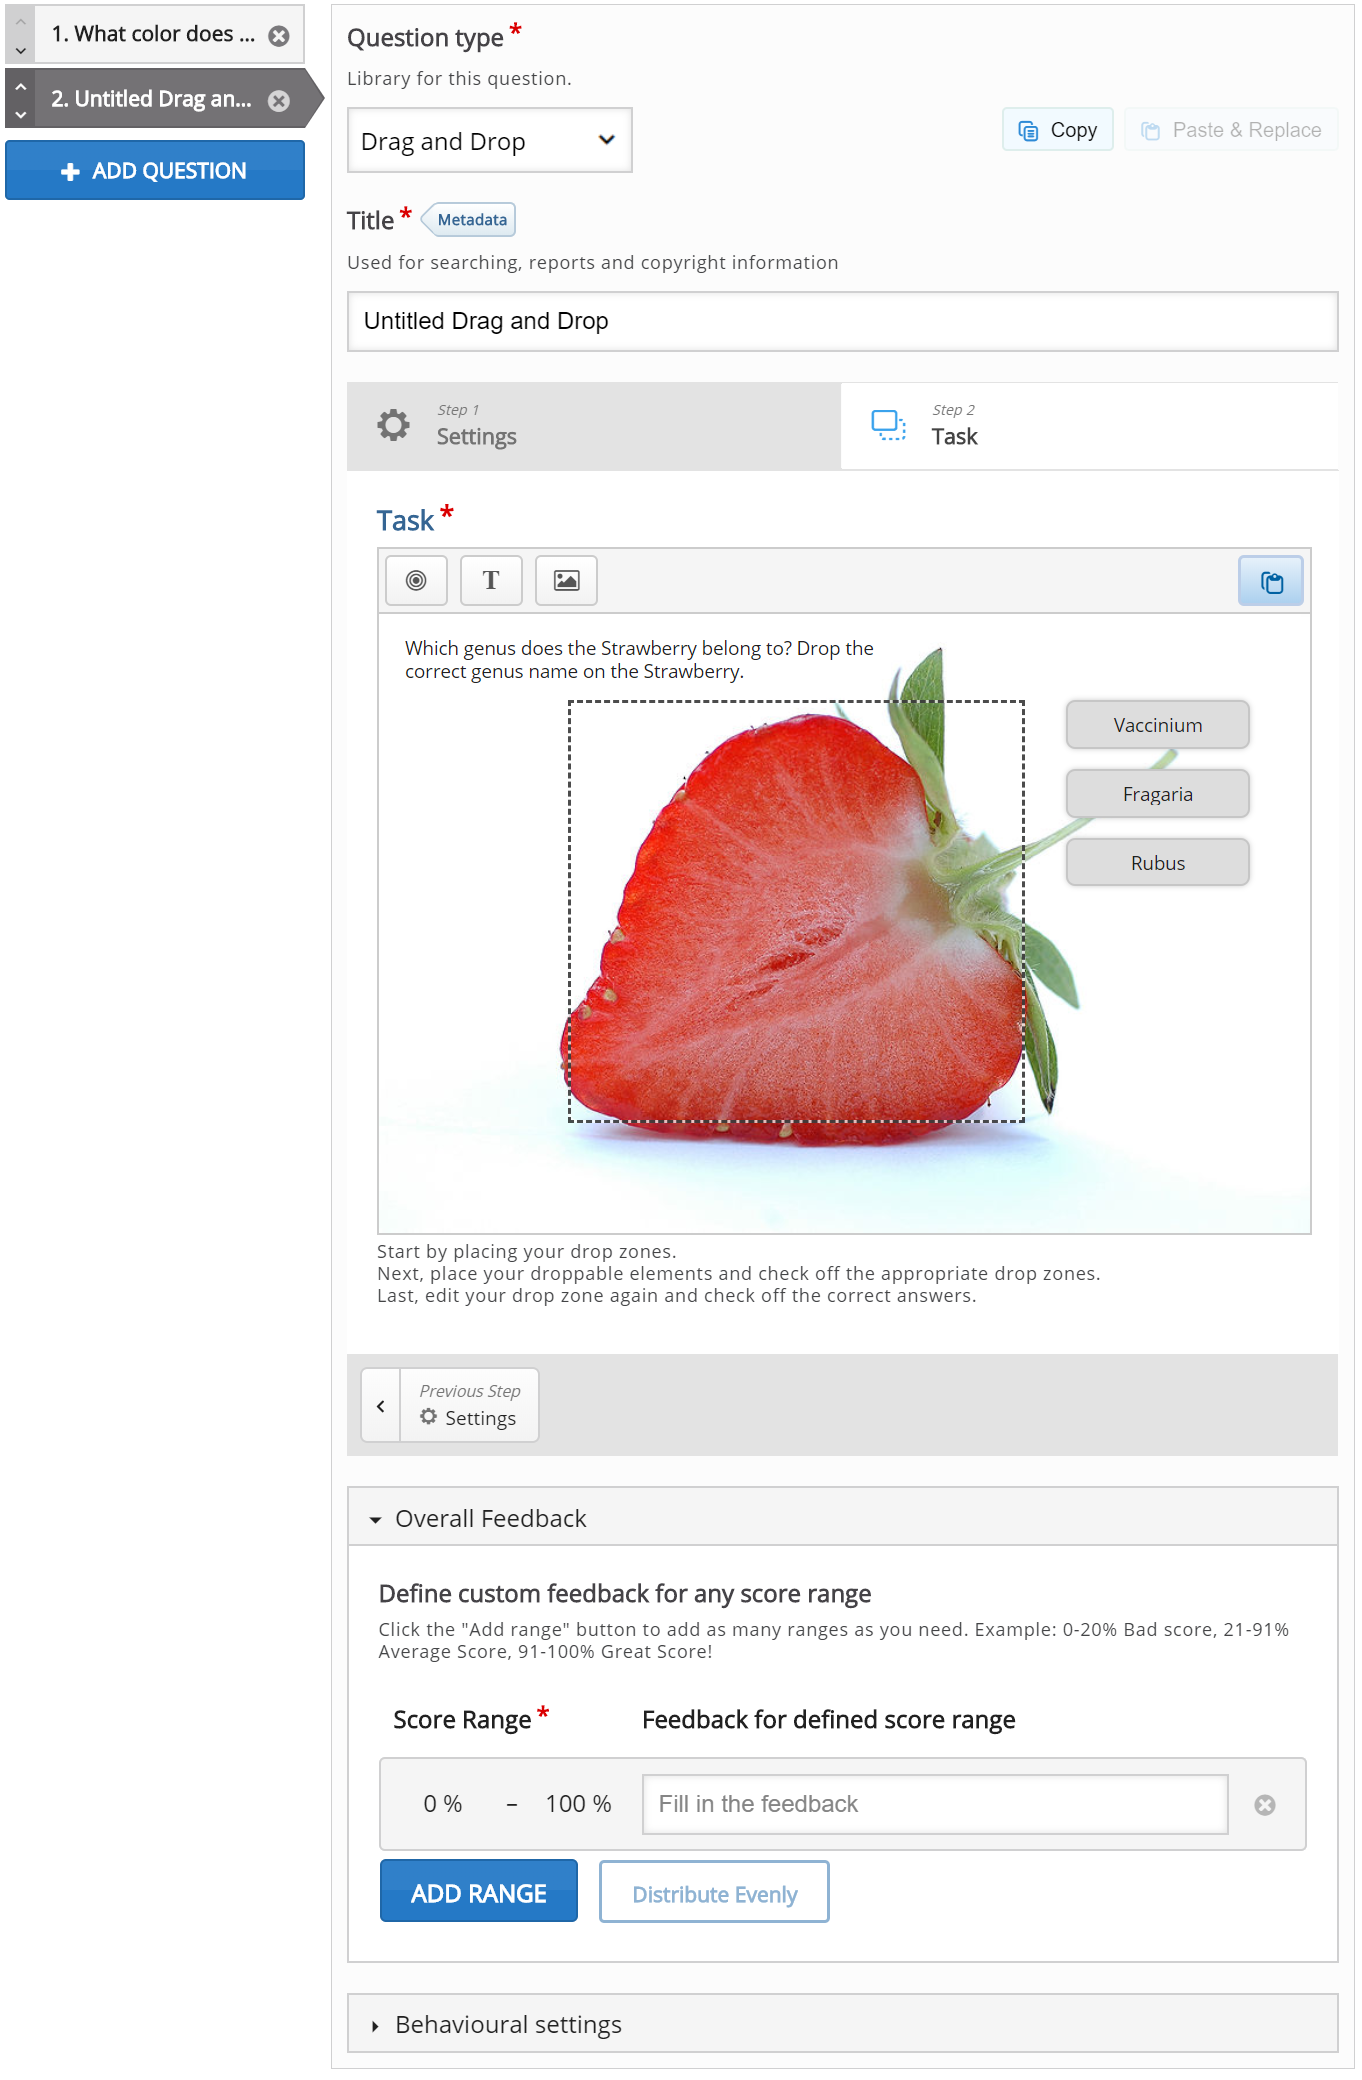
Step 9: Add Drag and drop question
Press the Add question button to add another question to the Question set.
This time, we'll choose Drag and drop question from the dropdown menu. The Drag and drop question editor will now appear.
Add the exact same content as in the Drag and drop question tutorial. Read it if you're curious about how to create a Drag and drop question.
After adding content to the Drag and drop question you should have something like this:
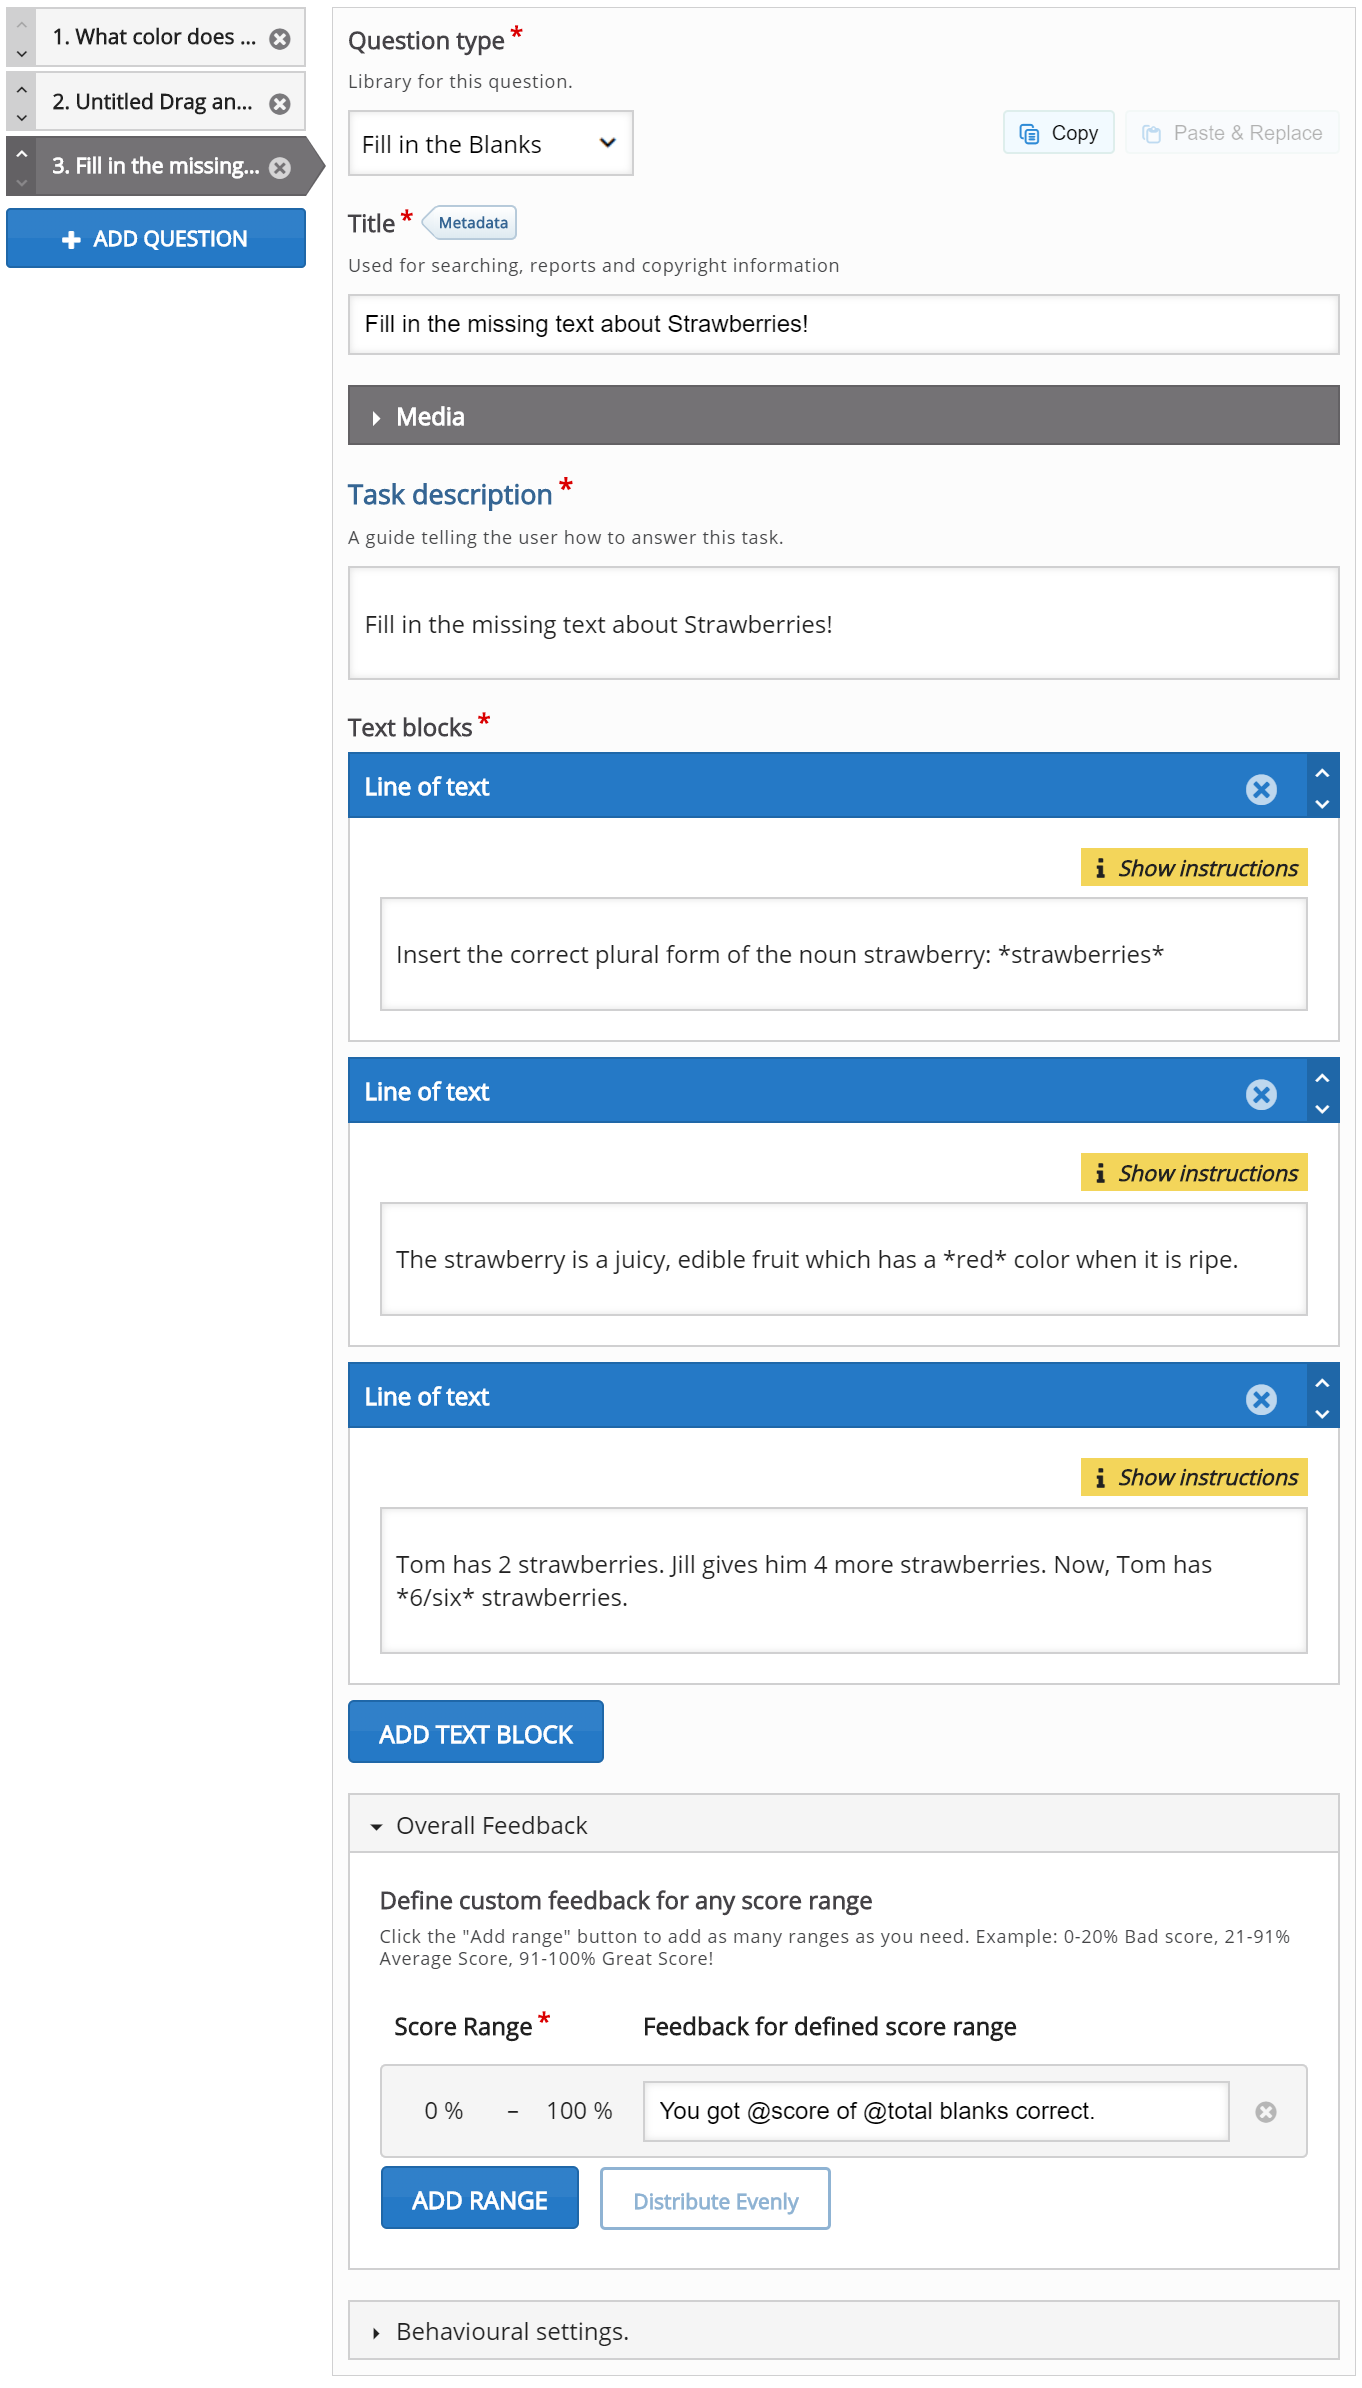
Step 10: Add Fill in the blanks question
Press the Add question button to add another question to the Question set.
As our final question for this question set, we'll choose the question type Fill in the blanks from the dropdown menu. The Fill in the blanks editor will now appear.
Now we'll add the exact same content as in the Fill in the blanks tutorial. Read it if you're curious about how to create Fill in the blanks.
After adding content to the Fill in the blanks question type, you should have something like this:
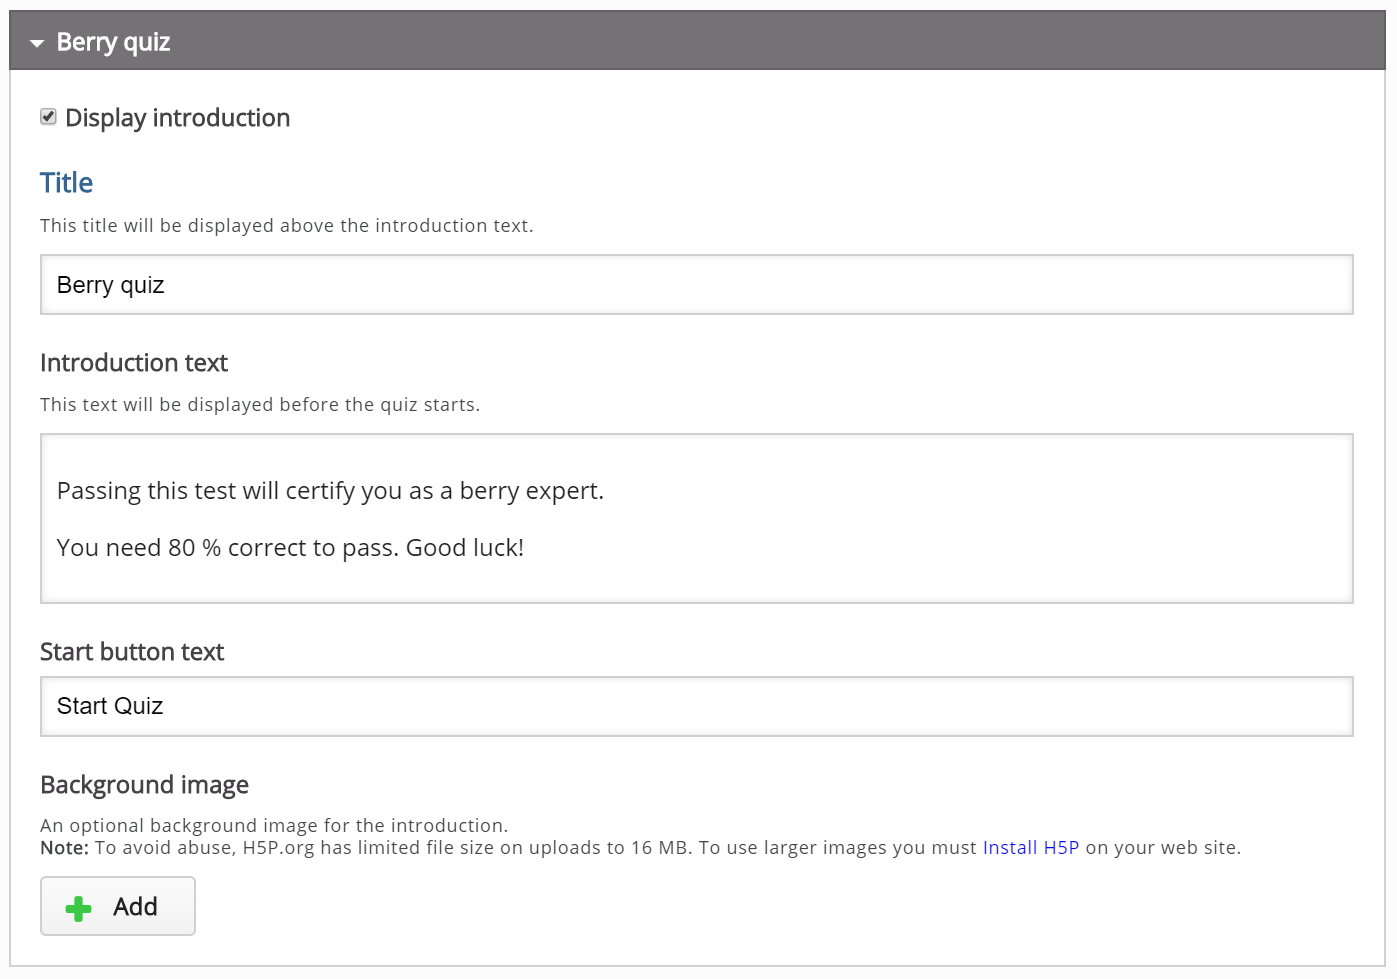
Step 11: Quiz introduction
By checking the Display introduction checkbox, the learner is shown an Introduction text and must press a Start quiz button to start solving the Question set.
Check the Display introduction checkbox. Then, add the following text in the Title field: Berry quiz
In the Introduction text insert this text:
Passing this test will certify you as a berry expert.
You need 80 % correct to pass. Good luck!
Leave the Start button text as it is, or change it to your own liking.
You should now have something like this:
Step 12: Quiz finished: Your result
Under the Quiz finished: Your result: header you have options related to how the quiz results are shown to the learner at the end of the Question set.
You will also find several text fields where you can customize or adapt the text being used to your own liking.
Make sure that the Display results checkbox is checked, as we want the learners to evaluate their own performance:

At the bottom of this field, you can also choose to Display video before quiz results. Here you can upload a video clip which is shown to the learner after completing the Question set, but before the results are displayed. You may choose to display one video clip if the learner passes the Question set, and another video clip if the learner fails. However, we'll skip adding video feedback in this tutorial, as this is entirely optional.
Step 13: Finishing up
Save the node/article to view your finished Question set.
You should now have the same result as the example on top of this page.
Feel free to leave any comments or suggestions on how to improve this tutorial.
Comments
swin
Tue, 12/22/2020 - 20:53
Permalink
I do see that Interactive
I do see that Interactive Book (according to https://documentation.h5p.com/content/1290591871936510658) is only in alpha. I do wonder if there are gotchas I should be aware of before using on H5P.com?
It's interesting though that this activity DOES appear on H5P, so I am now a little confused. In the "Content types settings" page on our site, Interactive Book is allowed (and active), so perhaps this documentation is out of date?
BV52
Tue, 12/22/2020 - 21:08
Permalink
Hi Swin,Overall pass rate,
Hi Swin,
Overall pass rate, completion settings etc. all depends on the LMS. Most if not all content types follow the same rules coding wise so how Question Set sends the scores is the same as how IB does it.The main difference is Question Set is a quiz content type and have little way of using it as a teaching tool while IB has more flexibility since it is mainly a tabular version of Column which has more content types available.
Some content types on the list are available in H5P.com only after changing the settings, so I am assuming that an admin of your account has enabled it before. As for exisiting issues there are some and you can check them here. For the documentation I have to reach out to the H5P core team although replies may take longer than usual because of the holidays.
-BV
swin
Tue, 12/22/2020 - 23:33
Permalink
Hi BV,FWIW, LMS is currently
Hi BV,
FWIW, LMS is currently Moodle but connected to H5P via LTI.
I don't believe I added any content in the H5P settings that weren't enabled by H5P directly. Indeed, this doc link seems to suggest that Interactive full is all good - https://documentation.h5p.com/content/1290410474004879128.
BV52
Wed, 12/23/2020 - 00:42
Permalink
Hi swin,
Hi swin,
I think you're right. There is no way to check on my account since there is no reset to default option and I've enabled IB when it was released. Nonetheless I'll reach out to the H5P core team to get these two documentations synched.
-BV
swin
Wed, 12/23/2020 - 15:31
Permalink
Ok, built a few things with
Ok, built a few things with the interactive book but I can see you do not really have the quiz like control. You can't set an overall passing score of feedback. So close, but ultimately it would seem simpler to be able to add a piece of media to the front end of the quiz.
swin
Wed, 12/23/2020 - 13:32
Permalink
FWIW BV, I noted that there
FWIW BV, I noted that there was a "Question Set" content type that could be added to the Interactive Book. I'm not too sure about the applicability of this in this situation as it gives an odd UX whereby you have pages within a page. I will play with just adding the individual content element to the column and see how that behaves.
BV52
Wed, 12/23/2020 - 17:11
Permalink
Hi Swin,You're correct it has
Hi Swin,
You're correct it has a weird feel to it since it was not designed to replace Question Set's behaviour. Please note that I sent this concern (having video as introduction for Question Set) as a feature request to H5P.com's development team so that they may consider adding such feature for future updates.
-BV
Ceit
Fri, 01/22/2021 - 17:59
Permalink
Drop down box
Is there a chance that drop down menu selection will be added
BV52
Fri, 01/22/2021 - 18:58
Permalink
Hi Ceit,I'm not sure what you
Hi Ceit,
I'm not sure what you meant with "drop down menu selection".
-BV
Ceit
Fri, 01/22/2021 - 19:56
Permalink
dropdown selection
In moodle when creating a quiz you are able to select and answer by using a dropdown box to select your choices.
BV52
Mon, 01/25/2021 - 15:12
Permalink
Hi Ceit,You should check
Hi Ceit,
You should check Advanced Fill in the Blanks.
-BV
Serenity38
Mon, 09/20/2021 - 18:14
Permalink
Change of colours
Hi there,
I need to change the color for each row, is it possible, and how?
Serenity38
Mon, 09/20/2021 - 18:47
Permalink
Change of colours
Can I change the colour from grey to others for each row? Even a gradient will do.
Serenity38
Thu, 10/21/2021 - 14:56
Permalink
CSS not working
Hi there, me again. I am trying to have bigger boxes as per the previous message. I have tried ".h5p-drag-text [aria-dropeffect]{height: 2.25em;}" but it is not working.
chrisn
Thu, 04/14/2022 - 18:52
Permalink
Finish button not always available the end of a quiz
We have a course using H5P do deliver a quiz. we are also using H5P for Moodle. Moodle is at version 3.10 and H5P is at 1.22.4. When a user goes through quiz (muliple choice, drag and drop, true false etc) and gets to the end of the course the Finish button is not always available. The back button is available and sometimes if the user goes back and forth, the finish button will show up. The student also receives their certificate even when though they didn’t complete the test.
Any thoughts on what might be causing this issue? Is it possible it could be a browser type issue? Maybe the set up of the questions procedure?
Thanks for any input on this.
E.McGraw-Austin
Fri, 12/23/2022 - 18:38
Permalink
scores for questions
Sorry if I'm overlooking this, but where do you put the number of points that each question holds?
BV52
Mon, 12/26/2022 - 17:20
Permalink
Hi E.McGraw-Austin,You are
Hi E.McGraw-Austin,
You are not overlooking, there is no feature to set a number of points per question. The only content type that lets you set specific points for questions would be the Branching screnario.
-BV
munavir
Thu, 12/29/2022 - 16:05
Permalink
Auto move to the next question
Hi,
1) Right now we have the Next and Back navigation buttons to move to the newxt question in QuestionSet. Is there any way to move to the next question automatically once the user selects an option (for multiple choice) for the current question?
2) Is there any way we can make the questions required in the question set. So that user won't be able go to skip any question. Or disable the Next button if there is no selection (multiple choice).
Thanks in advance!
BV52
Thu, 12/29/2022 - 17:47
Permalink
Hi munavir,Unfortunately both
Hi munavir,
Unfortunately both features are not avaialble in Question Set.
-BV
munavir
Tue, 01/03/2023 - 15:01
Permalink
Thank you
Thank you BV for your help!!!
Is these avaialble for any other content type for multi options questions? I have gone throuh the samples and docs but couldn't find and thought it would be great to double check with you.
BV52
Tue, 01/03/2023 - 17:26
Permalink
Hi munavir,For Multiple
Hi munavir,
For Multiple Choice Question there are no content types that lets you automatically move to the next question. One reason I can think of is that for Multiple Choice Questions there is no way for the content to know that the student is choosing all the answer they want. In contrast Single Choice set have the feature to move to the next question automatically since you are only needed to choose one answer.
For the 2nd feature only Interactive Video have the option to force users to answer (correctly) to continue the video.
-BV
munavir
Thu, 01/05/2023 - 06:34
Permalink
Thank you
Thank you, BV.
You mentioned 'Single Choice set have the feature to move to the next question automatically'
Could you please share a sample link or something which I can refer.
Appreciate your help and time.
BV52
Thu, 01/05/2023 - 17:21
Permalink
Hi munavir,Here's a sample
Hi munavir,
Here's a sample content. By default the option "Auto continue" is enabled in the Behavioural settings so you really don't need to worry about it.
-BV
munavir
Fri, 01/06/2023 - 12:21
Permalink
Thank you
Thank you, BV for your help. Appreciate it.
- Munavir
Ariana Abraham
Thu, 12/21/2023 - 18:57
Permalink
send emails with H5p
Hello,
I would like to know if it is possible to prepare a level test in the english language for foreigh students with h5p and after they do it they receive the grade of the test in their email address.
The idea is that the tool grades the student correctly. The test has between 50 and 60 questions.
Thanks in advance for your help.
Kind regards,
Ariana Abraham
BV52
Fri, 12/22/2023 - 17:17
Permalink
Hi Ariana,This is not
Hi Ariana,
This is not possible with H5P alone. You will need a CMS or LMS that hosts the contents. The CMS or LMS may have a feature to send the grades to the student's email are another plugin that can do this.
-BV
Zyablik
Mon, 02/26/2024 - 13:12
Permalink
Question link
I have 10 questions in my test. Can I make a link for each question?
Zyablik
Mon, 02/26/2024 - 13:13
Permalink
Question link
I have 10 questions in my test. Can I make a link for each question?
dlj2we
Tue, 03/05/2024 - 10:08
Permalink
How to save 5 question quiz?
I created a quiz question set in WP, but when I view it, it is not there with recent changes. How do I save it so I don't lose what I entered?
BV52
Tue, 03/05/2024 - 17:37
Permalink
Hi dlj2we,Please repost your
Hi dlj2we,
Please repost your question in this thrread: https://h5p.org/forum/9. Provide as much detail as requested in that forum.
-BV
dlj2we
Tue, 04/09/2024 - 21:23
Permalink
ok thanks.
ok thanks.
kerry.accipio
Mon, 04/08/2024 - 13:36
Permalink
Minimum Characters in an Essay question in a question set.
Hi,
I have set mimium charcacters in an essay question within a question setr to 500 yet I can submit small one worded answers.
Is there an issue with essays in a question set? It seems to work when adding Essay as the top level content
kerry.accipio
Mon, 04/08/2024 - 13:37
Permalink
Minimum Characters in an Essay question in a question set.
Hi,
I have set mimium charcacters in an essay question within a question setr to 500 yet I can submit small one worded answers.
It seems to work when adding an essay as top level content
Is there an issue with essays in a question set? It seems to work when adding Essay as the top level content
BV52
Mon, 04/08/2024 - 21:56
Permalink
Hi Kerry,If you are creating
Hi Kerry,
If you are creating your contents using the plugin for Moodle, Drupal or Wordpress please make sure that Essay and Question Set are both using the most updated libraries. As you can see in my test content the minimum characters settings works in Question Set.
-BV
kerry.accipio
Tue, 04/09/2024 - 10:14
Permalink
Thank you.Can you confirm
Thank you.
Can you confirm what version of the library do we need please?
kerry.accipio
Tue, 04/09/2024 - 10:44
Permalink
Thanks again for helping.I
Thanks again for helping.
I have taken a look at your example content and it seems I can progress to the next question and finish, even though I have not obtained the minimum characters in the essay question. Is this expected behaviour? The essay question has a score of 0 but it still lets me progress.
BV52
Tue, 04/09/2024 - 19:12
Permalink
Hi Kerry,Progress in Question
Hi Kerry,
Progress in Question Set cannot be stopped by any setting within Essay. So yes this is an expected behaviour.
-BV
Regis246
Mon, 12/09/2024 - 10:41
Permalink
Show solution and Retry buttons displaying in Spanish
Hi, everyone!!
This is my first time using H5P as a course designer. Right now I'm working on a set of simple True/False questions for a secondary ELT lesson. Even though I was able to set everything to the target language (English, the final users a Spanish native speakers from Argentina), the last buttons shown at the end of the exercise are still displayed in Spanish...and I don't want it that way!
Maybe there's something I missed out...What could that be?
Thanks a lot in advance,
Gina
BV52
Tue, 12/10/2024 - 17:24
Permalink
Hi Gina,The only possible
Hi Gina,
The only possible reason I can think of is that their browser is automatically translating the buttons. I've seen some cases where only the buttons are translated (or vice versa).
-BV
Regis246
Sat, 12/14/2024 - 22:39
Permalink
It surely is!!
Thanks a lot, BV!!!!!
Greetings from Argentina
Gina
Pages