Course Presentation Tutorial
The Course presentation content type allows you to create a slide-based presentation of your learning material. Elements such as slide titles, links, pictures, audio and video clips, as well as various quiz types can be embedded seamlessly right into the presentation for a richer learning experience.
In this tutorial you will learn:
- When to use Course presentations
- How to create a Course presentation
Click the "Get started" button to explore all of the possible ways to use H5P!
Video tutorial
The following video shows what Course Presentations may be used for and how to make one:
Textual tutorial - example
Here's the Course presentation we'll create in this tutorial:
When to use Course presentations
Course presentation enables you to author and deliver your course material directly in your browser. Course presentations contain slides where you can add various multimedia- and interactive elements to engage the learner.
Course presentations are used when you want to package a piece of learning content in a structured and interactive format. Learners swipe through slides to experience the learning material while solving various quizzes or watching videos along the way.
Try Course presentations as an alternative to presenting your learning content as Powerpoint presentations, PDFs or text-based web pages. Course presentations are very flexible to use, as they are simple to create, publish and edit.
Step 1: Topic
We'll use the Wikipedia article about Cloudberries as background material for our Course presentation. We'll use a couple of pictures from Wikimedia Commons as well.
Let's create three slides, with a test at the end:
- Slide 1: Cloudberries
- Slide 2: Where to find them?
- Slide 3: Uses
- Summary
Step 2: Creating a Course presentation
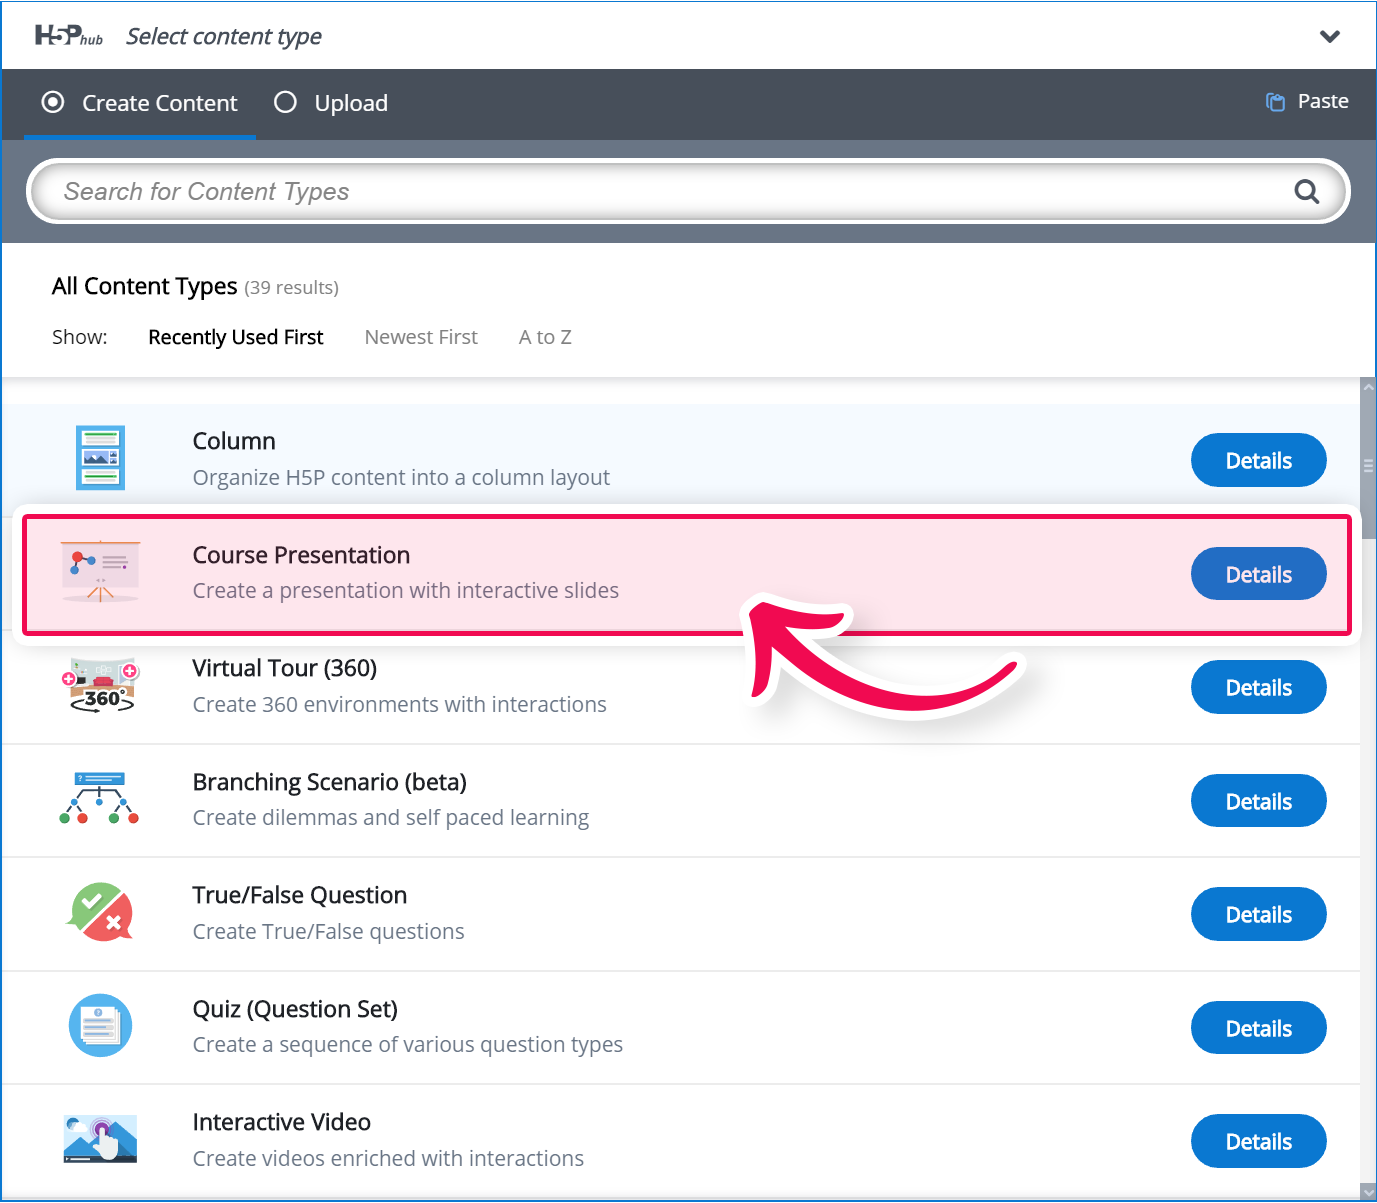
Select the New content option and choose Course presentation from the list of Content types:
Step 3: Course presentation editor
The Course presentation editor should now appear. The top part of the editor looks like this: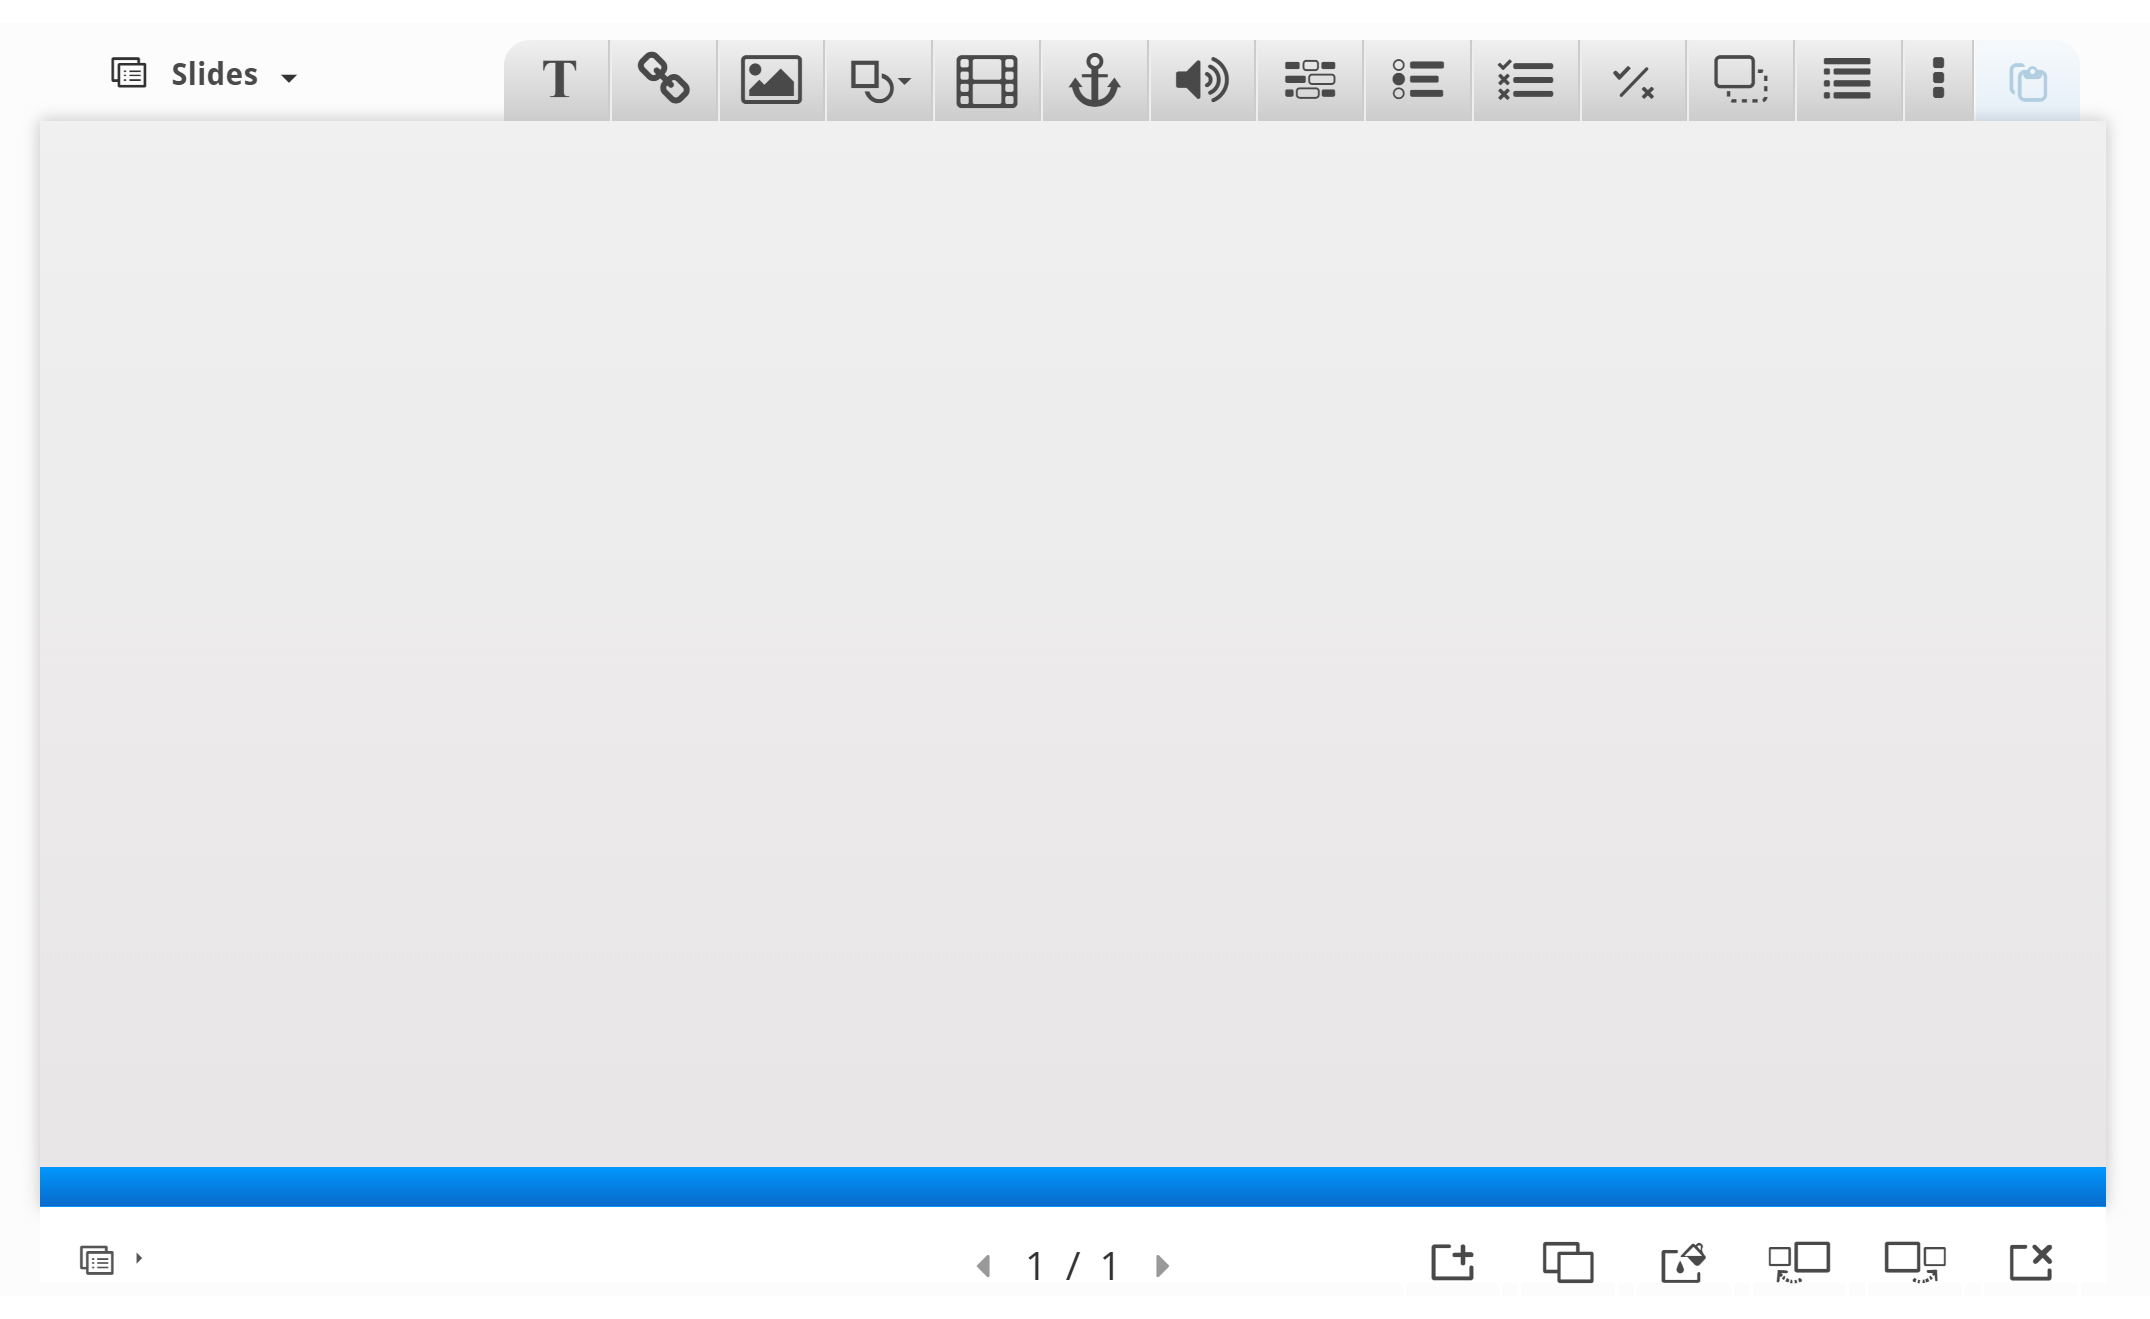
In this tutorial, we'll focus on creating the Course presentation content. The content creation happens in the top part of the editor, so we'll only focus on this for now.
The Course presentation editor is WYSIWYG. The end-user view of the Course presentation will look very similar to the editor's view.
Step 4: Slide 1
We'll start by adding a slide in the slides panel to the left. The slide titles can be used to navigate between the slides.
You can remove the slides panel entirely by pressing the Remove slides button. However, this action cannot be undone.
Press the  button to open the "Slides" menu.
Press the pen next to "No title" ![]() to add a slide title.
to add a slide title.
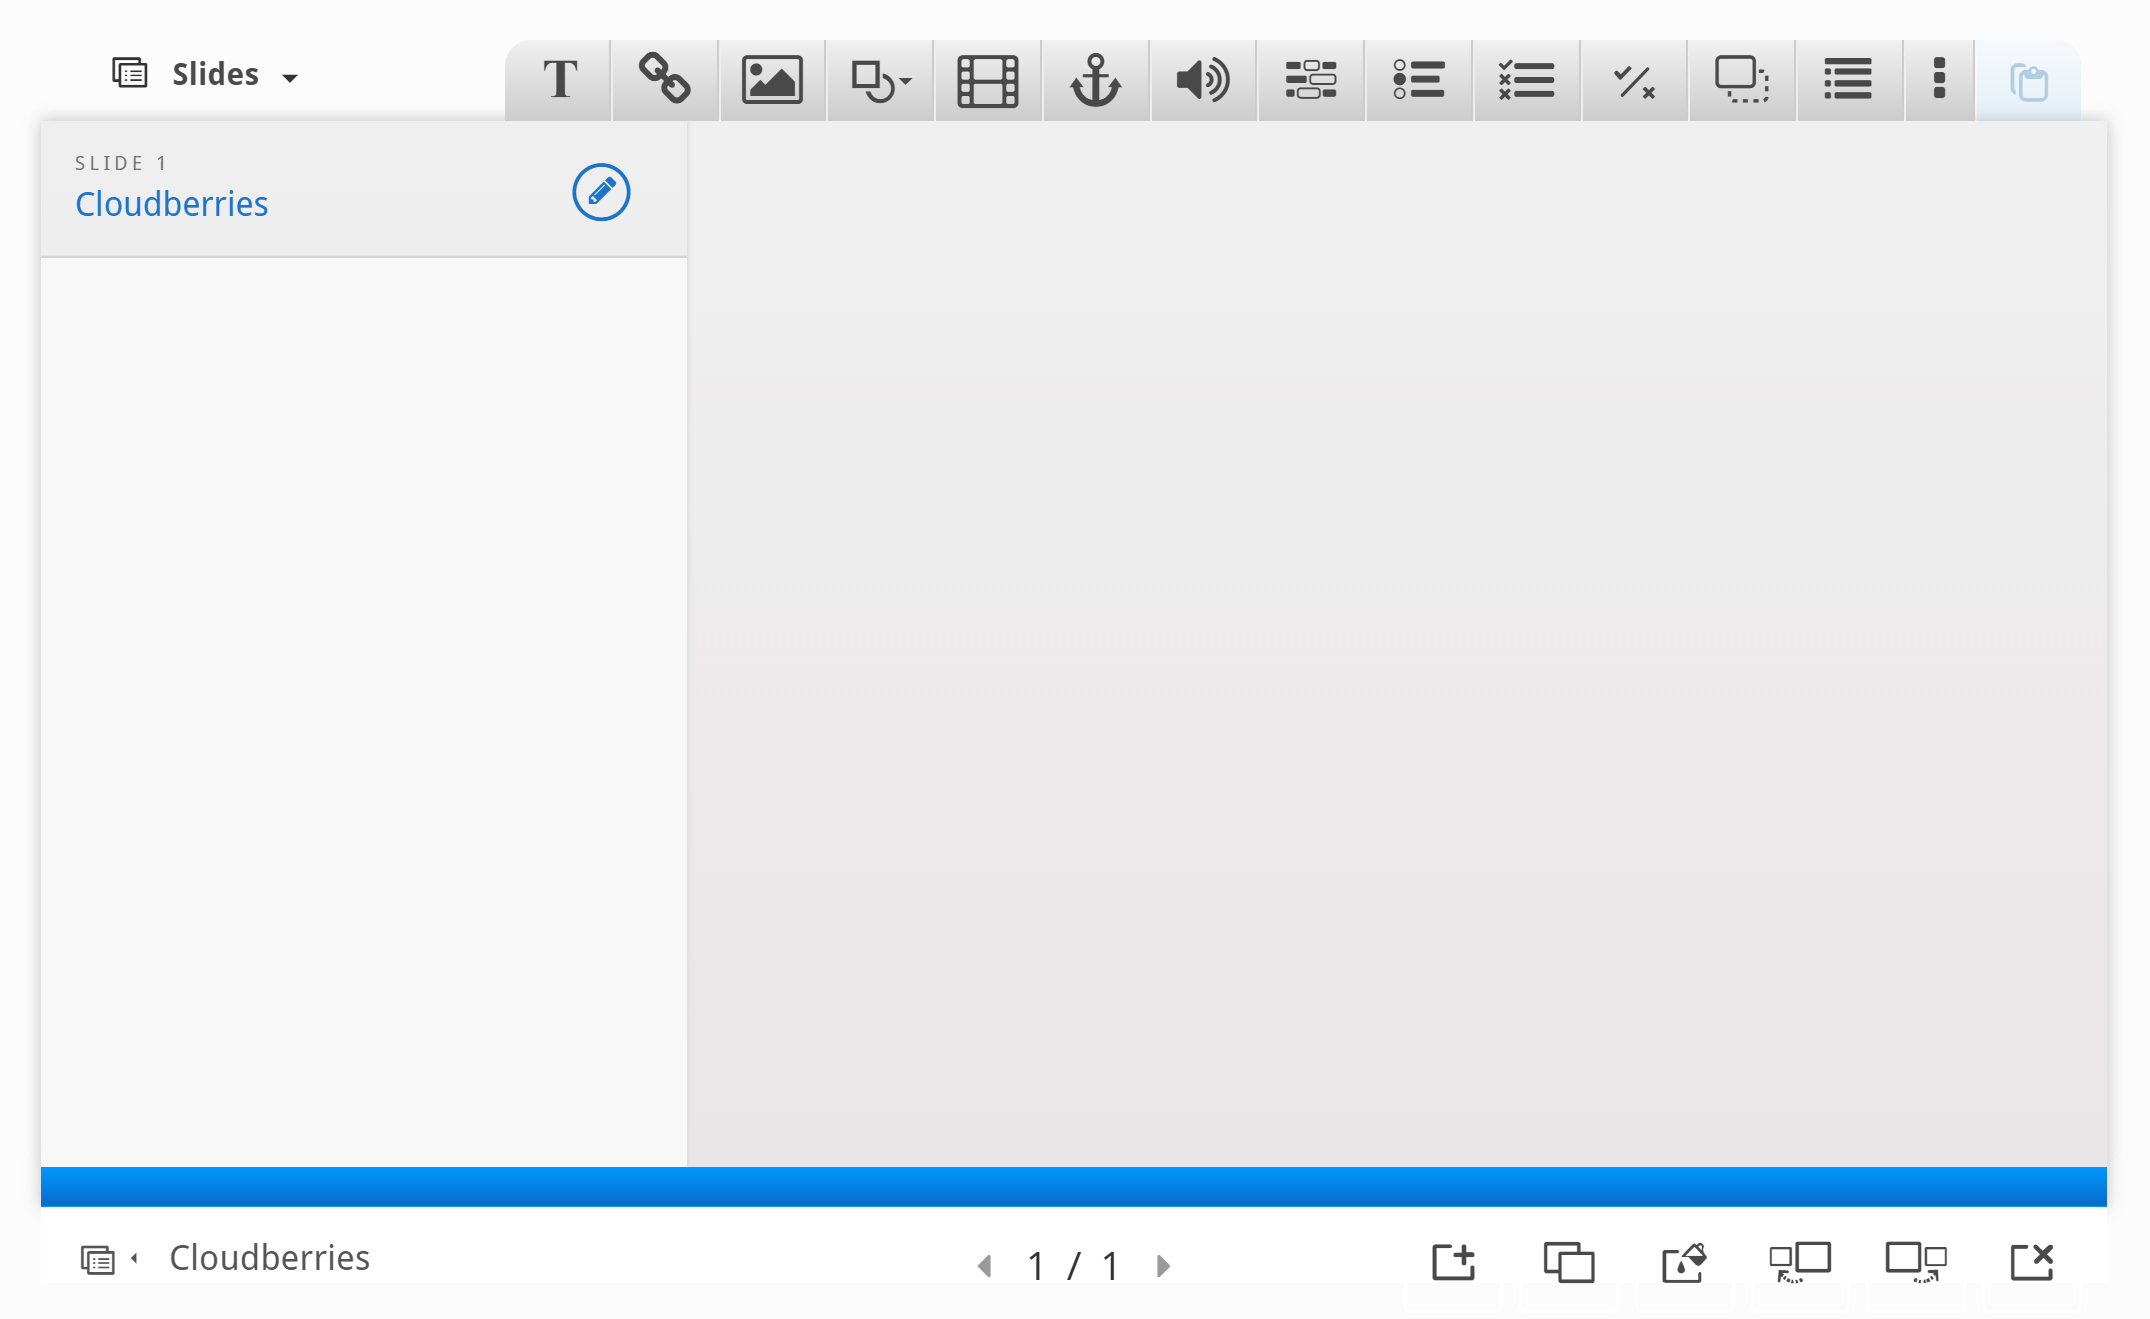
Use Cloudberries as the title. You should now have something like this:
Now we can move on to adding some images.
We'll use these two images from Wikimedia:
Note the license information and URL and save the pictures to a local folder.
We add the pictures by using the ![]() button in the top toolbar. Press this button, drag it to where you want the image to be placed and drop it there. A dialog will automatically open:
button in the top toolbar. Press this button, drag it to where you want the image to be placed and drop it there. A dialog will automatically open:
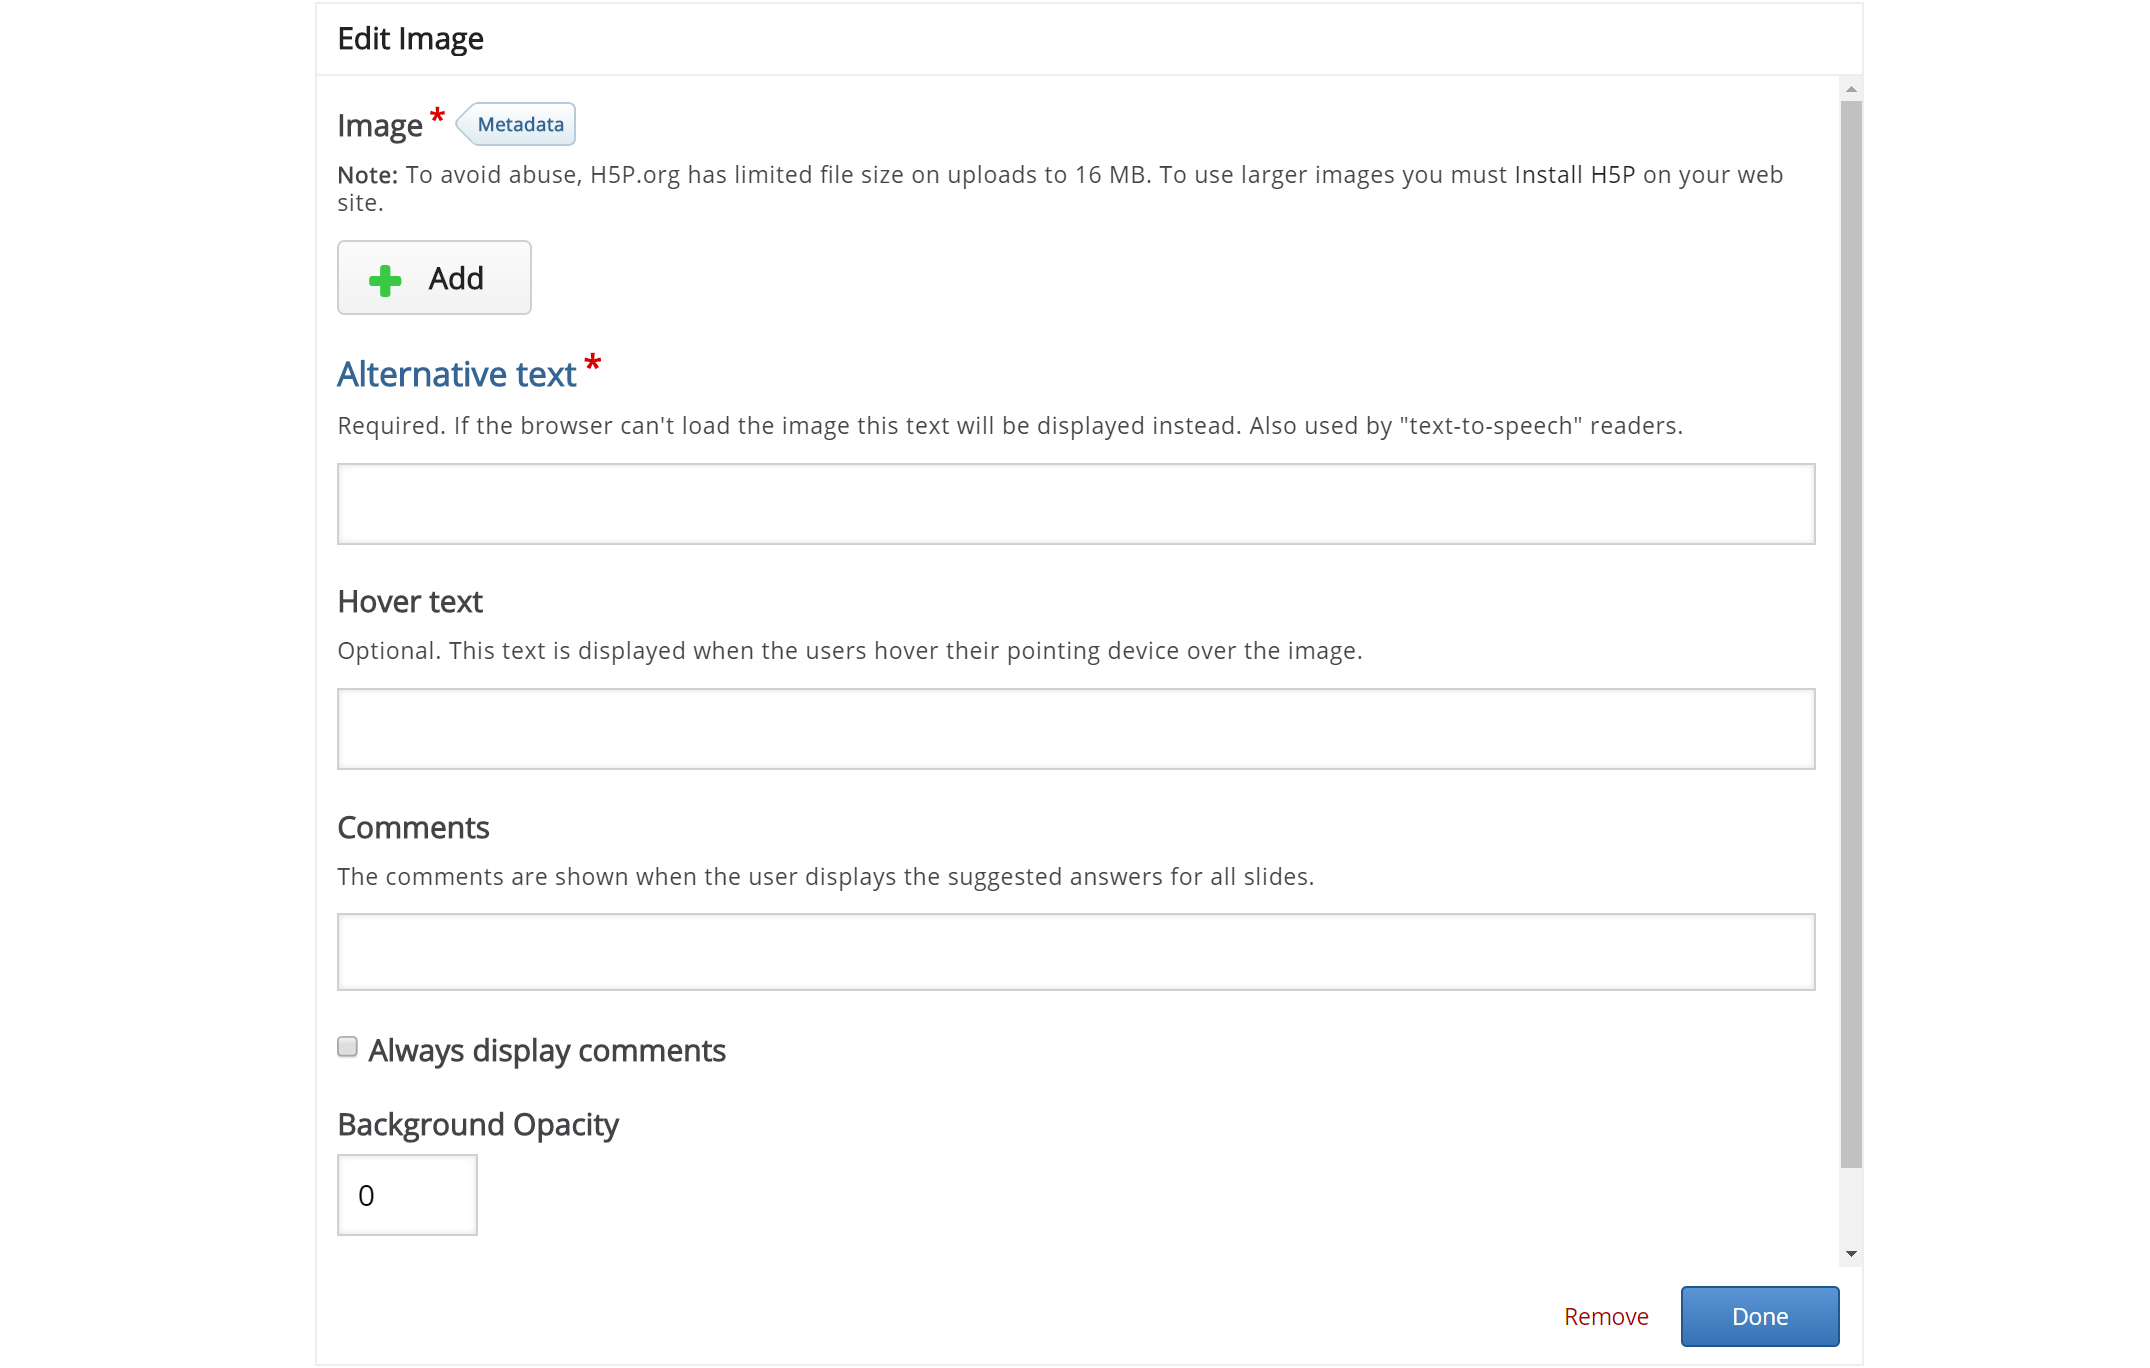
Press the  button, browse to where you saved the cloudberry flower picture and select it for upload.
We must also remember to add multimedia license information. Add the following information to the Metadata  dialog:

Finally, we have to add an Alternative text and a Hover text. The Alternative text is used to describe the image as an alternative to being displayed. The Hover text will show up on devices using a mouse when the cursor hovers over the image.
Alternative text: Picture of a Cloudberry flower
Hover text: Cloudberry flower
You should now have something like this:

Resize the picture by pulling in the lower right corner of the image. Make the image slightly smaller in size. You can move the picture by using drag and drop. Place it in the top left corner, so you get something like this:
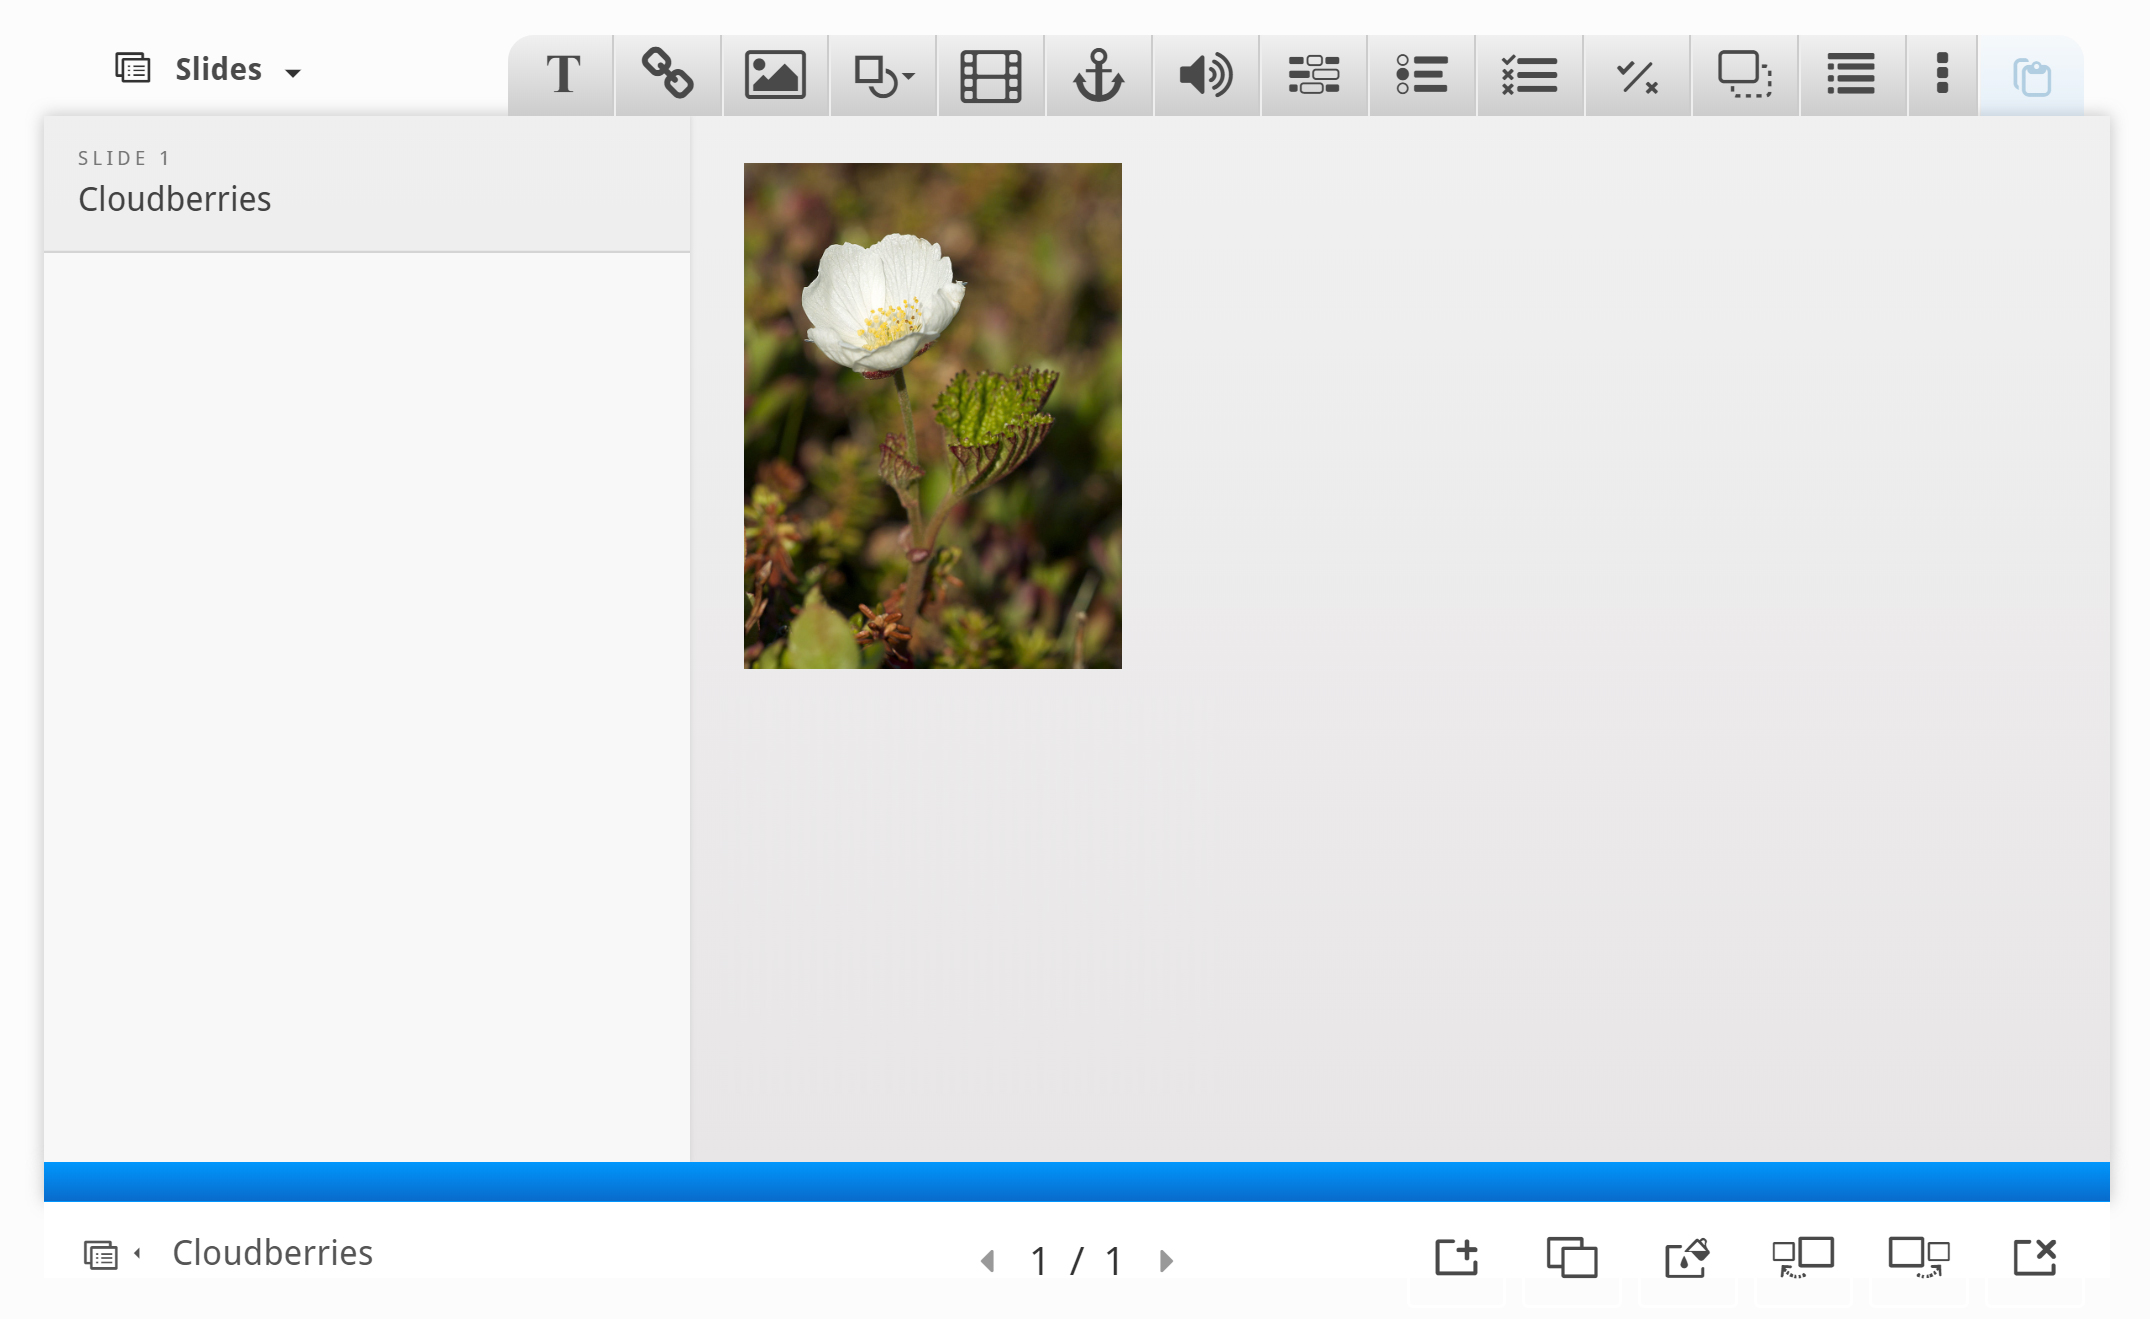
Now, add a second picture. This time, we'll use the cloudberry picture and place it beneath the cloudberry flower picture. Use the same procedure as above.
You should now have something like this:

To finish slide 1, we'll add the following text, which is paraphrased from the Wikipedia article:
- The Rubus chamaemorus is a herb producing amber-colored edible fruit similar to the raspberry or blackberry.
- The cloudberry grows to 10–25 cm high.
- The leaves alternate between having 5 and 7 soft, handlike lobes on straight, branchless stalks.
- After pollination, the white flowers form raspberry-sized berries.
- Each fruit is initially pale red, ripening into an amber color in early autumn.
Use the Text tool ![]() to add a block of text to the slide. Once you have dropped the text box, a dialog will appear. Insert the text above in the Edit text dialog:
to add a block of text to the slide. Once you have dropped the text box, a dialog will appear. Insert the text above in the Edit text dialog:
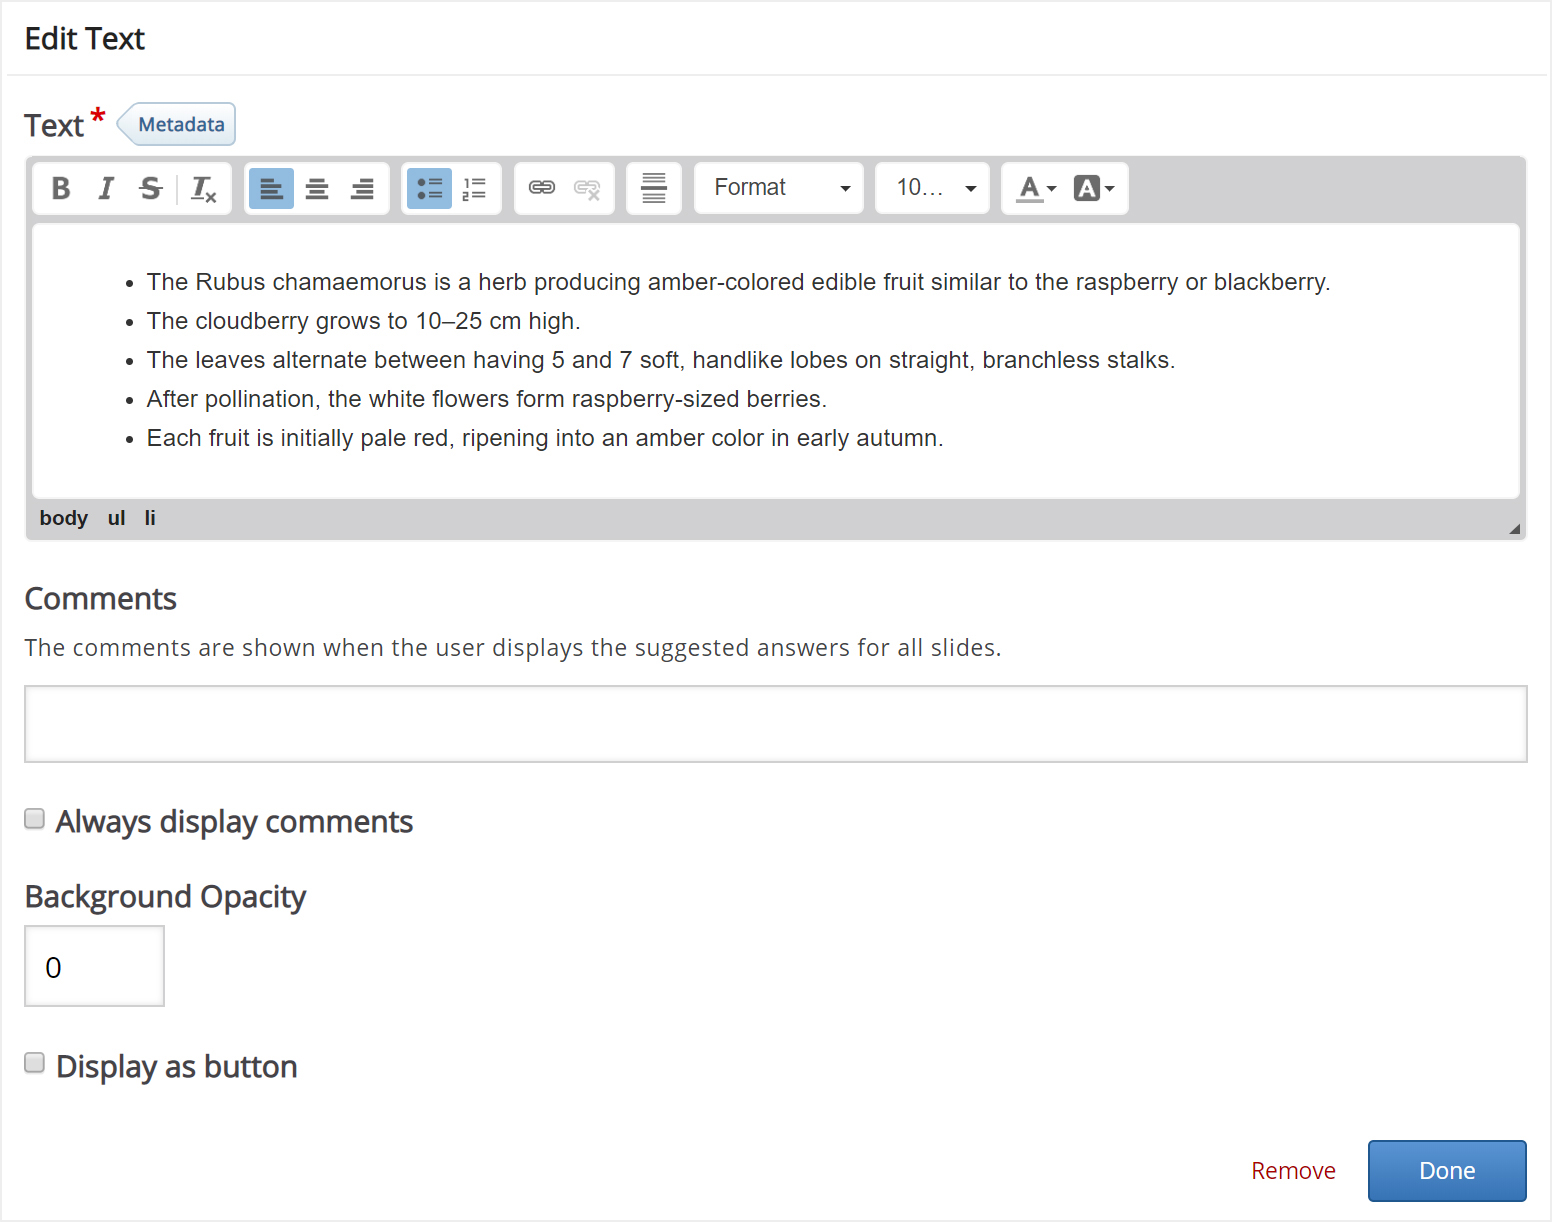
Leave the other fields blank and press Done.
You can place and resize the text block in the same way as images.
Now, position and size the text block so that you end up with something like this:

We have now finished slide 1.
Step 5: Slide 2
Press the  button in the lower right corner of the editor to add another slide.
Slide 2 will contain information about where Cloudberries can be found. Add the slide title Where to find them? in the slides panel.
We'll use the map picture from Wikipedia to show where Cloudberries grow in the wild. We add the picture by using the ![]() button in the top toolbar. Drag the picture onto the slide, upload the picture and add license information. Press Done, then resize the picture so you have something like this:
button in the top toolbar. Drag the picture onto the slide, upload the picture and add license information. Press Done, then resize the picture so you have something like this:

To finish slide 2, we'll add the following text, which is also paraphrased from the Wikipedia article:
Cloudberries are found in mountainous areas on the Northern Hemisphere
- Europe: In the Nordic countries and the Baltic states
- Asia: Across northern Russia east towards the Pacific Ocean
- North America: across most of northern Canada, Alaska, northern Minnesota, New Hampshire and Maine
As on slide 1, use the Text tool ![]() to add a text box to the slide. Once you have dropped the text box, a dialog will appear. Insert the text above in the Edit text dialog:
to add a text box to the slide. Once you have dropped the text box, a dialog will appear. Insert the text above in the Edit text dialog:

You can navigate between slides by pressing the slide titles in the slides panel or by using the navigation bar.
Step 6: Slide 3
Press the  button to add the third slide. Slide 3 will describe various uses of the cloudberry. Add the slide title Uses in the slides panel.
Again, we'll use text and images to deliver our message. In addition, we'll add a link to a website where the learner can find recipes using cloudberries.
Here are the links to the Wikimedia Commons pictures we'll use:
We add the pictures by using the ![]() button in the top toolbar. As on slide 1, we'll place the pictures in a column on the left side of the slide. Insert the three pictures, add the appropriate license information, place and resize them so you have something like this:
button in the top toolbar. As on slide 1, we'll place the pictures in a column on the left side of the slide. Insert the three pictures, add the appropriate license information, place and resize them so you have something like this:

The text we'll use, is again paraphrased from the Wikipedia article:
- In Finland, the berries are eaten with heated, local cheese
- In Sweden, cloudberry jam is used as a topping for ice cream, pancakes, and waffles
- In Norway, they are often mixed with whipped cream and sugar
- In Atlantic Canada, cloudberries are used to make "Bakeapple Pie".
- In Alaska and Northern Canada, the berries are mixed with seal oil, reindeer or caribou fat, and sugar to make "Eskimo Ice Cream" or "Akutaq".
Use the Text tool ![]() to add a block of text to the slide. Once you have dropped the text box, a dialog will appear. Insert the text above in the Edit text dialog. Press Done when you're finished. You should now have something like this:
to add a block of text to the slide. Once you have dropped the text box, a dialog will appear. Insert the text above in the Edit text dialog. Press Done when you're finished. You should now have something like this:

Finally, we'll add a link. Use the ![]() button on the toolbar and place the link onto the slide.
button on the toolbar and place the link onto the slide.
We can find a selection of Cloudberry desserts on yummly.com. Here's the URL: http://www.yummly.com/recipes/cloudberry-dessert
Use the link text Cloudberry dessert recipes.
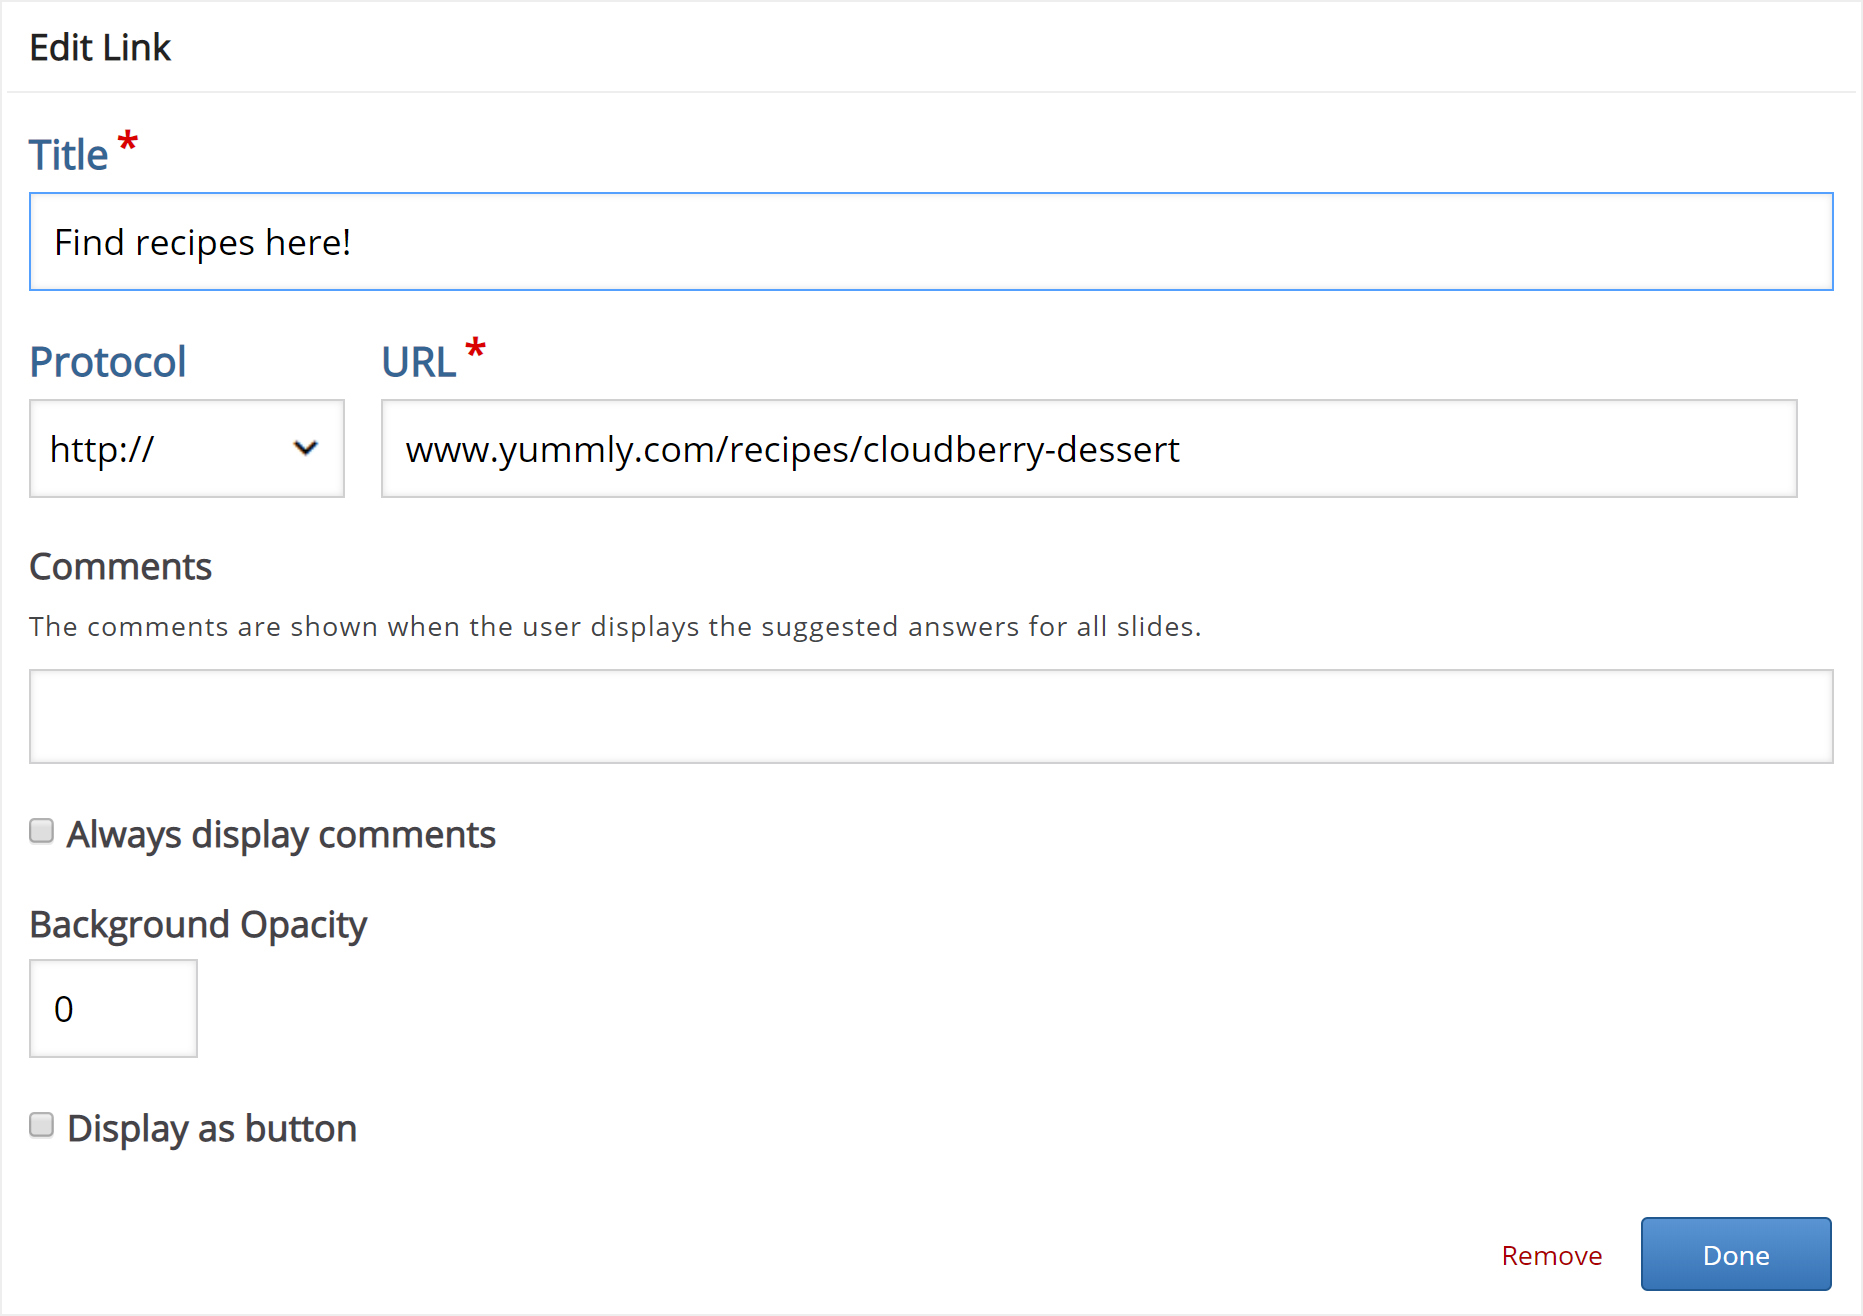
Press Done. then resize and place the link box so you have something like this:
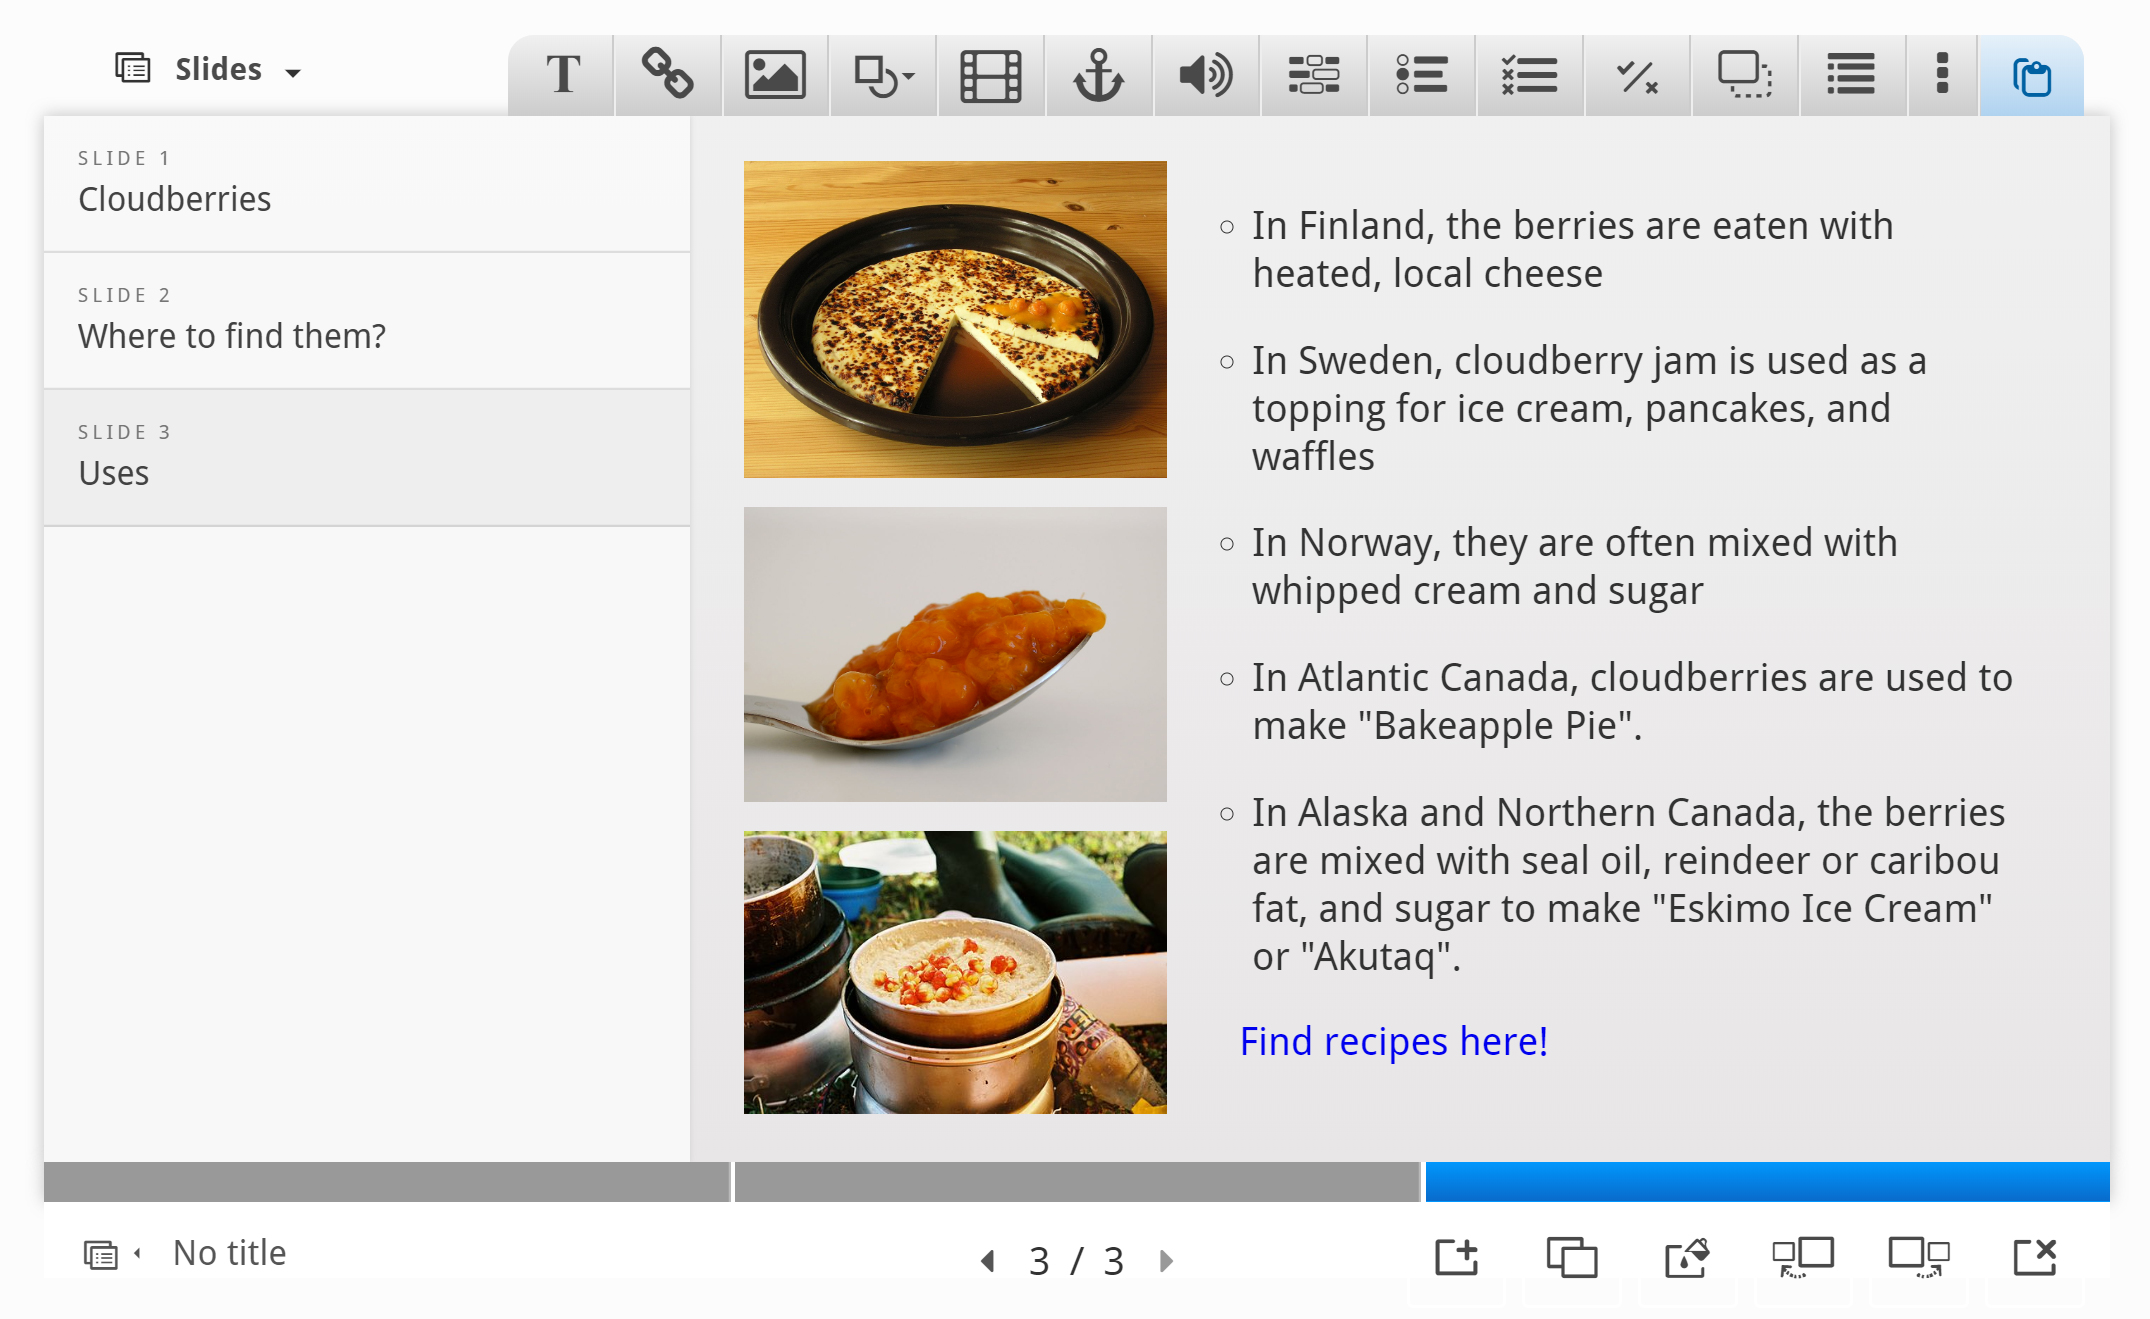
We're now finished with slide 3. Finally, we'll add a Summary to finish the Course presentation.
Step 7: Slide 4
Press the  button to add a fourth and final slide. Add the slide title Summary in the slides panel.
The Summary will allow the learner to make an interactive summary of the most important aspects of the previous three slides.
On the toolbar, press the ![]() button and drag a summary onto the slide. Creating a Summary is covered in this tutorial.
button and drag a summary onto the slide. Creating a Summary is covered in this tutorial.
Once you have dropped the Summary, the editor will appear.
Now we'll add statements to the Summary. Press the Add statements button to add two more statement groups.
In the Summary editor, the top statement in a statement group is always the correct one.
Introduction text:
Choose the correct statement about Cloudberries.
Statement group 1:
- Cloudberries are similar in shape and size to raspberries and blackberries.
- Cloudberries are similar in shape and size to blueberries and redcurrants.
- Cloudberries are similar in shape and size to strawberries.
Statement group 2:
- Cloudberries are found in the Northern Hemisphere.
- Cloudberries are found in the Southern Hemisphere.
Statement group 3:
- In Atlantic Canada, cloudberries are often used to make "Bakeapple pie".
- In Atlantic Canada, cloudberries are mainly eaten with a heated local cheese.
- In Atlantic Canada, cloudberries are mainly eaten with a heated local cheese.
Press Done when you have added the statements. Then position and resize the Summary so you'll have something like this:

Step 8: Finishing up
At the bottom of the editor, you'll find the Enable show solution buttons option. In this context, the option does not have any effect.
Save the node/article to view your finished Course presentation.
You should now have the same result as the example on top of the page.
Feel free to leave any comments or suggestions on how to improve this tutorial.

Comments
Chrissuli
Mon, 05/22/2017 - 19:53
Permalink
Hot Spots and Links to supplementary or external content
Hi,
I am new to H5P so please excuse me if I am asking the obvious...
WHilst reviewing this tutorial on presentation feature, I found that pictures can be added, but, I saw no mention of embedding links into those pictures, only text links.
If the latter is possible, then perhaps that solves the first question and I only need create content once in the presentation module.
Thanks for your patience and advice.
Kr,
Chris
thomasmars
Tue, 05/23/2017 - 10:26
Permalink
Hi Chris,Unfortunately none
Hi Chris,
Unfortunately none of the above is possible currently, but they are great suggestions!
You should post them in the "feature request" forum together with motivation for doing it and some use-cases. This should drastically increase the chance of them being picked up by a developer.
jgriffinid
Thu, 05/25/2017 - 17:52
Permalink
Test drive not working
I'm trying to create the Cloudberries course using the test drive, but the image won't upload. I get a message asking if I want to open or save the file, but can't do either with that file type. Thanks for your help.
icc
Thu, 05/25/2017 - 18:27
Permalink
Are you using Internet
Are you using Internet Explorer? We currently have an issue with files there. Try to use another browser.
The issue should be fixed pretty soon, though.
Eric.Teaches
Thu, 06/29/2017 - 17:52
Permalink
Accordion inside of Course Presentation?
Just wondering whether a slide inside of a course presentation can contain an accordion object.
BV52
Fri, 06/30/2017 - 03:57
Permalink
Accordion in Course Presentation
Hi Eric,
We cannot insert accordion in course presentation yet. There are plans though to improve course presentation so that it will include most if not all of the content types. As for the timeline we do not have any at the moment. You can read more about the discussion on said topic here.
-BV52
akjern
Fri, 08/04/2017 - 20:03
Permalink
Change order?
Hi,
This is a very useful tool! I didn't think of it first because I don't hold lectures.
1. This is how I can put images to the exercises whith only text, like Drag text and Fill in blancs.
2. This is how I can link exercises to eachother and make a path for progression from from simple to more complicated.
Now my question:
Can I change the order of the slides in a presentation?
AK
BV52
Sun, 08/06/2017 - 05:03
Permalink
Course Presentation
Hi akjern,
Im glad that you found ways to put Course Presentation into good use.
For your question: Yes you can just use the the Control buttons of course presentation found at the buttome right hand corner.
-BV52
cpeterson
Mon, 09/25/2017 - 17:11
Permalink
Saving my work
Hi, I have a silly question...so don't laugh.
I have no idea how to save my project. I downloaded my project from my account on your servers, then uploaded to my server, following the instructions, to make edits and I don't see anywhere within my platform a save button.
Please advise,
Thanks
Crawford
cpeterson
Mon, 09/25/2017 - 18:09
Permalink
Problem Solved
Hi,
I was a little weird finding out how to save my project without buttons, but an "enter key" did it. To make this aspect a little more user-friendly, a save button would be best in my opinion.
Thanks
BV52
Tue, 09/26/2017 - 07:02
Permalink
Hi Crawford,It's good to hear
Hi Crawford,
It's good to hear that you found what you were looking. Although I'm not sure what you mean about not having a "save button". Which platform are you using?
-BV52
cpeterson
Mon, 09/25/2017 - 17:13
Permalink
Saving my work
Saving my work
Hi, I have a silly question...so don't laugh.
I have no idea how to save my project. I downloaded my project from my account on your servers, then uploaded to my server, following the instructions, to make edits and I don't see anywhere within my platform a save button.
Please advise,
Thanks
Crawford
cpeterson
Mon, 09/25/2017 - 18:10
Permalink
Problem Solved
Hi,
I was a little weird finding out how to save my project without buttons, but an "enter key" did it. To make this aspect a little more user-friendly, a save button would be best in my opinion.
Thanks
tsar
Wed, 10/11/2017 - 13:11
Permalink
Create new content type like course presentation
Hi,
So i want to create a new content type just like course presentation. I followed the Hello World tutorial of creating a new content type. But i dont know how to proceed further. I know a little javascript. I want to create a content type that will allow me to add images, videos, audios and creating new slides. Can you please tell me how should I proceed. Thanks!
tomaj
Thu, 10/12/2017 - 08:59
Permalink
Where to start
I suggest you don't create a custom editor, but use one that is generated by semantics.
The first thing you can do, is to try to:
- Tom
elegram
Fri, 11/10/2017 - 03:48
Permalink
Normal presentation
Hi, I would like to use this to explain the grammar rules in each unit of my course. But I just want a normal, simple type of presentation like PowerPoint. How do I create the boxes, etc? The tutorial explains how to do it inserting types of exercises but I just want a plain presentation. Thanks!
BV52
Fri, 11/10/2017 - 05:21
Permalink
Hi Elegram,If you want to
Hi Elegram,
If you want to insert just plain text you can use the "Text" option in CP.
-BV52
kevblucas
Tue, 11/21/2017 - 12:42
Permalink
Linking to other slides
Hi,
First of all I've got to say thanks this plugin is really good.
I'm trying to create links to other slides (so on slide one there will be two buttons one for slide 2 and one for slide 4). Is there a way of implementing this?
Thanks in advance,
Kev
kevblucas
Tue, 11/21/2017 - 14:02
Permalink
Sorry I'm an idiot
I have just seen the goto slide button. I can be so dopey sometimes.
BV52
Wed, 11/22/2017 - 05:28
Permalink
Good to hear that you found
Good to hear that you found it kevblucas. If you have any other questions feel free to post in the forums.
-BV52
tonywai
Tue, 11/28/2017 - 04:06
Permalink
PPT to H5P Presentation
Just following the discussions above in this subject, there seems to be some open source code that can just take a ppt deck and convert them into a series of images, if that can be integrated as PPT import function for the Presentation, and just create a sequence of slides with those images, rather than having to upload the images one at a time to recreate the presentation, it will save the world of trainers who has accumulated lots of course design on PPT.
tim
Tue, 11/28/2017 - 14:02
Permalink
Hi Tony, that's a highly
Hi Tony, that's a highly requested feature and I think it would save trainers a lot of time. It's not in the short term plans of the Core Team but since H5P is open source, any developer (or company) can contribute the code to get it working.
evanio.cursos@g...
Wed, 01/31/2018 - 13:13
Permalink
Evanio
how do I return the active surface modeBV52
Thu, 02/01/2018 - 04:55
Permalink
Hi Evanio,Unfortunately
Hi Evanio,
Unfortunately Surface mode cannot be deactivated once activated.
-BV52
Dr.noooo
Mon, 02/05/2018 - 20:11
Permalink
Editor icons missing in ios
hi all,
phantastic tool. But I have one question: on ios I do not see the icons in the editor, just little rectangles. can you help? Thanks.
br,
oliver
BV52
Tue, 02/06/2018 - 02:53
Permalink
Hi Oliver,I am using a Mac
Hi Oliver,
I am using a Mac and on some ocassions an Ipad to create/edit contents. Can you please provide more details on this issue? What browser are you using (version wouldbe helpful as well)? If you use a different browser are you getting the same issue?
-BV52
Dr.noooo
Thu, 02/08/2018 - 13:52
Permalink
Bigger issue
Hi,
thanks for answering. The problem seems to be bigger than I thought:
independent from browser the icons are not shown in any H5P content type I install. Also when editing (without the icons) and saving, the result is not shown and the place stays empty. Any idea? Thanks a lot in advance.
BR,
Oliver
BV52
Fri, 02/09/2018 - 05:54
Permalink
Hi Oliver,I have created a
Hi Oliver,
I have created a separate thread for this issue. I have a few additional questions and you can access it here.
-BV52
Dr.noooo
Fri, 02/09/2018 - 11:31
Permalink
Link not working
Hi BV52. Thanks, but when clicking the link, it says "Access Denied"
BV52
Fri, 02/09/2018 - 11:50
Permalink
Hi Oliver, Sorry about that,
Hi Oliver,
Sorry about that, I missed publishing it. You should be able to acces it now.
-BV52
PROFEL_DECOSTA
Tue, 02/13/2018 - 18:21
Permalink
ACERCA DEL TUTORIAL
EL ASPECTO DEL TUTORIAL ES DISTINTO Y NO SE PUEDE AGREGAR PALABRAS CLAVE
ALGUNOS ICONOS NO CORRESPONDEN DEL TUTORIAL A LA ACTIVIDAD DE PRESENTACIÓN CON DIAPOSITIVAS
BV52
Wed, 02/14/2018 - 08:10
Permalink
Hi PROFEL_DECOSTA,Can please
Hi PROFEL_DECOSTA,
Can please specify which icons are incorrect? Also can you please attach a screenshot on what you are seeing on your side in terms of the keyword section.
-BV52
jklew888
Tue, 04/03/2018 - 01:07
Permalink
Scoring vs. active surface mode
When surface mode is activated, there's apparently no way to get to the summary slide (the one with the score information and the "Show solutions" and "Retry" buttons). Because of this, the course presentation can't be "completed" and a grade issued to Moodle. Is this the normal behavior? I can't have students being able to randomly move around between slides (like skipping to the ones with quiz questions) but I need to have the presentation finish out so a score can be posted.
BV52
Tue, 04/03/2018 - 02:38
Permalink
Hi jklew888,This is a known
Hi jklew888,
This is a known behaviour and I've raised this concern with the core team. YOu can follow the progress here.
-BV52
Pooja.Desai1
Thu, 04/12/2018 - 13:54
Permalink
How should i change font in
How should i change font in presentation?
BV52
Thu, 04/12/2018 - 16:01
Permalink
Welcome to H5P!
Hi Pooja,
Welcome to H5P!
This is not possible directly using the editor of Course Presentation. Although you can use a PHP hook, to add your own CSS-file to the content type. Please visit the Visual Changes page for more details.
-BV52
GIRIBABU
Wed, 04/25/2018 - 09:35
Permalink
Good and nice presentation
Good and nice presentation tutorial
BV52
Wed, 04/25/2018 - 15:44
Permalink
Thank you for the kind words
Thank you for the kind words GIRIBABU.
-BV52
kylemackie
Thu, 05/03/2018 - 18:16
Permalink
add existing h5p to course presentation
Hi. I assumed that I would be able to take existing h5p assets (dialogue cards, fill-in-the-blank, interactive videos, etc), and compile them into a course presentation. However, it appears that I have to recreate them in the presentation? Am I correct? (I hope not.)
-Kyle
BV52
Fri, 05/04/2018 - 04:57
Permalink
Hi Kyle,I'm afraid you are
Hi Kyle,
I'm afraid you are correct. There isn't a way yet to include a content that has already been created into CP.
-BV52
meneervaanhold
Tue, 05/15/2018 - 22:01
Permalink
Copying slides from one presentation to another
Is it possible to copy a slide from one presentation to another presentation?
BV52
Wed, 05/16/2018 - 05:38
Permalink
Hi meneervaanhold,I'm afraid
Hi meneervaanhold,
I'm afraid this is not possible.
-BV52
Bertille
Mon, 05/28/2018 - 15:53
Permalink
Hello,We try to erase the
Hello,
We try to erase the "show the solution" and "retry" buttons.
We need the summary slide (because we need to see who's right) baut we don't want the student can redo the question...
How can we unactivate this option?
Thanks
BV52
Tue, 05/29/2018 - 03:13
Permalink
Hi Bertille,Currently this is
Hi Bertille,
Currently this is not possible. Although we’re now working on something called the H5P supporter program allowing the H5P community to vote for and fund the top voted H5P features. Also there are developers in the community who every now and then works on a feature they find interesting or useful. In order for your feature request to attract as much interest as possible make sure it follows the below guidelines:
It is clear from every perspective how the feature will work. We recommend describing the feature with one or more user stories, for instance “As an author I want it to be possible to pick between different effects for the check answer animation so that the learners will see a variety of effects and also I can adapt the effects to my target audience(I’ll be using pink unicorns which works really well for both my target audience which are 4 year old girls and venture capitalists)”
If the feature can be illustrated with images or videos it always helps
Make it clear what content types this is relevant for, and or if this is a new content type
Make sure you post the feature in the Feature Request forum.
-BV52
Annette Hansen
Tue, 05/29/2018 - 16:01
Permalink
Content presentation with buttons and automatic slides
In the example and download section there is a course presentation ("How familiar are you with France?") used as a quiz. After answering a question the slide shows up (or a button to go to the next slide).
I think this is a wonderful format and one I could make good use of, but I don't know how to build it. The functionality goes way beyond what is explained in the tutorial. Is there an advanced tutorial or some other place where I could find documentation?
Thank you in advance,
Annette
BV52
Wed, 05/30/2018 - 05:37
Permalink
Hi Annette,It's not as
Hi Annette,
It's not as complicated as you might expect ;-). I'll give you a brief explanation on how the content was created.
1. Most of the slides are anchors placed on top of the images.
2. The anchors are set to go to the next slide for correct answers and to the "incorrect" slide.
3. The national anthem questions is again an anchor on top of text.
4. Lastly if you plan to create an activity similar to this you need to make sure that you activate the "Surface Mode", so that users will not be able to move to other slides without using the anchors.
I hope this helps and if you have any clarifications feel free to post in the forum. Also if you see an activity that you like and if you want to check how it was created, you can download and upload it to your account (as long as it's not more that 15MB).
-BV52
Annette Hansen
Wed, 05/30/2018 - 09:25
Permalink
Aha!
Thanks, BV52,
that is really helpful.
And I never thought of copying content to take a look at how it's made. I'll definitely try that!
Annette
jojomagno
Wed, 06/06/2018 - 15:44
Permalink
Links to other lesson slides
BV52
Thu, 06/07/2018 - 04:18
Permalink
Hi Jojomagno,I'm afraid this
Hi Jojomagno,
I'm afraid this is not possible with the current content. You can of course post a feature request. In order for your feature request to attract as much interest as possible make sure it follows the below guidelines:
It is clear from every perspective how the feature will work. We recommend describing the feature with one or more user stories, for instance “As an author I want it to be possible to pick between different effects for the check answer animation so that the learners will see a variety of effects and also I can adapt the effects to my target audience(I’ll be using pink unicorns which works really well for both my target audience which are 4 year old girls and venture capitalists)”
If the feature can be illustrated with images or videos it always helps
Make it clear what content types this is relevant for, and or if this is a new content type
Make sure you post the feature in the Feature Request forum.
-BV52
emy
Tue, 06/26/2018 - 01:39
Permalink
Moodle: Save learner responses
Hi there,
Is it not possible for learners to save their responses to questions and text inputs?
Thanks
Pages